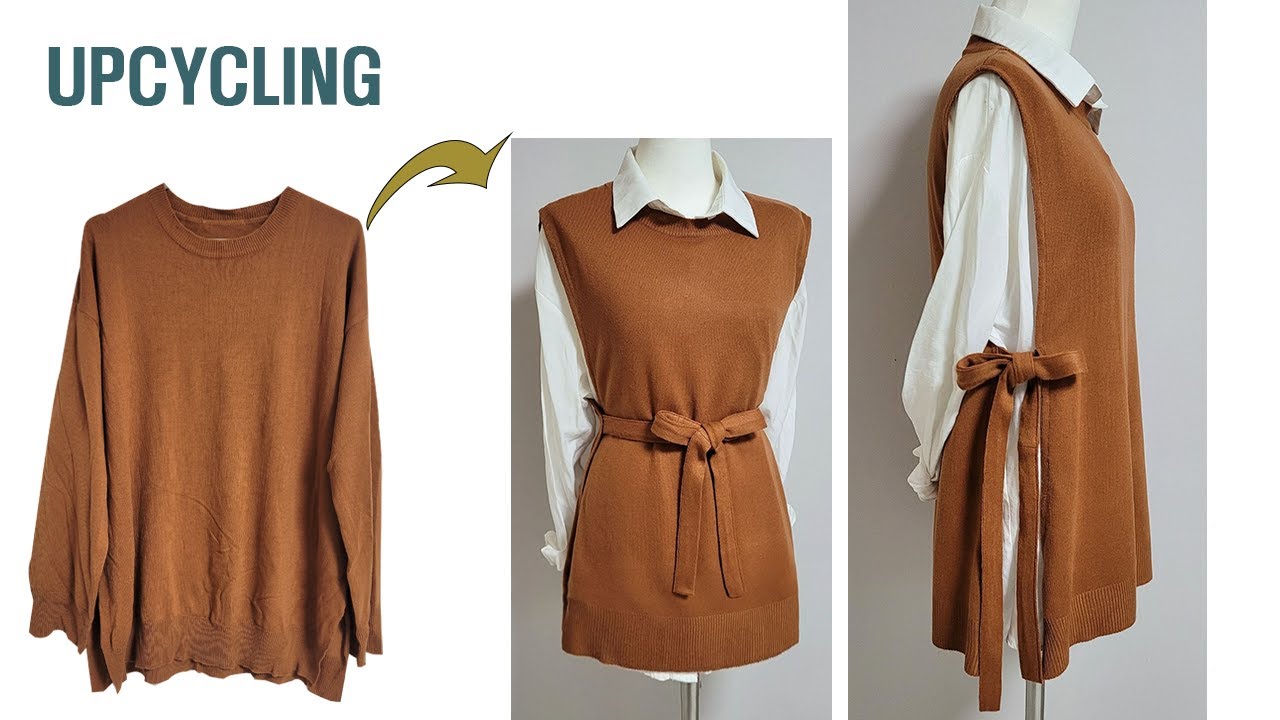
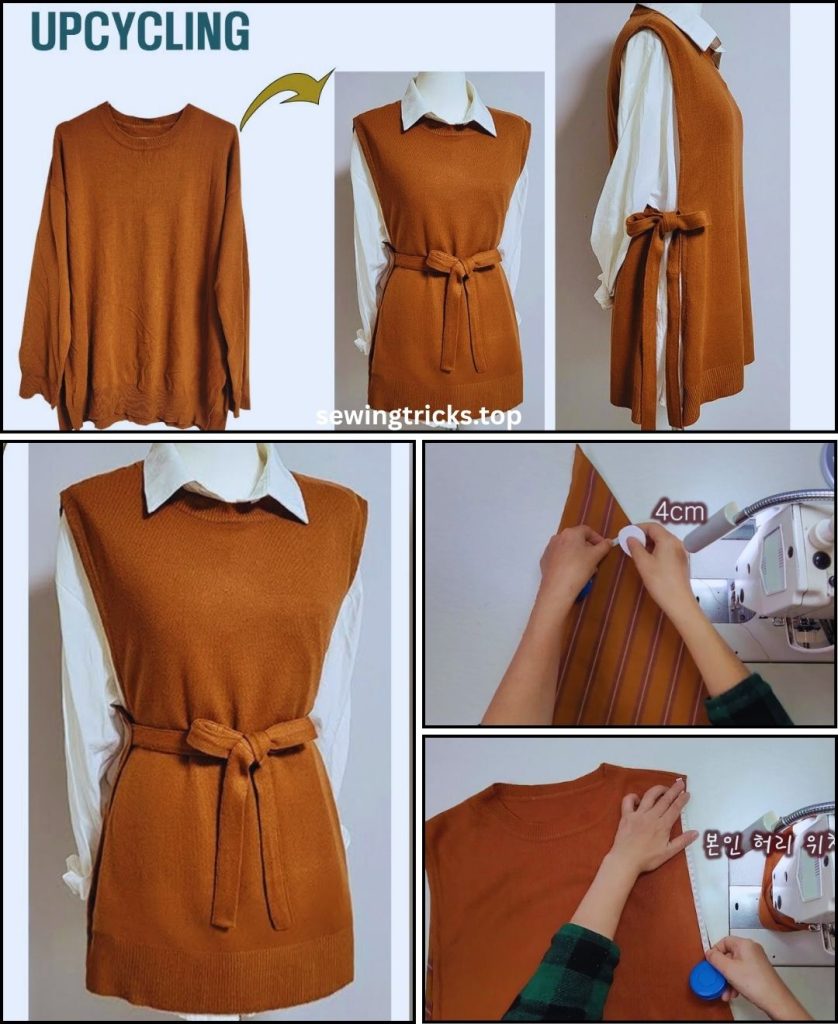
Transforming an old shirt into a new vest is a fantastic way to upcycle clothing, add a unique piece to your wardrobe, and practice your sewing skills. This project is all about giving new life to forgotten garments, turning something dated or ill-fitting into a stylish and functional item.
There are many ways to approach this, depending on the original shirt and your desired vest style. Here, I’ll detail two popular and versatile ideas, ranging from a simpler adaptation to a more involved reconstruction.
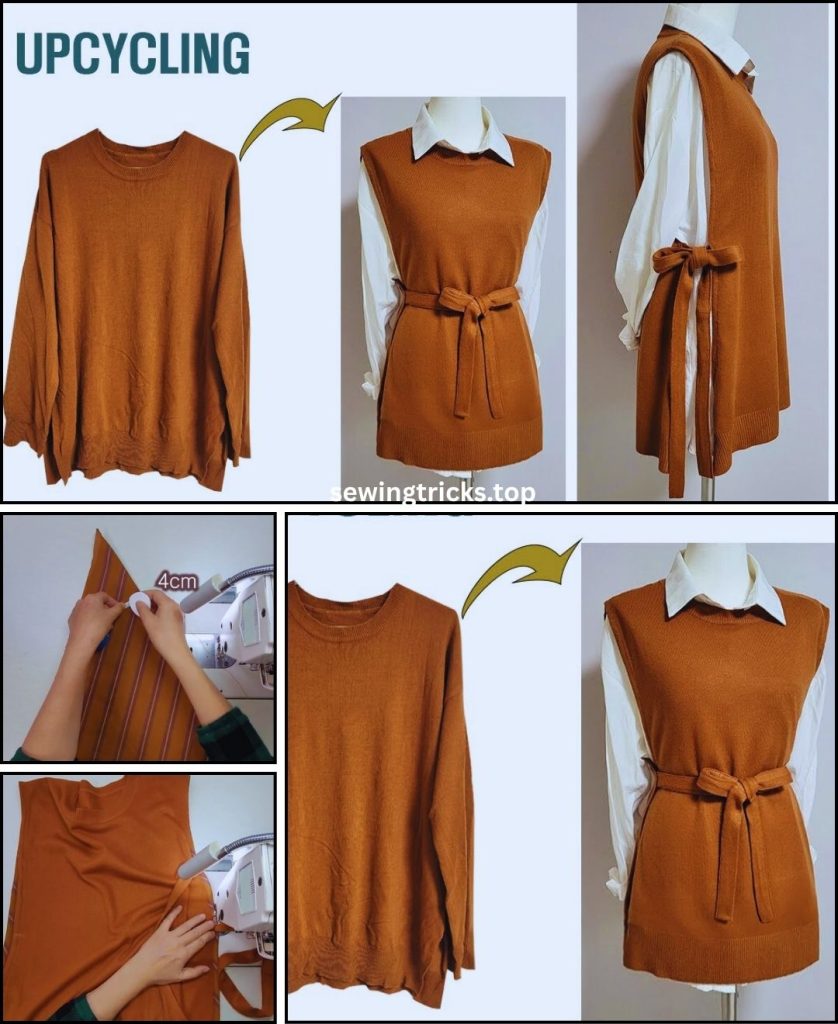
DIY Recycling a Shirt to a New Vest: Reform Old Clothes
Before you start any project, make sure your old shirt is clean and ironed. This makes cutting and sewing much easier and ensures any shrinkage has already occurred.
Idea 1: The Simple & Chic Button-Down Vest (No-Sew or Minimal Sew)
This method is ideal if you have a button-down shirt that’s a bit too big or has an interesting print, and you want a quick, fashionable vest. It’s particularly great for beginners or those looking for a fast transformation.
Design Features:
- Original Garment: A men’s or women’s button-down shirt. A larger size is generally better for creating shaping without deconstruction. Sturdy fabrics like denim, chambray, or thicker cotton shirts work well.
- New Style: A relaxed, open-front vest that drapes nicely, often preserving the original button placket and collar for character.
- Key Skills: Accurate cutting, minimal sewing (or no-sew depending on preference).
Materials You’ll Need:
- Old Button-Down Shirt: 1 large, clean, ironed shirt.
- Fabric Scissors: Sharp!
- Measuring Tape or Ruler
- Fabric Chalk or Marker
- Optional for minimal sewing: Matching thread, sewing machine, pins, iron, seam ripper.

Step-by-Step Tutorial: Simple Button-Down Vest
1. Prepare Your Shirt
- Lay your shirt flat and smooth on a large surface. Button it up completely.
- Ensure there are no wrinkles, especially in the front panels.
2. Mark and Cut the Sleeves
- Using your fabric chalk, mark a line from the bottom of the armpit seam, extending straight or slightly curved towards the shoulder seam. The goal is to remove the sleeve without cutting into the main body of the shirt.
- For a simple vest, you’ll be cutting just outside the existing armhole seam. You can try the shirt on and mark where you want the new armhole to be for a more custom fit.
- Carefully cut off both sleeves along your marked lines. Ensure you cut both layers of the shirt evenly.
3. Mark and Cut the Back
- This is the key step for shaping the vest. You want to remove the back center, so the vest hangs open in the front.
- Lay the shirt flat, buttoned up.
- Fold the shirt lengthwise, aligning the outer edges of the armholes (or a few inches inside the armhole edge, depending on how wide you want the back panel to be). The goal is to keep the front panels intact while removing the bulk of the back.
- Mark a line from the top shoulder seam straight down the center back, ensuring it’s wide enough to not pull uncomfortably around your shoulders. A good starting point is to mark the line 2-4 inches (5-10 cm) in from the original back armhole seam on both sides, ensuring you’re only cutting the back layer.
- Cut along this line, effectively removing the center back panel of the shirt. You’ll be left with two front panels connected at the shoulder seams, and two smaller back shoulder sections.
4. Finish Raw Edges (Optional, but Recommended for Durability)
- Armholes and Back Edges: The cut edges of the armholes and the newly cut back edges will be raw. You have a few options:
- No-Sew (Fraying Look): If you like a distressed, casual look, you can leave the edges raw. They will naturally fray over time. You can encourage fraying by gently pulling threads after washing.
- Simple Hem (Minimal Sew): Fold the raw edge under by 1/4 inch (0.6 cm), press, then fold again by 1/4 inch and press. Stitch this hem in place using your sewing machine. This gives a neat, finished look and prevents excessive fraying.
- Bias Tape (More Polished): For a really clean finish, you can bind the raw edges with pre-made bias tape. This is a bit more involved but results in a professional edge.
5. Final Touches
- Give your new vest a good press.
- Try it on! You can wear it open, or use a belt or pin to cinch it.
You now have a chic, unique vest from an old button-down shirt!

Idea 2: Reconstructed & Structured Vest (From a T-Shirt or Button-Down)
This approach involves more deconstruction and reconstruction, allowing you to create a completely new vest silhouette, add lining, or incorporate specific details. This is suitable for intermediate sewers. We’ll outline a more tailored, fitted vest that could be worn as a top or layering piece.
Design Features:
- Original Garment(s): One or more t-shirts, button-down shirts, or other stable fabric shirts. Using multiple shirts allows for color blocking or patchwork.
- New Style: A fitted or semi-fitted vest, potentially with a front closure (buttons, snaps, or zipper), and optional lining. This vest is built from new pattern pieces.
- Key Skills: Pattern drafting/using a pattern, accurate cutting, sewing curves and potentially closures, optional lining.
Materials You’ll Need:
- Old Shirt(s): 1-2 large, clean, ironed shirts (depending on fabric and desired size/style).
- Lining Fabric (Optional but Recommended): 1/2 – 1 yard (0.45 – 0.9 meters) of light to medium-weight cotton.
- Fusible Interfacing (Optional but Recommended): 1/2 yard (0.45 meters) of light to medium-weight, for stability.
- Matching Thread: All-purpose polyester.
- Closure (Optional): Buttons (and buttonhole foot), snaps, or a zipper.
- Sewing Essentials: Sewing machine (with appropriate needle – universal for most shirts, denim for heavier cotton), sharp fabric scissors or rotary cutter, measuring tape, fabric chalk/pen, pins/clips, iron, ironing board, seam ripper.
- Pattern (Essential): A vest pattern you like, or a well-fitting top/vest you can trace to create your own pattern pieces (front, back, facing/lining).
Step-by-Step Tutorial: Reconstructed Vest
1. Deconstruct Your Shirt(s) & Create Pattern Pieces
- Deconstruct: Carefully cut off sleeves, collar, and open up all side seams, shoulder seams, and possibly the back seam to get the largest flat panels of fabric possible. Iron thoroughly.
- Create/Find Pattern: Lay out your chosen vest pattern pieces (or trace from an existing garment) onto your flattened shirt fabric. If your fabric has a prominent design or button placket you want to preserve, align your pattern accordingly.
- Cut Fabric: Cut out all your vest pattern pieces from the shirt fabric. You’ll typically need:
- 2 Front Vest pieces (mirror images)
- 1 Back Vest piece (often on the fold)
- (Optional) 2 Front Facing pieces (mirror images)
- (Optional) Lining pieces (same as front and back, but without facing if using).
- Cut Interfacing (if using): Cut corresponding interfacing pieces for your main vest pieces (front and back).
2. Fuse Interfacing (if using)
- Lay your main vest pieces (front and back) wrong side up.
- Center and fuse the interfacing pieces to them according to manufacturer’s instructions. This adds stability and body to your vest. Let cool.
3. Assemble Vest Exterior
- Place the two Front Vest pieces right sides together with the Back Vest piece, aligning the shoulder seams. Stitch shoulder seams. Press open.
- Align the side seams of the assembled front and back pieces, right sides together. Stitch side seams. Press open.
- (If using) If your vest has darts for shaping, stitch those now and press them towards the center.
4. Prepare and Attach Closure (if using)
- If your vest has a button placket (for buttons), follow your pattern’s instructions for creating or finishing this placket. Mark and sew buttonholes on one side.
- If using snaps, you can install these now or after the vest is fully assembled.
- If using a zipper, you’ll typically install it now along the front edges, before attaching the lining/facing.
5. Assemble Vest Lining/Facing (if using)
- Option A: Facing Only (simpler):
- Place your Front Facing pieces right sides together with the Back Vest piece along the shoulder seams (if your pattern has a separate back facing). Stitch shoulder seams, press open.
- Align the facing unit with the vest exterior, right sides together, around the armholes and neckline/front opening. Pin well. Stitch. Clip curves and corners. Turn right side out and press. Understitch the facing to the seam allowance where possible for a clean edge.
- Option B: Full Lining:
- Assemble your Lining pieces (front and back) exactly as you did the vest exterior (shoulder and side seams). Press seams open.
- Place the vest exterior and the lining right sides together. Align the outer edges (front opening, neckline, armholes). Pin securely.
- Stitch all around these edges, leaving a 4-6 inch (10-15 cm) opening along one side seam or bottom edge of the lining for turning.
- Clip curves and corners, trim seam allowances. Turn the entire vest right side out through the opening. Press well.
6. Finish & Hem
- Close the Turning Opening: Stitch the opening in the lining closed by machine (close to the edge) or by hand with an invisible ladder stitch.
- Hem the Vest: Try on the vest and determine your desired hem length. Fold the raw bottom edge under by 1/4 inch, press, then fold again by your desired hem allowance (e.g., 1 inch / 2.5 cm) and press. Stitch the hem in place. If fully lined, you might slipstitch the lining to the hem or simply press.
- Final Press: Give your new vest a thorough press to set all seams and give it a polished look.
You now have a completely transformed and unique vest, giving your old shirt a fantastic new life!
What kind of shirt are you hoping to transform, and what style of vest are you leaning towards? Knowing that can help tailor the advice even further!