
That’s an excellent project! A patchwork denim crossbody bag without a zipper is a fantastic way to upcycle old jeans, use up scraps, and create a truly unique, casual accessory. The patchwork adds visual interest, the no-zipper design simplifies the sewing, and the crossbody style makes it practical for everyday wear.
This detailed guide will walk you through creating a stylish and functional patchwork denim crossbody bag, complete with a lining and a secure magnetic snap closure.
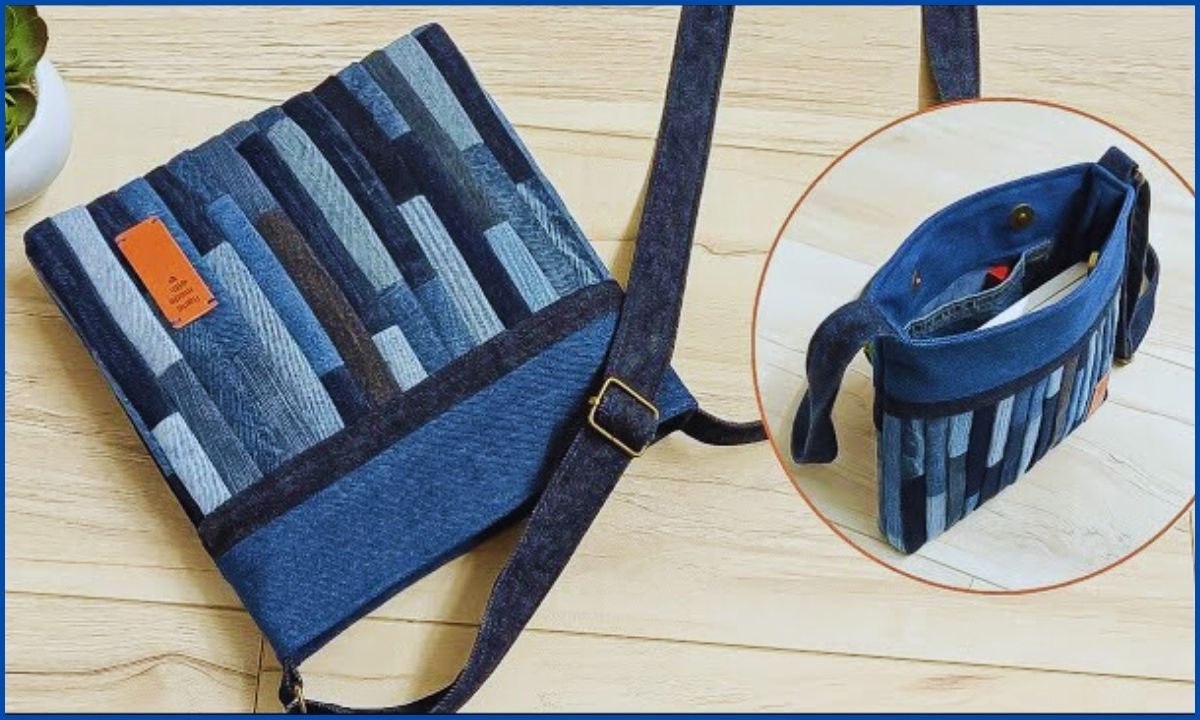
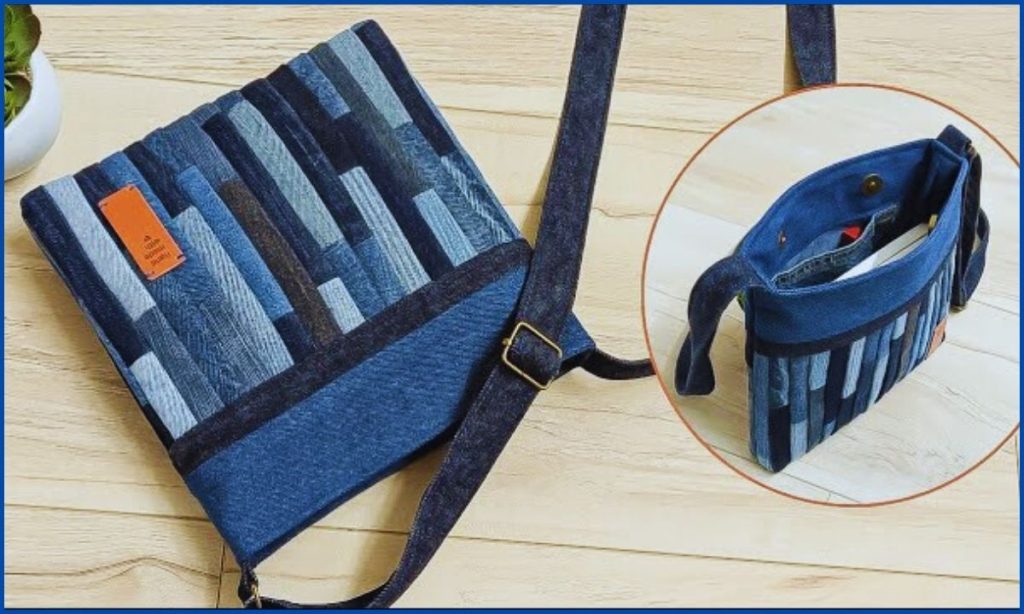
How to Sew a DIY Casual No-Zipper Patchwork Denim Crossbody Bag from Old Jeans
I. Planning Your Upcycled Denim Crossbody Bag
Careful planning is key, especially with patchwork, as it helps you make the most of your denim scraps and ensures a beautiful, cohesive design.
- Assess Your Denim Scraps:
- Lay out all your old jeans and denim scraps. Do you have varying washes (light, medium, dark)? This will create a beautiful patchwork effect.
- Think about the size of the pieces you have. Can you cut rectangles, squares, or irregular shapes that will fit together nicely?
- Aim for enough denim for two main bag panels (front and back) and a long strap. You’ll definitely be piecing these together.
- Desired Bag Size:
- A versatile size for a casual crossbody might be around 10 inches wide x 10 inches tall x 2 inches deep (25.4 cm x 25.4 cm x 5 cm) when finished. This comfortably fits essentials like a wallet, phone, keys, and a few small items.
- Design Considerations:
- Patchwork Style: Will you use uniform squares, random rectangles, or a more abstract design? For beginners, working with rectangles or squares in horizontal or vertical strips is easiest.
- Denim Features to Reuse: Integrate existing jean seams, small pockets (if salvaging from back pockets), or even belt loops into your patchwork design for added character.
- Lining: Highly recommended! A lining gives your bag a professional finish, hides raw seams, and adds durability. Choose a fun print or solid color that complements your denim.
- Stabilizer/Interfacing:Essential! This gives your bag structure and helps it maintain its shape.
- Heavyweight Fusible Interfacing (e.g., Pellon 809 Decor Bond or Pellon 71F Peltex II Ultra Firm) is ideal for a sturdy bag.
- Closure (No Zipper):
- A magnetic snap is a secure and easy-to-install option.
- A Velcro tab or button loop are also possibilities for simplicity. We’ll use a magnetic snap for this tutorial.
- Strap Style:
- Fabric Strap: Made from pieced denim or a complementary sturdy fabric. This is what we’ll focus on.
- Webbing: A simpler option if you prefer not to piece a long strap.
II. Gather Your Materials
Having all your supplies ready before you start sewing will make your project much smoother.
- Old Jeans & Denim Leftovers: Enough clean, ironed, sturdy denim scraps to create your patchwork panels and strap. (At least one large pair of jeans is recommended).
- Lining Fabric: 1/2 to 3/4 yard (0.45 to 0.68 meters) of medium-weight quilting cotton, broadcloth, or poly-cotton.
- Heavyweight Fusible Interfacing: 1/2 to 3/4 yard (0.45 to 0.68 meters) (e.g., Pellon 809 Decor Bond or Pellon 71F Peltex II Ultra Firm).
- Magnetic Snap: 1 set, about 1/2-inch (1.27 cm) or 3/4-inch (1.9 cm) diameter.
- Matching Thread: Strong, all-purpose polyester thread. For topstitching on denim, use a slightly thicker topstitching thread in a contrasting color (like gold, orange, or beige) for that authentic jean look.
- Basic Sewing Supplies:
- Sewing Machine: It needs to handle thick layers. A walking foot is highly recommended for even fabric feeding.
- Heavy-Duty Needles: Denim needles (size 90/14 or 100/16) are essential. Have spares!
- Sharp Fabric Scissors or Rotary Cutter and Mat.
- Long Quilting Ruler or Measuring Tape.
- Fabric Chalk or Mark-B-Gone Pen.
- Plenty of Wonder Clips (superior to pins for thick denim and patchwork).
- Iron and Ironing Board (crucial for pressing seams flat and fusing interfacing – especially important for patchwork).
- Seam Ripper (your best friend for deconstructing jeans and unpicking stitches!).
III. Prepare & Cut Your Fabric Pieces
Accuracy in cutting and piecing is important for a well-proportioned bag. We’ll use a consistent 1/2-inch (1.27 cm) seam allowance throughout this tutorial, unless otherwise specified for patchwork.
- Desired Finished Handbag Size: 10″ W x 10″ H x 2″ D (25.4 cm x 25.4 cm x 5 cm).
A. Deconstruct Your Jeans:
- Cut Off Legs: Lay the jeans flat and smooth. Cut straight across both pant legs, just below the crotch seam.
- Open Leg Seams: Use your seam ripper to carefully open up both the inseam (inner leg seam) and the outseam (outer leg seam) of each cut-off leg. This gives you large, flat panels. Iron these flat.
- Salvage Pockets/Waistband (Optional): Carefully seam rip if you plan to reuse them as decorative elements.
B. Patchwork Design & Cutting (for Exterior Panels):
This is the creative part! Decide on your pattern (e.g., horizontal strips, random squares, brick lay).
- Determine Patch Size: If using uniform patches, subtract 1 inch from your desired finished patch size to account for 1/2-inch seam allowances. For example, if you want 3-inch finished squares, cut them 4×4 inches.
- Cut Many Patches: Cut a variety of denim pieces (squares, rectangles, strips) from your different washes. Ensure you cut enough to assemble two panels that are at least 13 inches wide x 13 inches high. (This accounts for 10″ finished width + 2″ finished depth + 1″ seam allowance on sides. Same for height: 10″ H + 2″ D + 1″ SA = 13″ H).
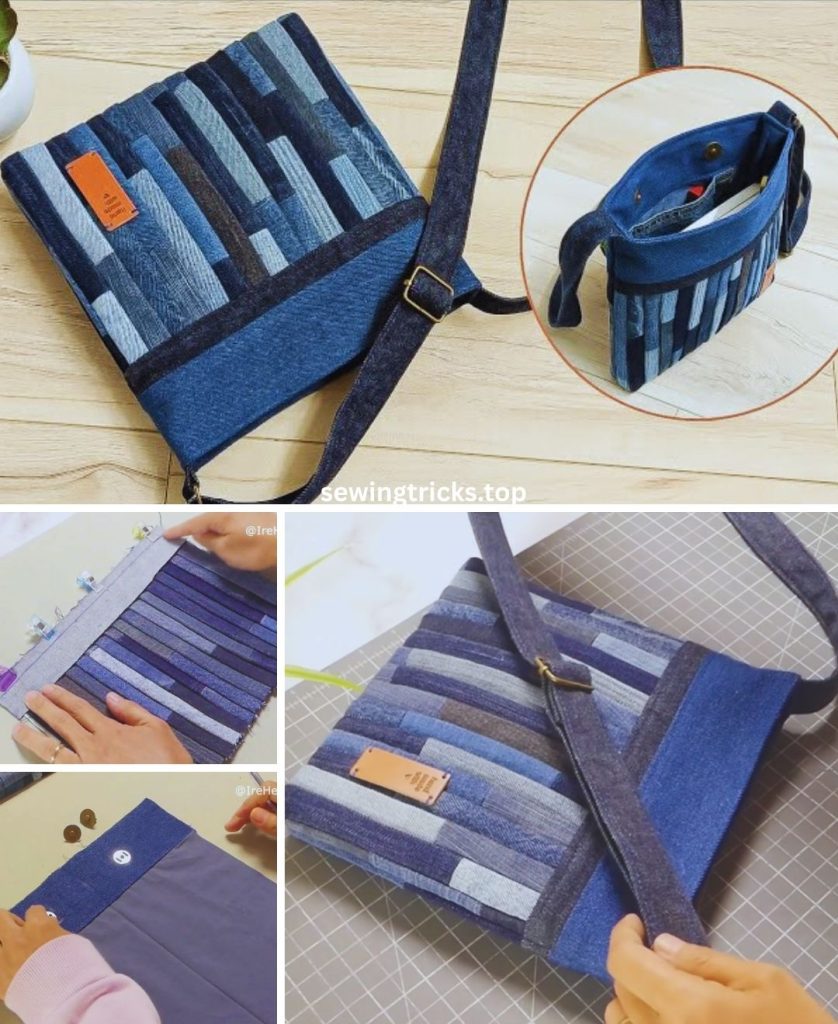
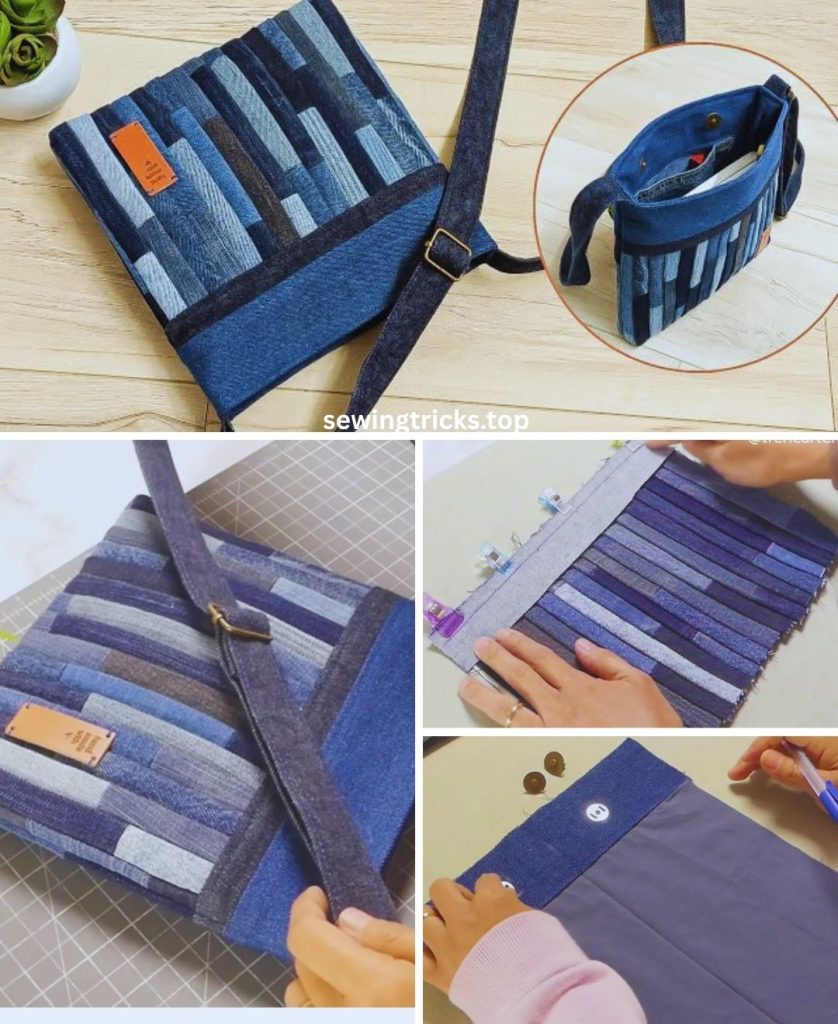
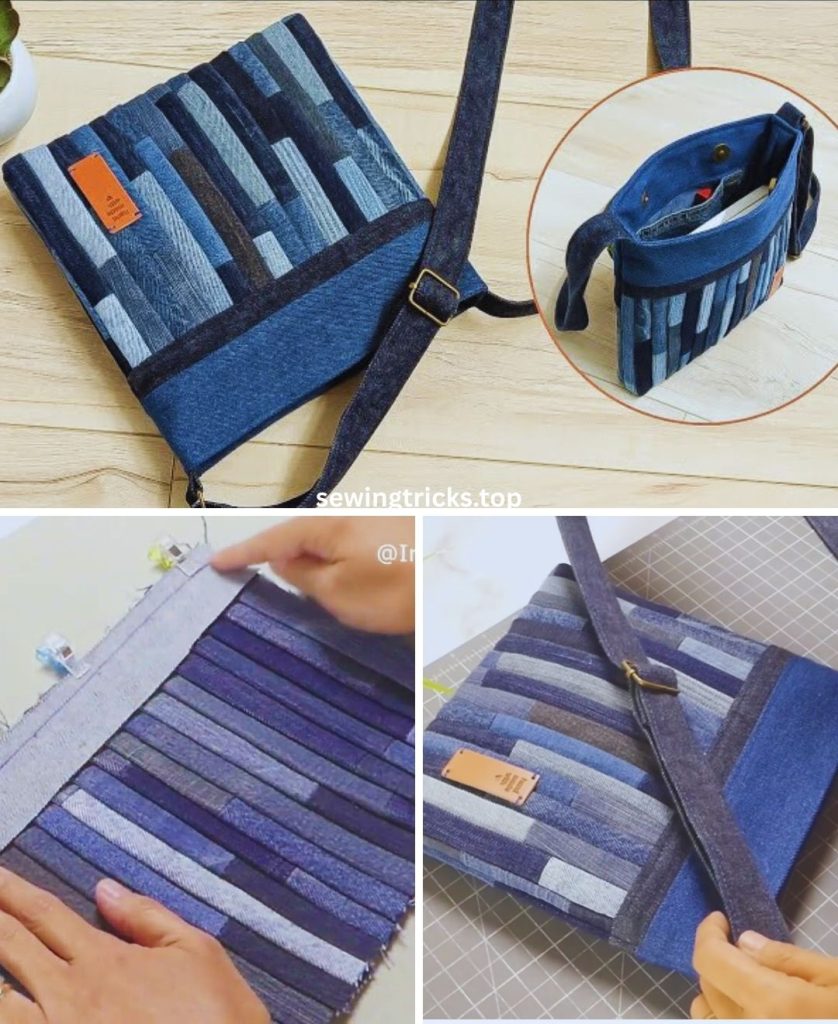
- Assemble Patchwork Panels:
- Arrange your cut denim pieces into two design layouts on a flat surface (your cutting mat or floor). Take a photo to remember your layout!
- Working in rows or columns, place two adjacent patches right sides together. Stitch them with a 1/2-inch seam allowance.
- Press seams open or to one side. For patchwork, pressing seams open generally reduces bulk.
- Continue adding patches, stitching them together one by one, then joining rows/columns until you have two large patchwork panels that are each at least 13 inches wide x 13 inches high.
- Important: Once stitched, press the entire patchwork panel thoroughly from the back.
- Trim Patchwork Panels: Now that you have two large patchwork pieces, use your ruler and rotary cutter (or scissors) to trim them down to the precise dimensions: 2 rectangles, each 13 inches wide x 13 inches high. These are your Exterior Patchwork Panels.
C. Other Fabric Pieces:
- Denim Strap: Cut 1 rectangle, 4 inches wide x 45-50 inches long. (You will likely need to piece this from several denim scraps, using the same “right sides together, stitch, press, topstitch” method as described for the main panels if you want the piecing to show).
- Lining Fabric Pieces:
- Main Body (Front & Back): Cut 2 rectangles, each 13 inches wide x 13 inches high.
- Interior Slip Pocket (Optional): Cut 1 rectangle, 8 inches wide x 10 inches high.
- Heavyweight Fusible Interfacing:
- Main Body Panels: Cut 2 rectangles, each 12 inches wide x 12 inches high (1 inch smaller on all sides than your main fabric panels to keep bulk out of the seam allowances).
- Strap: Cut 1 rectangle, 3 inches wide x (Strap Length – 1 inch).
IV. Let’s Start Sewing Your Patchwork Crossbody Bag!
General Sewing Tips for Denim & Patchwork:
- Pressing is PARAMOUNT! For patchwork especially, pressing each seam as you go ensures flat, accurate pieces.
- Backstitch at the beginning and end of every seam.
- Use your walking foot. This is a must for evenly feeding multiple layers of denim and interfacing.
- Clips, clips, clips! They are far superior to pins for holding thick, bulky denim.
- Go slow and be patient. Patchwork takes time, and denim is a sturdy fabric.
Step 1: Fuse Interfacing to Exterior Patchwork Panels & Strap
- Lay your two Exterior Patchwork Panels and your denim strap piece wrong side up on your ironing board.
- Center the corresponding Interfacing piece on each fabric piece (it should be 1 inch smaller on all sides).
- Following the manufacturer’s instructions for your specific interfacing, fuse the interfacing to the wrong side of the fabric. Press firmly and allow to cool completely. This gives your bag and strap structure.
Step 2: Prepare Interior Slip Pocket (Optional)
- Take your 8″ x 10″ pocket piece (lining fabric).
- Fold one long 8-inch edge down by 1/2 inch (1.27 cm) towards the wrong side and press. Fold it down again by another 1/2 inch and press. Stitch this hem in place, close to the folded edge. This is the top edge of your pocket.
- Fold the other three raw edges (the two short 10-inch sides and the bottom 8-inch side) in by 1/2 inch and press.
- Position this prepared pocket onto the right side of one of your Lining Fabric Main Body Panels. Center it horizontally, about 2-3 inches (5-7.6 cm) down from the top raw edge.
- Topstitch the pocket in place along its two sides and bottom edge, close to the folded edges. Backstitch at the beginning and end, and reinforce the top corners with a small triangle stitch or extra back-and-forth stitches for durability.
Step 3: Construct the Exterior Bag Body
Use a 1/2-inch (1.27 cm) seam allowance.
- Place the two Exterior Patchwork Panels right sides together, carefully aligning all raw edges.
- Clip securely along both side edges and the entire bottom edge. The top edge remains open.
- Stitch from one top corner down that side, pivot sharply at the bottom corner, stitch straight across the bottom, pivot again, and stitch up the other side to the top corner. Backstitch at the beginning and end of your seam.
- Press your seams open thoroughly to reduce bulk.
Step 4: Box the Corners of the Exterior Bag
This step creates the flat, defined bottom of your crossbody bag.
- Lay the exterior bag body flat. The side and bottom seams should be pressed open.
- At one of the bottom corners, carefully bring the side seam and the bottom seam together, aligning them perfectly. This action will naturally form a triangular shape at the corner.
- Measure from the tip of this triangle inward along the seam line a distance equal to half of your desired bag depth (e.g., for a 2-inch deep bag, you’ll measure 1 inch / 2.5 cm).
- Draw a straight line perpendicular to the seam at this measured point. (This line will be 2 inches long if your desired depth is 2 inches).
- Clip firmly along this drawn line.
- Stitch precisely along the drawn line, backstitching securely at both ends.
- Trim the excess fabric from the corner, leaving about a 1/2-inch (1.27 cm) seam allowance beyond your new stitching line.
- Repeat this exact process for the other bottom corner of your exterior bag body.
- Result: Your exterior bag now has a structured, flat bottom. Keep it wrong side out.
Step 5: Sew the Lining Bag Body
The lining is constructed almost identically to the main bag, with one crucial difference for turning the bag right side out later.
- Place the two Lining Fabric Main Body Panels right sides together, aligning all raw edges.
- Clip or pin along both side edges.
- CRUCIAL STEP: For the bottom seam, you must leave an opening! Stitch down one side seam. Then, for the bottom seam, stitch approximately 3 inches (7.6 cm) from one side, then leave a 4-6 inch (10-15 cm) unstitched gap in the middle of the bottom seam. This opening is absolutely essential for turning the entire bag right side out later. After the gap, stitch for another 3 inches (7.6 cm) to reach the other side seam. Backstitch well at the start and end of your stitching around the gap.
- Stitch up the second side seam.
- Press your seams open.
- Box the Corners of the Lining Bag: Box the corners of your lining bag using the exact same method you used for the exterior bag (refer back to Step 4).
- Result: Your lining bag is now fully constructed, with that important turning opening. Keep it wrong side out.
Step 6: Prepare and Attach the Crossbody Strap
- Take your 4″ x (desired length) denim strap piece (which should already have interfacing fused).
- Fold it in half lengthwise, wrong sides together, and press firmly. Open it up.
- Fold each long raw edge in towards the center crease you just made, and press again.
- Fold the entire strip in half again along the original center crease. You should now have a long, flat strap that is about 1 inch (2.5 cm) wide with no raw edges visible. Press firmly along the entire length.
- Topstitch down both long sides of the prepared strap, about 1/8 inch (0.3 cm) from the edge. This secures all the folds and makes a neat, strong strap.
- Attach to Exterior Bag:
- Turn your exterior patchwork bag right side out.
- Position one raw end of the prepared strap at the top raw edge of the bag, centered on one of the side seams. The strap itself should lie flat against the bag, pointing downward.
- Stitch the strap end in place within the 1/2-inch (1.27 cm) seam allowance. Use a sturdy X-box stitch (sew a square, then an “X” through it) for maximum reinforcement, as this connection will bear weight.
- Repeat for the other end of the strap, attaching it to the top raw edge of the opposite side seam.
- Result: Your exterior bag has the strap securely attached and pointing down into the bag.
Step 7: Install Magnetic Snap (Optional)
If you’re using a magnetic snap closure:
- Take one of your Lining Main Body Panels (before it’s sewn into a bag if you want to apply interfacing behind it for extra strength, which is recommended). Mark the center of the top edge. Measure down about 1.5 to 2 inches (3.8 to 5 cm) from the top raw edge. This is where the first half of your snap will go.
- Follow the magnetic snap manufacturer’s instructions to install one half of the snap onto this lining piece. Apply a small piece of fusible interfacing to the back of the fabric first for reinforcement if your snap didn’t come with a metal washer with prongs.
- Repeat for the other half of the snap on the other Lining Main Body Panel. Ensure they will align perfectly when the bag is assembled.
Step 8: Join the Exterior Bag and the Lining Bag (The “Bag-in-a-Bag” Method)
This clever technique encloses all raw edges at the top for a super clean and professional finish.
- Ensure your exterior patchwork bag is right side out, with the strap attached and pointing down into the bag.
- Ensure your lining bag is wrong side out (and still has that turning opening at the bottom).
- Carefully insert the exterior patchwork baginto the lining bag.
- The right sides of both bags should now be facing each other.
- Align the side seams of the exterior bag with the side seams of the lining bag.
- Align the top raw edges of the exterior fabric and the lining fabric all around the entire opening of the bag. The strap should be sandwiched between the layers, pointing down.
- Clip very securely all the way around this top edge, matching up seams precisely.
- Using your 1/2-inch (1.27 cm) seam allowance, stitch all the way around the entire top opening of the bag. Go slowly and carefully, especially when you go over the strap attachment points (which will be thick!). Backstitch at the beginning and end of your seam.
- Trim Bulk: Carefully trim the seam allowance at the top down to about 1/4 inch (0.6 cm) to reduce bulk inside the top edge.
Step 9: Turn Your Bag Right Side Out & Finish
This is the incredibly satisfying moment your upcycled denim crossbody bag takes its final, beautiful shape!
- Reach through the opening you left in the bottom seam of the lining.
- Slowly and carefully pull the entire bag (exterior, lining, strap – everything!) through this opening until it is completely right side out. Take your time, gently pushing out all the corners for a crisp, well-defined shape.
- Close the Lining Opening: Go to your ironing board. Press the raw edges of the opening in the bottom of the lining under by 1/2 inch (1.27 cm) so they meet neatly. Align these pressed edges and clip them together. Stitch this opening closed by machine (sewing very close to the folded edge for a neat finish) or by hand using an invisible ladder stitch for a truly seamless look.
- Now, gently push the lining down into the exterior denim bag.
- Final Press & Topstitch: Carefully press the entire top edge of the bag. Make sure the lining is fully tucked inside and isn’t peeking out over the top edge of the exterior fabric.
- For a super polished and durable finish, topstitch all around the entire top opening of the bag, about 1/8 inch (0.3 cm) from the edge. This final topstitching marries the lining to the exterior, helps the bag hold its shape, and creates a crisp, professional look. You can also sew a second row of topstitching about 1/2 inch (1.27 cm) from the top edge for added detail and stability.
Your unique, upcycled Patchwork Denim Crossbody Bag is now complete! You’ve transformed old jeans into a functional, durable, and truly stylish accessory that’s one-of-a-kind. Enjoy carrying your sustainable creation with pride!
What kinds of denim washes did you use for your patchwork design?


