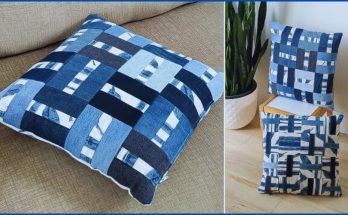
Repurposing old jeans into denim pillowcases is a fantastic way to add a touch of rustic charm and eco-friendly style to your home. Denim is durable, versatile, and holds up beautifully to everyday use. Plus, using old jeans means you’re giving new life to something that might otherwise be discarded!
Here are 3 detailed ideas for sewing denim pillowcases from old jeans, ranging from simple to more decorative. For all these ideas, we’ll assume you’re making a cover for a standard 18″ x 18″ (45 cm x 45 cm) pillow insert, using an envelope-style back for easy insertion and removal without needing a zipper.
General Preparations for All Denim Pillowcase Ideas
Before you dive into any of the specific designs, here are some essential steps and supplies you’ll need for working with old jeans:
I. Essential Materials & Tools
- Old Jeans: At least 1-2 pairs of clean, ironed, sturdy denim jeans. The number depends on the size of your pillow and how much patchwork you plan to do. Look for non-stretch or low-stretch denim for the best results. Varying washes (light, medium, dark) can add great visual interest.
- Pillow Insert: Your 18″ x 18″ (45 cm x 45 cm) pillow form.
- Matching Thread: Strong, all-purpose polyester thread. Consider topstitching thread in a contrasting color (like gold, orange, or beige) for decorative seams.
- Basic Sewing Supplies:
- Sewing Machine: A walking foot is highly recommended for feeding thick denim evenly.
- Heavy-Duty Needles: Denim needles (size 90/14 or 100/16) are crucial. Keep spares.
- Sharp Fabric Scissors or Rotary Cutter and Mat.
- Long Quilting Ruler or Measuring Tape.
- Fabric Chalk or Mark-B-Gone Pen.
- Plenty of Wonder Clips (they’re much better than pins for thick denim!).
- Iron and Ironing Board (essential for crisp seams).
- Seam Ripper (your best friend for deconstructing jeans!).
II. Deconstructing Your Jeans
This is the first step for any denim project:
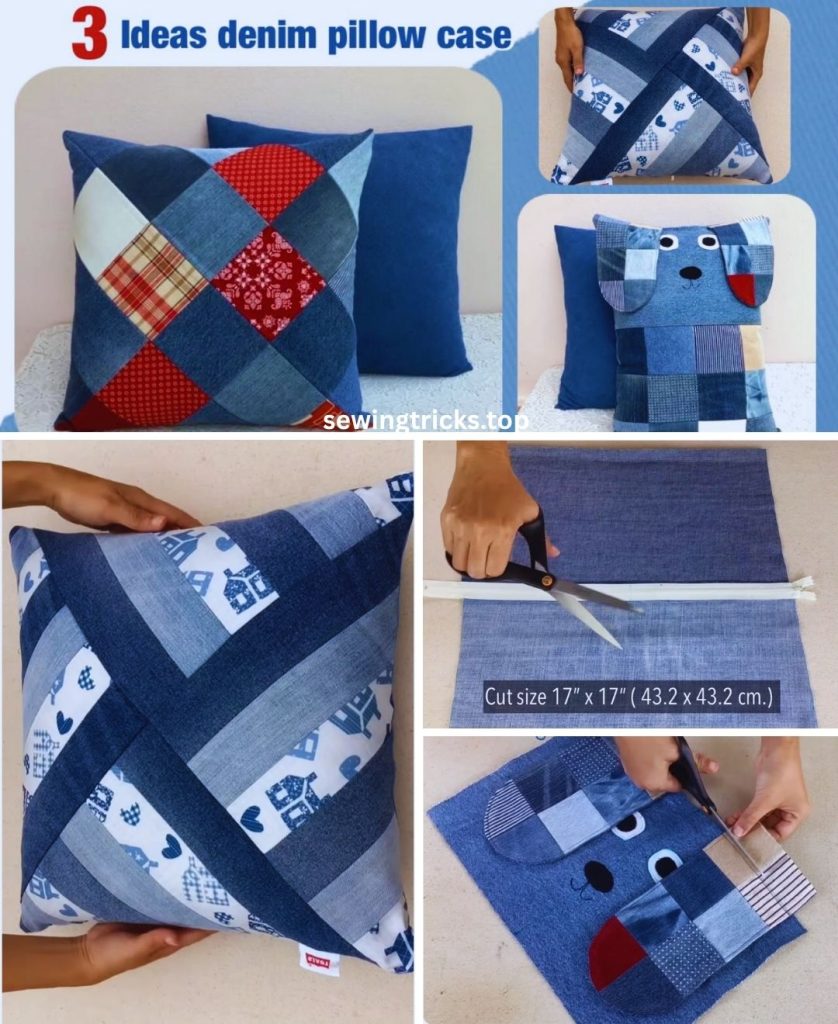
- Cut Off Legs: Lay the jeans flat and smooth. Using sharp scissors, cut straight across both pant legs, just below the crotch seam.
- Open Leg Seams: Use your seam ripper to carefully open up both the inseam (inner leg seam) and the outseam (outer leg seam) of each cut-off leg. This will give you two large, flat panels of denim fabric. Iron these pieces flat to remove creases.
- Salvage Features (Optional): Carefully remove back pockets, belt loops, or pieces of the waistband if you plan to incorporate them into your designs.
Pillowcase Construction: The Envelope Back
All three ideas will use the same envelope-style back for simplicity.
III. Prepare & Cut Backing Panels (for an 18″x18″ Pillow)
You’ll need two overlapping rectangles for the back. You can use solid denim from your jeans, or a complementary fabric if you prefer.
- Backing Panel 1 (Bottom Overlap): Cut 1 rectangle, 18.5 inches wide x 12 inches high (47 cm x 30.5 cm).
- Backing Panel 2 (Top Overlap): Cut 1 rectangle, 18.5 inches wide x 10 inches high (47 cm x 25.4 cm).
- Note: The extra 0.5 inches in width is for the 1/4-inch (0.6 cm) seam allowance on each side when joining the front and back.
IV. Prepare the Backing Panels
- For the first backing panel (18.5″ x 12″): On one of the 18.5-inch edges, fold it under by 1/2 inch (1.27 cm) towards the wrong side and press firmly. Fold it under again by another 1/2 inch and press. Stitch this hem in place, close to the inner fold. This will be the bottom overlap.
- For the second backing panel (18.5″ x 10″): On one of the 18.5-inch edges, fold it under by 1/2 inch (1.27 cm) towards the wrong side and press firmly. Fold it under again by another 1/2 inch and press. Stitch this hem in place, close to the inner fold. This will be the top overlap.
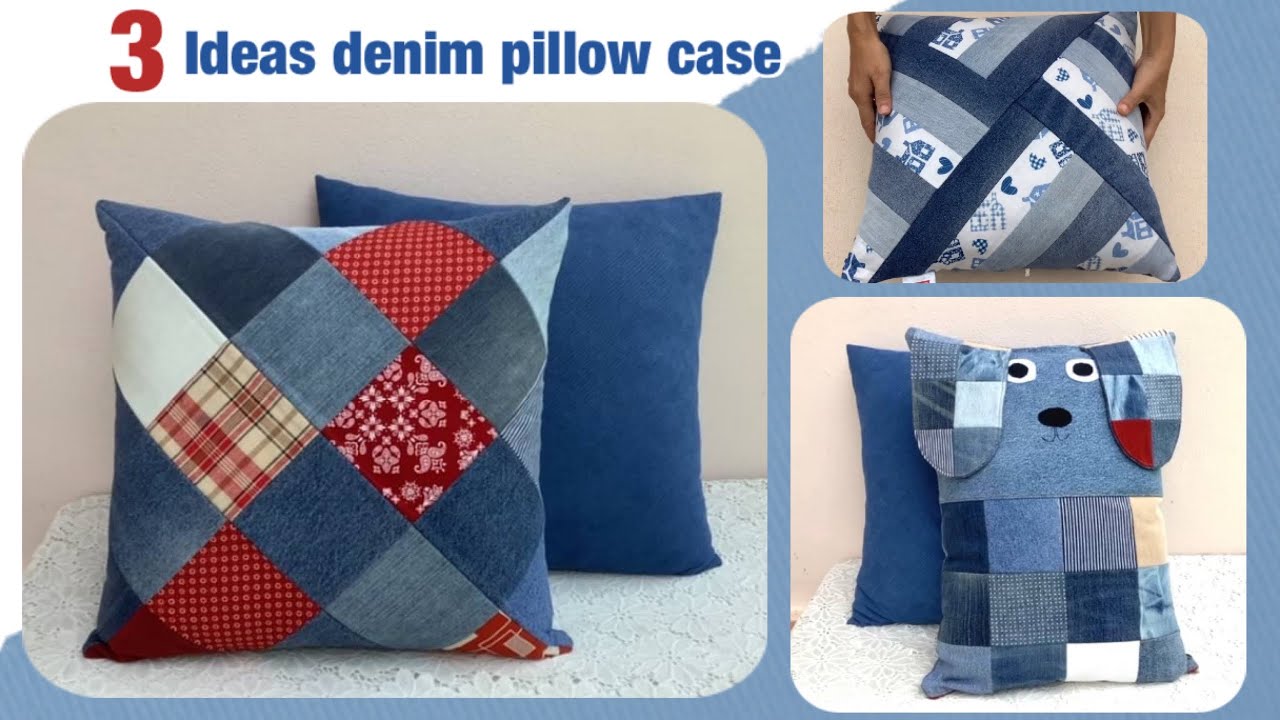
3 Ideas for Denim Pillowcases
Idea 1: Simple Denim Panel with Pocket Accent
This is the easiest design, perfect for beginners, and great for highlighting the classic denim look.
Materials Needed (Specific to this Idea):
- Front Panel: Enough denim to cut 1 rectangle, 18.5 inches x 18.5 inches (47 cm x 47 cm). You may need to piece together denim sections (see ‘Patchwork Tips’ below).
- Optional: 1-2 salvaged back pockets from your jeans.

Instructions:
- Cut Front Panel: From your flat denim pieces, cut one 18.5″ x 18.5″ (47 cm x 47 cm) square for the pillow front. If your denim pieces aren’t large enough, you’ll need to piece them together.
- Patchwork Tips for Piecing Denim:
- Place two denim pieces right sides together, aligning a raw edge. Stitch them with a 1/2-inch (1.27 cm) seam allowance.
- Press the seam open thoroughly to reduce bulk.
- Topstitch: On the right side, sew two parallel lines of stitching, one on each side of the seam line, about 1/8 inch (0.3 cm) away. Use topstitching thread for this. This mimics authentic jean seams and adds strength and a decorative touch.
- Continue piecing until you have a square large enough for your final cut.
- Patchwork Tips for Piecing Denim:
- Attach Pocket (Optional):
- If using a salvaged back pocket, position it on the right side of your 18.5″ x 18.5″ denim front panel. Think about placement: centered, offset to a corner, or even two pockets.
- Topstitch the pocket onto the denim panel along its two sides and bottom edge. Make sure to backstitch securely at the top corners of the pocket opening, as this area will see stress.
- Assemble Pillow Cover:
- Lay your denim front panel right side up.
- Place the first hemmed backing panel (18.5″ x 12″) on top, right side down, aligning its raw edge with the top raw edge of the front panel. The hemmed edge faces towards the center.
- Place the second hemmed backing panel (18.5″ x 10″) on top, right side down, aligning its raw edge with the bottom raw edge of the front panel. Its hemmed edge also faces towards the center, overlapping the first backing panel.
- Clip all around the entire perimeter of the stacked panels.
- Stitch all the way around the entire outer edge (all four sides) using a 1/2-inch (1.27 cm) seam allowance. Go slowly, especially over thick areas. Backstitch at beginning and end.
- Clip corners: Trim the seam allowance diagonally at each corner, close to the stitching, to reduce bulk when turning.
- Turn Right Side Out & Finish:
- Reach into the envelope opening at the back. Carefully pull the entire pillow cover right side out.
- Gently push out all four corners.
- Give the entire pillow cover a final, good press.
- Insert your pillow.
Idea 2: Striped Patchwork Denim Pillow Cover
This design uses strips of denim (and optionally other fabrics) to create a visually interesting, modern look.
Materials Needed (Specific to this Idea):
- Denim Scraps: Various washes, cut into long strips (e.g., 2.5″, 3″, 4.5″ wide).
- Optional: Coordinating fabric scraps (quilting cotton, linen, etc.) for contrasting strips.
Instructions:
- Cut Strips: From your denim and optional printed fabric scraps, cut numerous strips.
- For an 18″ pillow, aim for strips that are at least 18.5 inches (47 cm) long.
- Vary the widths of your strips for visual interest (e.g., cut some 2.5″ wide, some 3.5″ wide, some 4.5″ wide). Remember, a 2.5″ wide raw strip will result in a 2″ wide finished strip if using a 1/4″ seam allowance.
- Assemble Striped Front Panel:
- Place two strips right sides together, aligning a long edge. Stitch with a 1/4-inch (0.6 cm) seam allowance.
- Press the seam open or to one side.
- Continue adding strips, one by one, to create a large striped piece.
- Topstitch (Optional): After pressing each seam, you can topstitch along both sides of the seam (on the right side of the fabric) to mimic jean seams. This adds a nice detail.
- Continue adding strips until your pieced fabric is at least 18.5 inches wide x 18.5 inches high (47 cm x 47 cm).
- Trim Front Panel: Once your striped panel is assembled, give it a thorough final press. Use your ruler and rotary cutter (or scissors) to trim it down to precisely 18.5 inches x 18.5 inches (47 cm x 47 cm). This is your Striped Denim Front Panel.
- Assemble Pillow Cover: Follow Step 3 from Idea 1 (assembling the front and back panels).
- Turn Right Side Out & Finish: Follow Step 4 from Idea 1.

Idea 3: “Crazy Patchwork” Denim Pillow Cover
This idea is perfect for using up even the smallest, most irregularly shaped denim scraps. It’s a more free-form and organic look.
Materials Needed (Specific to this Idea):
- Denim Scraps: Many irregularly shaped denim pieces of various washes and sizes.
- Base Fabric (Optional but Recommended): A piece of inexpensive cotton fabric (like muslin or an old sheet) cut to 18.5 inches x 18.5 inches (47 cm x 47 cm). This provides a stable base to sew your “crazy” patches onto.
Instructions:
- Prepare Base Fabric (if using): Cut your base fabric to 18.5 inches x 18.5 inches (47 cm x 47 cm).
- Start Patchworking:
- Place your first denim scrap (can be irregular) in the center of your base fabric (or directly on your ironing board if not using a base). You can put a small dab of fabric glue or use an iron to temporarily hold it down.
- Take a second denim scrap. Place it right sides together with the first scrap, aligning one edge (even if it’s curved or diagonal). Stitch along this edge using a 1/4-inch (0.6 cm) seam allowance.
- Press the second scrap open so it lays flat, covering part of the base fabric.
- Take a third scrap. Place it right sides together with one of the newly exposed raw edges of your stitched pieces. Stitch with a 1/4-inch seam allowance.
- Press this third scrap open.
- Continue this process: always placing a new scrap right sides together with a raw edge of your existing patchwork, stitching, and then pressing it open to cover more of the base fabric. Overlap the edges as needed; you’ll trim later.
- Tip: Vary the shapes, sizes, and denim washes for a dynamic look. Embrace the irregularity!
- Cover the Panel: Keep adding and stitching scraps until your entire 18.5″ x 18.5″ (47 cm x 47 cm) area is completely covered with denim patchwork.
- Final Press & Trim: Once completely covered, give the entire patchwork panel a thorough final press from the back. Use your ruler and rotary cutter (or scissors) to trim the panel to precisely 18.5 inches x 18.5 inches (47 cm x 47 cm). This is your Crazy Patchwork Denim Front Panel.
- Assemble Pillow Cover: Follow Step 3 from Idea 1 (assembling the front and back panels).
- Turn Right Side Out & Finish: Follow Step 4 from Idea 1.
No matter which idea you choose, your new denim pillowcase will be a unique and charming addition to your home, showcasing your creativity and commitment to upcycling!
Which of these denim pillowcase ideas are you most excited to try first?