

Sure, let’s make a beautiful half-moon-shaped shoulder bag! This design is chic and surprisingly roomy, perfect for a stylish everyday carry. We’ll include a zipper for security and a comfortable shoulder strap.
How to Sew a DIY Half-Moon Shaped Shoulder Bag
This tutorial will guide you through creating a lined half-moon bag with a zipper closure. We’ll use a 1/2-inch (1.27 cm) seam allowance throughout, unless otherwise specified.
I. Planning Your Half-Moon Shoulder Bag
Before you start, it’s good to visualize your finished bag.
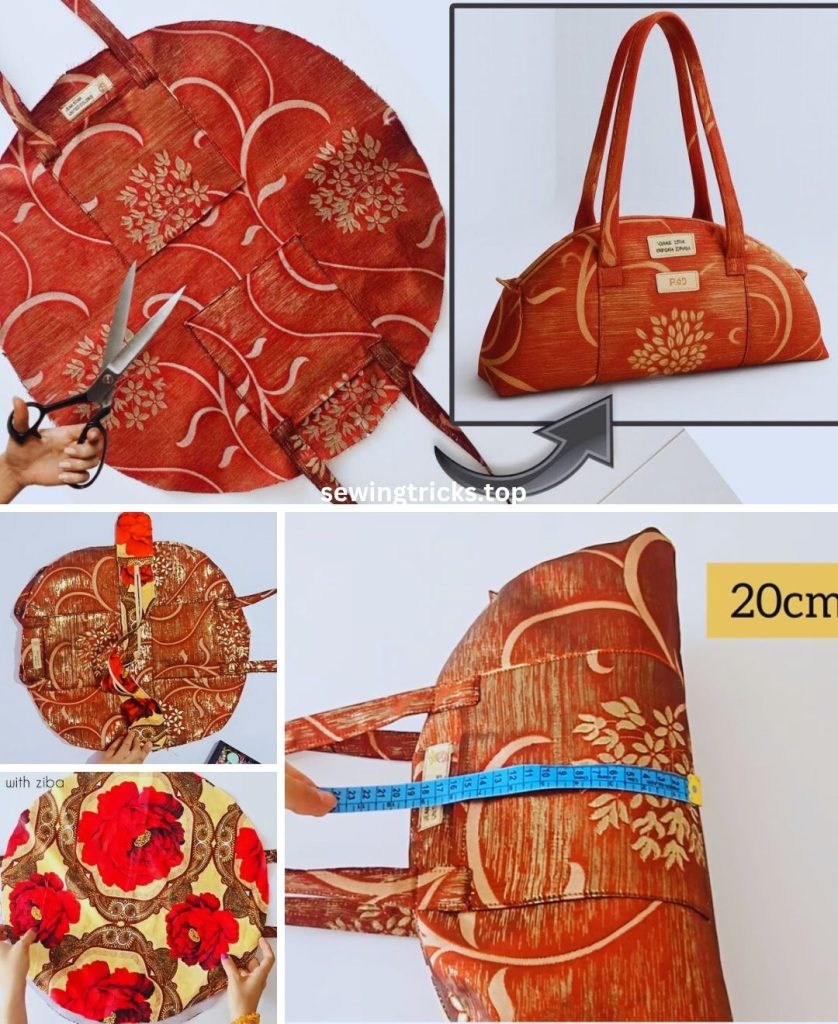
- Size: A good versatile size is about 12 inches wide at the base, 8 inches high at the center, and 3 inches deep (approximately 30.5 cm W x 20.3 cm H x 7.6 cm D). You can adjust these measurements, but keep the proportions similar.
- Fabric Choice:
- Exterior Fabric: Medium-weight fabrics like canvas, denim, faux leather, sturdy cotton twill, or even a beautiful upholstery fabric work well. A fabric with some body will help the bag hold its shape.
- Lining Fabric: Light to medium-weight cotton fabrics (like quilting cotton or broadcloth) are perfect for the interior. Choose a fun print or a contrasting solid.
- Strap Style: A comfortable shoulder strap. We’ll make a fabric strap in this tutorial.
- Closure: A zipper is ideal for security.
II. Gather Your Materials
Having everything ready before you begin will make the sewing process smoother.
- Exterior Fabric: 1/2 yard (0.45 meters)
- Lining Fabric: 1/2 yard (0.45 meters)
- Fusible Fleece (Optional but Recommended for Soft Structure): 1/2 yard (0.45 meters) (e.g., Pellon 987F Fusible Fleece). This gives a soft, padded feel and helps the bag keep its shape.
- Heavyweight Fusible Interfacing (Optional, for more rigidity): 1/2 yard (0.45 meters) (e.g., Pellon 809 Decor Bond or Peltex II Ultra-Firm). Use instead of or in addition to fusible fleece for a stiffer bag.
- Zipper: One 14-inch (35.5 cm) handbag zipper (a standard nylon coil zipper is easiest to work with). Choose a color that matches or contrasts nicely.
- Matching Thread: All-purpose polyester thread.
- Basic Sewing Supplies:
- Sewing Machine: With a zipper foot and a walking foot (highly recommended for thicker fabrics).
- Sharp Fabric Scissors or Rotary Cutter and Mat.
- Measuring Tape or Long Quilting Ruler.
- Fabric Chalk or Mark-B-Gone Pen.
- Plenty of Pins or Fabric Clips (great for holding bulk).
- Iron and Ironing Board (essential for fusing and pressing).
- Seam Ripper.
- Large Compass or String & Pencil: For drawing the curved shape.
- Optional: Template Material: Cardboard or thick paper to make a reusable pattern piece.
III. Prepare & Cut Your Fabric Pieces
This is the most crucial part for getting your bag’s shape right.
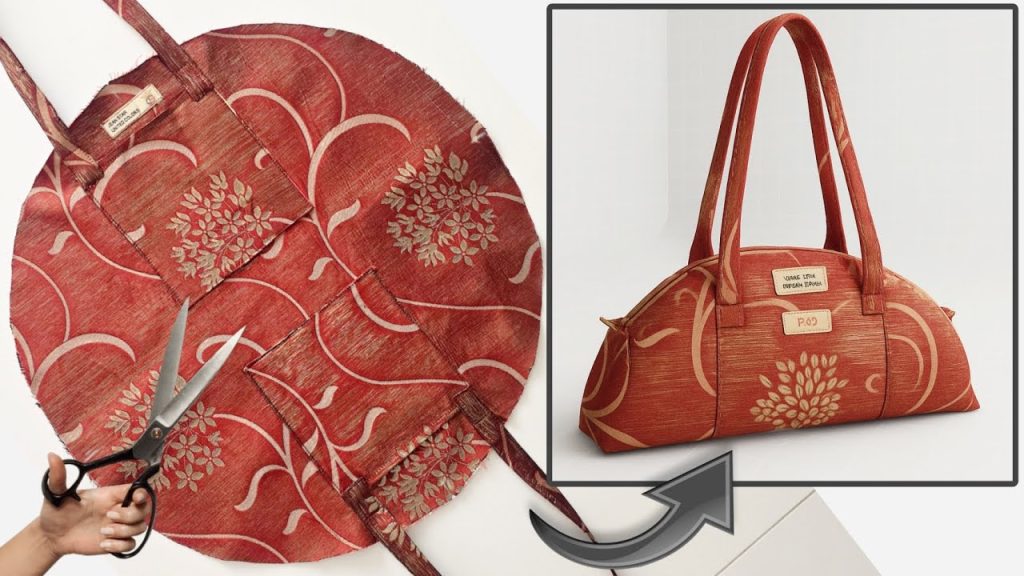
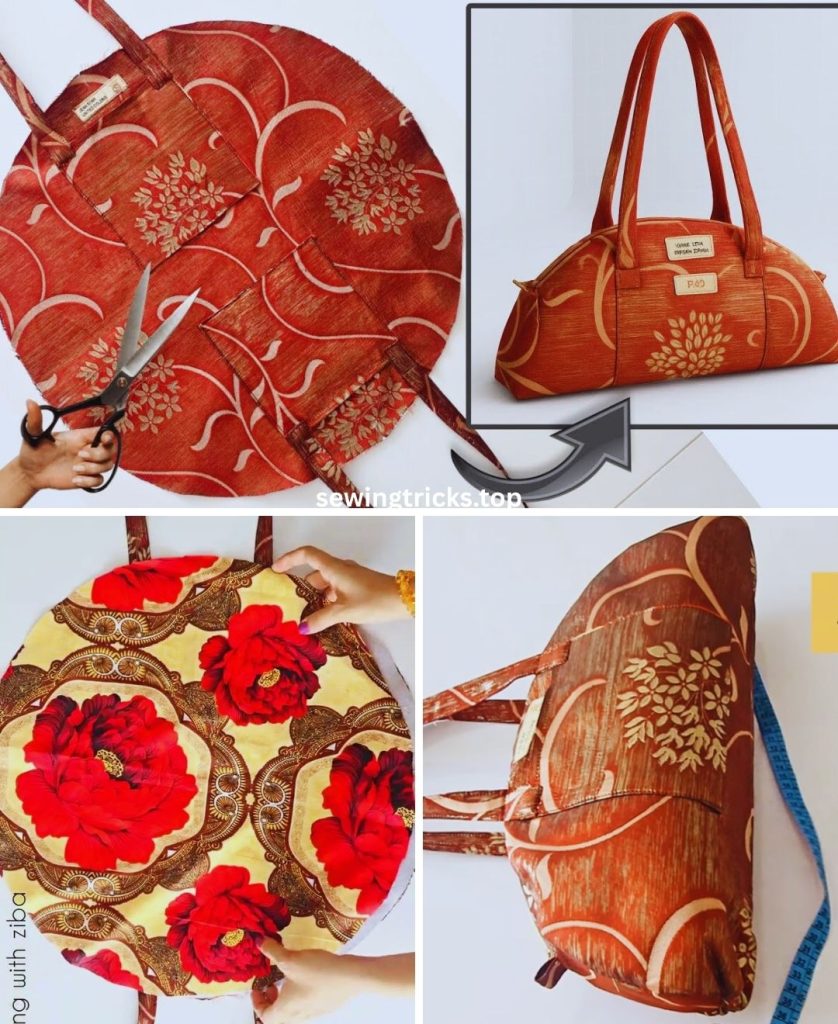
A. Create Your Half-Moon Pattern Piece:
- Take a large piece of paper (or cardboard). Draw a rectangle the size of your finished bag’s dimensions + seam allowance. For an 12″ W x 8″ H x 3″ D bag, you’ll need:
- Width: Finished width + 1″ (seam allowance on both sides) = 12″ + 1″ = 13 inches (33 cm).
- Height: Finished height + 1″ (seam allowance on top and bottom) = 8″ + 1″ = 9 inches (22.9 cm).
- So, draw a rectangle that is 13 inches wide x 9 inches high.
- Create the Curved Top:
- Find the exact center of the 13-inch top edge (at 6.5 inches).
- Using a large compass or a string and pencil:
- Place the pivot point of your compass or secure your string at the center of the bottom edge of your rectangle (at 6.5 inches).
- Extend the compass/string radius so the pencil reaches the top corners of your rectangle.
- Draw an arc connecting the two top corners. This will create your half-moon shape.
- Carefully cut out this half-moon pattern piece.
B. Cut Your Fabric:
- Exterior Main Body:
- Cut 2 pieces from your Exterior Fabric using your half-moon pattern.
- Cut 2 pieces from your Fusible Fleece (if using) using your half-moon pattern.
- Cut 2 pieces from your Heavyweight Fusible Interfacing (if using) minus seam allowance (e.g., 12″ W x 8″ H) to keep bulk out of seams.
- Exterior Side/Bottom Strip (Gusset): This will be one long strip that forms the depth of your bag.
- Length: This needs to go around the curved edge of your half-moon. A rough estimate is (pi * bag height) + (bag width) + some extra for curves and fitting. For our 12″ W x 8″ H bag, this is roughly (3.14 * 8″) + 12″ = 25.12 + 12 = 37.12 inches. Let’s make it generous: 40 inches (101.6 cm).
- Width: Finished depth + 1″ (seam allowance) = 3″ + 1″ = 4 inches (10.2 cm).
- Cut 1 strip from your Exterior Fabric: 40 inches long x 4 inches wide.
- Cut 1 strip from your Fusible Fleece (if using): 39 inches long x 3 inches wide (or slightly smaller than the fabric, to keep bulk out of seams).
- Cut 1 strip from your Heavyweight Fusible Interfacing (if using) minus seam allowance (e.g., 39″ x 3″).
- Lining Main Body:
- Cut 2 pieces from your Lining Fabric using your half-moon pattern.
- Lining Side/Bottom Strip (Gusset):
- Cut 1 strip from your Lining Fabric: 40 inches long x 4 inches wide.
- Strap:
- Cut 1 rectangle from your Exterior Fabric: 2.5 inches wide x 45 inches long (adjust length for desired strap drop).
- Cut 1 rectangle from your Fusible Fleece (if using): 1.5 inches wide x 44 inches long.
IV. Let’s Start Sewing Your Half-Moon Bag!
General Sewing Tips:
- Press, Press, Press: Essential for crisp, professional results. Press seams open after each stitching step.
- Backstitch: Always at the beginning and end of seams.
- Walking Foot: Use it, especially for attaching the gusset around the curves!
- Clips: Use plenty of clips to hold curves and thick layers.
- Go Slow: Take your time, especially on curves and when inserting the zipper.
Step 1: Fuse Interfacing/Fleece
- Lay all exterior fabric pieces (2 main body half-moons, 1 side/bottom strip, 1 strap piece) wrong side up on your ironing board.
- Center the corresponding fusible fleece or interfacing pieces on each fabric piece.
- Following the manufacturer’s instructions, fuse the fleece/interfacing to the wrong side of the fabric. Press firmly and allow to cool completely.
Step 2: Prepare the Strap
- Take your Exterior Fabric Strap Piece (2.5″ x 45″).
- Fold it in half lengthwise, wrong sides together, and press firmly. Open it up.
- Fold each long raw edge in towards the center crease you just made, and press again.
- Fold the entire strip in half again along the original center crease. You should now have a long, flat strap that is about 1.25 inches (3.2 cm) wide with no raw edges visible. Press firmly.
- Topstitch down both long sides of the prepared strap, about 1/8 inch (0.3 cm) from the edge. This secures all the folds and makes a neat, strong strap. Set aside.
Step 3: Attach the Zipper
This is the trickiest part, but take it slow for a clean finish.
- Lay one Exterior Fabric Half-Moon Body Piece right side up.
- Place your zipper on top of the half-moon piece, right side down, aligning the top edge of the zipper tape with the curved raw edge of the half-moon panel. The zipper teeth should be facing down.
- Place one Lining Fabric Half-Moon Body Piece on top of the zipper, right side down, aligning its curved raw edge with the zipper tape and the denim panel.
- You now have a “sandwich”: Exterior Fabric (right side up) – Zipper (right side down) – Lining Fabric (right side down).
- Clip all three layers together along the curved edge.
- Using your zipper foot, stitch through all three layers, sewing as close to the zipper teeth as possible. Stitch from one end of the zipper to the other.
- Press: Open up the fabric pieces so the exterior and lining are pulled away from the zipper, and the zipper teeth are exposed. Press the fabric well away from the zipper.
- Topstitch: On the right side of the exterior fabric, sew a line of topstitching very close to the seam you just made (about 1/8 inch / 0.3 cm from the zipper teeth). This helps the fabric lay flat and gives a polished look.
- Now, you’ll attach the other side of the zipper.
- Take your remaining Exterior Fabric Half-Moon Body Piece. Lay it right side up.
- Take the already-attached zipper/exterior/lining unit. Place it on top of the new exterior panel, aligning the unstitched side of the zipper tape with the curved raw edge of this new exterior panel. The first exterior piece and lining should be flipped out of the way.
- Place the remaining Lining Fabric Half-Moon Body Piece on top of the zipper tape, right side down, aligning its curved raw edge with the zipper tape and the exterior panel.
- You now have a second “sandwich”: New Exterior Fabric (right side up) – Zipper (unstitched side down) – New Lining Fabric (right side down).
- Clip all three layers together.
- Using your zipper foot, stitch through all three layers, as close to the zipper teeth as possible.
- Press & Topstitch: Open up the fabric pieces and press well away from the zipper. Then, topstitch on the right side of the exterior fabric, close to the zipper teeth.
- Result: You now have a flat piece of fabric with the zipper running across the middle, and the exterior fabric pieces on one side, lining pieces on the other. IMPORTANT: Unzip the zipper about halfway before proceeding! If you don’t, you won’t be able to turn the bag right side out.
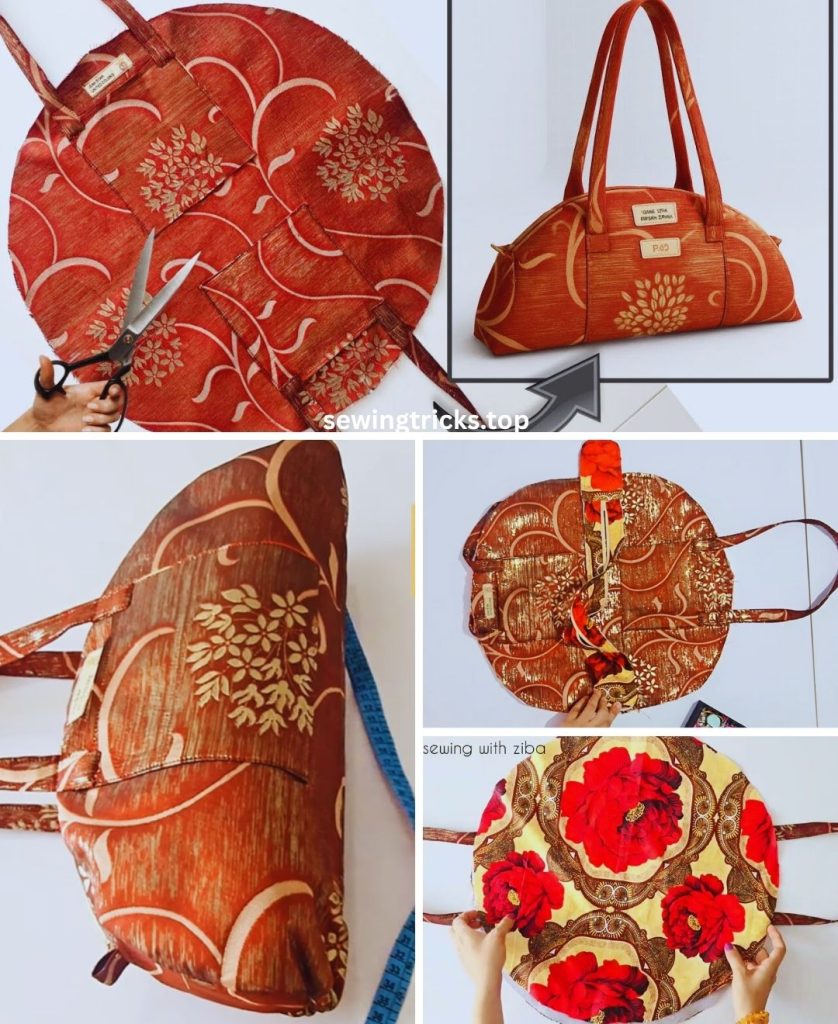
Step 4: Attach the Gusset (Side/Bottom Strip)
- Take your Exterior Fabric Side/Bottom Strip (40″ L x 4″ W).
- Find the exact center of one long 40-inch edge of the gusset strip.
- Find the exact center of the bottom straight edge of your zippered exterior unit (the bottom of the half-moon, opposite the zipper).
- Align these two center points, right sides together. Clip.
- Working from the center outwards, slowly and carefully clip the gusset strip around the curved edge of the half-moon zippered unit. Take your time, easing the fabric to fit. There will be excess gusset length on both ends – that’s normal.
- Stitch the gusset to the half-moon unit, following the curve, using a 1/2-inch (1.27 cm) seam allowance. Go slowly, pivoting as needed.
- Press the seam allowance towards the gusset.
- Repeat this process for the other exterior half-moon piece, attaching the other long raw edge of the gusset strip to it.
- Result: Your exterior bag is now a 3D shape, with the zipper across the top. The two ends of the gusset strip will be raw and unsewn where they meet near the bottom of the zipper.
Step 5: Construct the Lining Bag
The lining is constructed almost identically to the exterior bag.
- Take your Lining Fabric Side/Bottom Strip (40″ L x 4″ W).
- Attach it to the two Lining Fabric Half-Moon Body Pieces using the exact same method as you did for the exterior bag (Step 4).
- Result: Your lining bag is now a 3D shape, mirroring the exterior. Keep it wrong side out.
Step 6: Close Gusset Seams & Add Strap
- For the Exterior Bag:
- With the exterior bag still wrong side out, find the two raw ends of the gusset strip near the zipper.
- Align these two raw ends right sides together.
- Stitch them together with a 1/2-inch (1.27 cm) seam allowance. This closes the loop of your gusset.
- Press the seam open.
- Attach Strap: Find the side seams of your bag (where the gusset ends meet the main half-moon panels). Position the raw ends of your prepared Strap (from Step 2) onto the side seams, about 1/2 to 1 inch down from the zipper. The strap should point down into the bag. Stitch these ends securely using an X-box stitch (sew a square, then an “X” through it) for reinforcement. Stitch within the 1/2-inch seam allowance.
- For the Lining Bag:
- Close the raw ends of the gusset strip on the lining bag using the same method.
- IMPORTANT: Leave a 3-4 inch (7.6-10.2 cm) unstitched gap in this seam! This opening is absolutely essential for turning the entire bag right side out later. Backstitch well at the start and end of the stitched sections around your opening.
- Press the seam open.
Step 7: Join the Exterior Bag and the Lining Bag (The “Bag-in-a-Bag” Method)
This clever technique encloses all raw edges for a super clean and professional finish.
- Ensure your exterior bag is right side out, with the zipper halfway unzipped, and the strap tucked inside.
- Ensure your lining bag is wrong side out (and still has that turning opening in its gusset seam).
- Carefully insert the exterior baginto the lining bag.
- The right sides of both bags should now be facing each other.
- Align the main side seams of the exterior bag with the main side seams of the lining bag.
- Align the top edge (where the zipper is) of the exterior bag with the top edge (where the zipper is) of the lining bag. The zipper tape will be sandwiched between the two.
- Clip very securely all the way around this entire opening. Make sure the strap is tucked well inside and won’t get caught in the seam.
- Using your 1/2-inch (1.27 cm) seam allowance, stitch all the way around the entire top opening of the bag. Go slowly and carefully, especially over the zipper ends and where the strap is attached (these will be thick!). Backstitch at the beginning and end.
- Trim Bulk: Carefully trim the seam allowance at the top down to about 1/4 inch (0.6 cm) to reduce bulk.
Step 8: Turn Your Bag Right Side Out & Finish
- Reach through the opening you left in the gusset seam of the lining.
- Slowly and carefully pull the entire bag through this opening until it is completely right side out. Take your time, gently pushing out all the seams and curves for a crisp, well-defined shape.
- Close the Lining Opening: Go to your ironing board. Press the raw edges of the opening in the bottom of the lining under by 1/2 inch (1.27 cm) so they meet neatly. Align these pressed edges and clip them together. Stitch this opening closed by machine (sewing very close to the folded edge for a neat finish) or by hand using an invisible ladder stitch for a truly seamless look.
- Now, push the lining down into the exterior bag.
- Final Press & Topstitch: Carefully press the entire bag, especially around the zipper, to ensure the fabric lays flat and the shape is crisp.
- For a super polished and durable finish, topstitch all around the entire zipper opening, about 1/8 inch (0.3 cm) from the zipper teeth. This secures the lining to the exterior, helps the zipper lay flat, and gives a professional look.
Your beautiful, handmade Half-Moon Shaped Shoulder Bag is now complete! You’ve created a unique and stylish accessory that’s perfect for carrying your essentials.
What color zipper did you choose for your bag?


