

You’re looking for DIY women’s denim bag sewing tutorials with popular designs and multiple pockets – that’s a fantastic and eco-friendly project! Denim bags are incredibly durable and stylish, and repurposing old jeans adds unique character.
Here are two popular designs for women’s denim bags with a focus on multiple pockets, along with detailed tutorials:
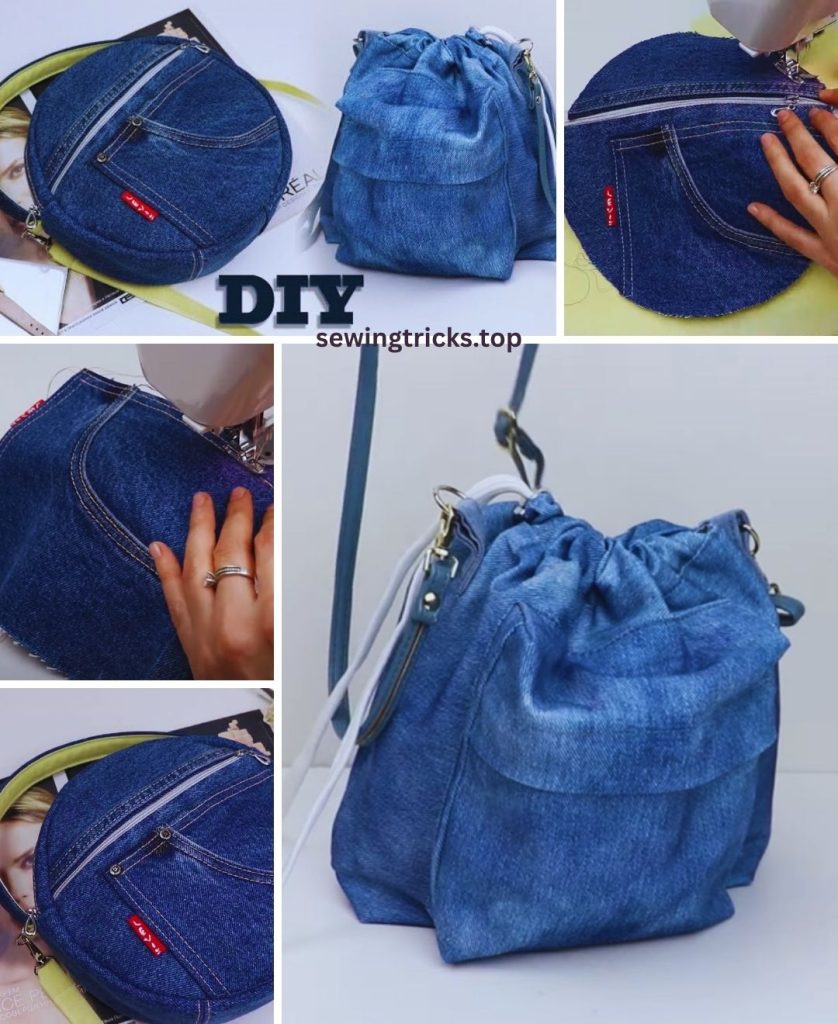
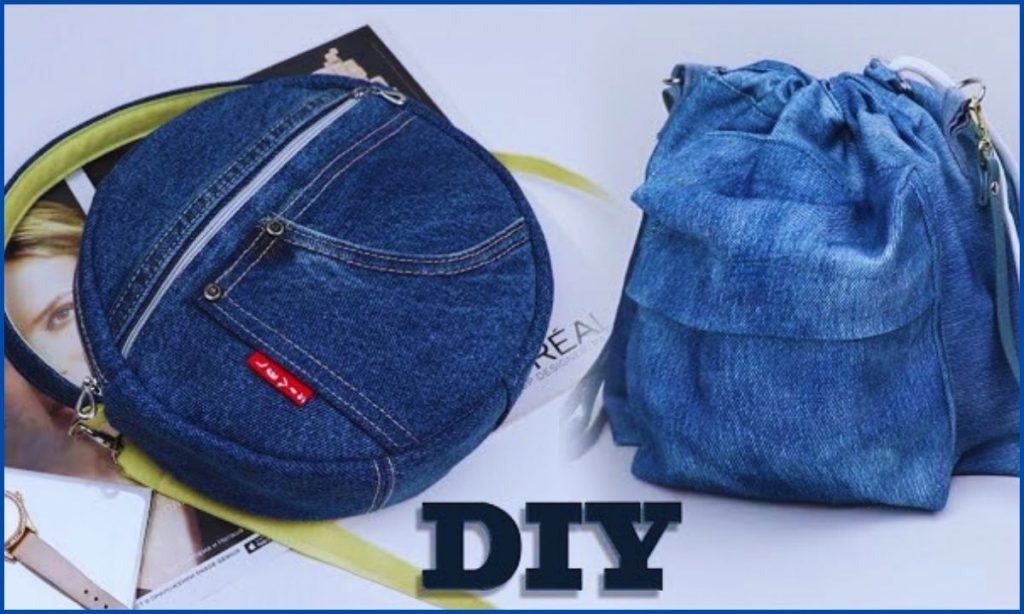
DIY Woman Bag Sewing From Denim Cloth: 2 Popular Designs
When working with denim, remember to use a denim needle (size 90/14 or 100/16) on your sewing machine, as well as a walking foot if you have one. This will help your machine handle the thick fabric layers smoothly. Always press your seams to keep your bag looking professional.
Idea 1: The Versatile Multi-Pocket Tote Bag
This is a classic, roomy tote perfect for everyday use, shopping, or as a stylish carry-all. It features repurposed jean pockets on the exterior and multiple slip pockets inside for excellent organization.
Design Features:
- Size: Approx. 14″ W x 15″ H x 4″ D (35.5 cm W x 38 cm H x 10 cm D)
- Exterior: Clean, solid denim panels or subtle patchwork, with two repurposed jean back pockets.
- Interior: Full lining with a multi-section slip pocket (e.g., for phone, pens, keys) and possibly an additional smaller slip pocket.
- Bottom: Boxed corners for a flat, stable base.
- Handles: Sturdy denim fabric handles.
Materials You’ll Need:
- Old Jeans: 1-2 pairs of clean, ironed, sturdy non-stretch or low-stretch denim jeans. (Larger sizes work best for cutting panels).
- Lining Fabric: 1 yard (0.9 meters) of medium-weight quilting cotton or broadcloth.
- Heavyweight Fusible Interfacing: 1 yard (0.9 meters) (e.g., Pellon 809 Decor Bond or Pellon 71F Peltex II Ultra Firm).
- Thread: All-purpose polyester thread matching your fabrics. Topstitching thread (gold, orange, or beige) for denim accents.
- Sewing Essentials: Sewing machine (with denim needle and walking foot), sharp fabric scissors or rotary cutter, long ruler, fabric chalk/pen, Wonder Clips (highly recommended!), iron, ironing board, seam ripper.
Cutting Instructions (with 1/2″ seam allowance):
- Exterior Denim Main Body: 2 rectangles, 19″ W x 20″ H. (Piece together denim scraps if needed, pressing seams open and topstitching).
- Exterior Denim Handles: 2 rectangles, 4″ W x 25″ L.
- Lining Fabric Main Body: 2 rectangles, 19″ W x 20″ H.
- Interior Multi-Section Slip Pocket (Lining Fabric): 1 rectangle, 12″ W x 10″ H.
- Heavyweight Fusible Interfacing: 2 rectangles, 18″ W x 19″ H (for main body panels).
Step-by-Step Tutorial: Multi-Pocket Tote Bag
1. Prepare Denim & Fuse Interfacing
- Deconstruct Jeans: Cut off jean legs, open inseams/outseams, and iron flat. Carefully seam rip off the two back pockets.
- Fuse Interfacing: Lay your Exterior Denim Main Body Panels (wrong side up). Center and fuse the corresponding interfacing pieces to them, following manufacturer’s instructions. Let cool.
2. Attach Exterior Jean Pockets
- Position the repurposed jean back pockets onto the right side of each Exterior Denim Main Body Panel. Center them horizontally, about 3-4 inches from the bottom raw edge.
- Topstitch each pocket in place along its two sides and bottom edge, close to the original stitching lines. Leave the top opening of the pocket open. Reinforce the top corners with a small triangle or X-box stitch for durability.
3. Prepare and Attach Interior Slip Pocket
- Take your 12″ x 10″ lining pocket piece. Fold one 12-inch edge down by 1/2″ and press, then again by another 1/2″ and press. Stitch this hem (pocket top).
- Fold the remaining three raw edges in by 1/2″ and press.
- Position this pocket onto the right side of one Lining Fabric Main Body Panel. Center it horizontally, about 4-5 inches down from the top raw edge.
- Topstitch the pocket to the lining along its two sides and bottom.
- Create Divisions: Decide on pocket widths (e.g., two 6-inch sections). Use chalk to draw vertical lines from the pocket’s top hem to its bottom stitching line. Stitch along these lines to create compartments. Backstitch at the beginning and end of each division.
4. Prepare and Attach Denim Handles
- Take one 4″ x 25″ Handle Piece. Fold in half lengthwise (wrong sides together) and press. Open. Fold each long raw edge into the center crease and press. Fold in half again along the original center crease. You’ll have a 1-inch wide strap with no raw edges. Press firmly.
- Topstitch down both long sides of the prepared handle, about 1/8″ from the edge. Repeat for the second handle.
- Lay an Exterior Denim Main Body Panel (right side up). Measure in 4-5 inches from each side edge along the top raw edge. Mark these points.
- Position the raw ends of a handle at these marks, pointing downwards into the bag. Clip securely.
- Stitch the handle ends in place using an X-box stitch (a square with an “X” inside it) for strong reinforcement. Stitch within the 1/2″ seam allowance. Repeat for the second exterior panel.

5. Sew Exterior and Lining Bag Bodies
- Exterior Bag: Place the two Exterior Denim Main Body Panels right sides together (handles tucked inside). Clip/pin along both side edges and the bottom. Stitch all three sides (pivot at corners). Press all seams open.
- Lining Bag: Place the two Lining Fabric Main Body Panels right sides together. Clip/pin along both side edges. For the bottom seam, stitch 3 inches from one side, then leave a 4-6 inch unstitched gap, then stitch the rest of the bottom seam. Backstitch well at the start and end of the gap. Stitch up the second side. Press all seams open.
6. Box the Corners
- At each of the four bottom corners (two exterior, two lining), bring the side seam and bottom seam together to form a triangle.
- Measure 2 inches (5 cm) inward from the point of the triangle along the seam line. Draw a straight line (4 inches long) perpendicular to the seam.
- Stitch precisely along this drawn line. Trim the excess corner fabric, leaving a 1/2″ seam allowance. Repeat for all four corners.
7. Final Assembly (Bag-in-a-Bag Method)
- Keep the exterior bag right side out and the lining bag wrong side out.
- Insert the exterior bag into the lining bag. The right sides of both bags should now be facing each other. Align side seams and top raw edges. Clip securely all around the top opening.
- Stitch all the way around the top opening, using a 1/2″ seam allowance. Go slowly over thick sections.
- Trim the top seam allowance down to 1/4″ to reduce bulk.
8. Turn Right Side Out & Finish!
- Reach through the opening in the lining’s bottom seam. Slowly and carefully pull the entire bag right side out. Gently push out all corners.
- Close the Lining Opening: Press the raw edges of the opening under by 1/2″ so they meet neatly. Stitch the opening closed by machine (close to the fold) or by hand with an invisible ladder stitch.
- Push the lining down into the exterior bag.
- Final Press & Topstitch: Press the entire top edge of the bag. Topstitch all around the entire top opening of the tote, about 1/8 inch from the edge. You can add a second row of topstitching about 1/2 inch down for extra detail and stability.
Idea 2: The Stylish Flap-Top Shoulder Bag
This design offers a more structured look with a securing flap and strategically placed pockets, making it great for daily errands or a casual outing.
Design Features:
- Size: Approx. 12″ W x 9″ H x 3″ D (30.5 cm W x 23 cm H x 7.6 cm D)
- Exterior: Clean denim panels, a prominent flap closure with a magnetic snap, and one repurposed jean front pocket.
- Interior: Full lining with a zipper pocket for valuables and a simple slip pocket.
- Bottom: Boxed corners for structure.
- Strap: Adjustable denim shoulder strap.
Materials You’ll Need:
- Old Jeans: 1 large pair of clean, ironed, sturdy non-stretch denim jeans (or two smaller pairs).
- Lining Fabric: 1 yard (0.9 meters) of medium-weight quilting cotton.
- Heavyweight Fusible Interfacing: 1 yard (0.9 meters).
- Medium-Weight Fusible Interfacing: 1/2 yard (0.45 meters) (for flap and strap).
- Thread: All-purpose polyester thread, topstitching thread.
- Hardware: 1 magnetic snap (1/2″ or 3/4″), 2 D-rings (1″ wide), 1 strap slider (1″ wide).
- Zipper: 1 (8-inch) zipper for interior pocket.
- Sewing Essentials: Same as above.
Cutting Instructions (with 1/2″ seam allowance):
- Exterior Denim Main Body: 2 rectangles, 13″ W x 10″ H.
- Exterior Denim Flap: 2 rectangles, 13″ W x 8″ H.
- Exterior Denim Strap: 1 rectangle, 4″ W x 50″ L (adjust for desired length; can be pieced).
- Lining Fabric Main Body: 2 rectangles, 13″ W x 10″ H.
- Interior Zipper Pocket (Lining Fabric): 2 rectangles, 9″ W x 7″ H.
- Interior Slip Pocket (Lining Fabric): 1 rectangle, 6″ W x 8″ H.
- Heavyweight Fusible Interfacing: 2 rectangles, 12″ W x 9″ H (for main body).
- Medium-Weight Fusible Interfacing: 2 rectangles, 12″ W x 7″ H (for flap).
- Denim Tabs for D-rings: 2 rectangles, 2″ W x 4″ L.
Step-by-Step Tutorial: Flap-Top Shoulder Bag
1. Prepare Denim & Fuse Interfacing
- Deconstruct Jeans: Open leg seams. Carefully seam rip off one back pocket.
- Fuse Interfacing:
- Heavyweight to Exterior Denim Main Body Panels (wrong side up).
- Medium-weight to one Exterior Denim Flap piece (wrong side up).
- Let cool.
2. Attach Exterior Jean Pocket
- Position the repurposed jean back pocket onto the right side of one Exterior Denim Main Body Panel. Center it horizontally, about 2-3 inches from the bottom raw edge.
- Topstitch the pocket in place along its two sides and bottom edge. Reinforce corners.
3. Prepare Interior Zipper Pocket
- On one Lining Fabric Main Body Panel (right side up), mark a rectangle for the zipper opening: 7″ long x 1/2″ wide, centered horizontally, about 3 inches down from the top raw edge.
- Place one Interior Zipper Pocket piece (right side down) over the marked rectangle. Stitch around the marked rectangle.
- Cut through both layers down the center of the stitched rectangle, snipping diagonally into the corners (be careful not to cut stitches!).
- Turn the pocket piece to the wrong side through the opening, press the opening neatly.
- Center your 8-inch zipper in the opening. Topstitch around the zipper to secure it.
- Place the second Interior Zipper Pocket piece (right side down) on top of the first, aligning all edges. Stitch around the three raw sides to enclose the zipper pocket.
4. Prepare Interior Slip Pocket
- Take your 6″ x 8″ lining pocket piece. Hem one 6-inch edge (top). Fold in the remaining three edges by 1/2″ and press.
- Position onto the right side of the other Lining Fabric Main Body Panel. Center horizontally, 4-5 inches from top.
- Topstitch pocket in place along sides and bottom. Reinforce corners.
5. Prepare and Attach D-Ring Tabs
- Take a 2″ x 4″ denim tab. Fold in half lengthwise (wrong sides together) and press. Fold raw edges to center and press. Fold in half again. Topstitch both long sides.
- Thread one D-ring onto the prepared tab. Fold the tab in half, so the D-ring is at the fold.
- Position the raw ends of the tab onto the top raw edge of each Exterior Denim Main Body Panel, about 1.5 inches in from the side edges. The D-ring should face inward. Stitch in place within the 1/2″ seam allowance. Repeat for both sides.
6. Sew Exterior and Lining Bag Bodies
- Exterior Bag: Place the two Exterior Denim Main Body Panels right sides together. Clip/pin along both side edges and the bottom. Stitch all three sides. Press all seams open.
- Lining Bag: Place the two Lining Fabric Main Body Panels right sides together. Clip/pin along both side edges. For the bottom seam, leave a 4-6 inch unstitched gap for turning. Stitch remaining sides. Press all seams open.
7. Box the Corners
- At each of the four bottom corners (two exterior, two lining), bring the side seam and bottom seam together to form a triangle.
- Measure 1.5 inches (3.8 cm) inward from the point of the triangle along the seam line (half of your 3-inch depth). Draw a straight line (3 inches long).
- Stitch along this line. Trim excess. Repeat for all four corners.

8. Assemble the Flap
- Place the two Exterior Denim Flap pieces right sides together (one has interfacing).
- Stitch around the two side edges and the bottom curved edge (or whatever shape you chose for your flap), leaving the top straight edge open.
- Clip curves, trim seam allowances. Turn flap right side out. Press firmly.
- Install Magnetic Snap: Follow manufacturer’s instructions to install one half of the magnetic snap onto the right side of the flap, about 1-1.5 inches up from the finished edge, centered.
- Topstitch around the flap’s stitched edges, about 1/8″ from the edge.
9. Prepare and Attach Adjustable Strap
- Take your 4″ x 50″ denim strap piece. Prepare it like the tote bag handles (fold in half, press, fold edges to center, press, fold in half, topstitch both long sides).
- Attach Slider & D-ring:
- Thread one end of the strap through the center bar of the strap slider. Fold the raw end over 1 inch and stitch down securely.
- Take the other end of the strap and thread it through one of the D-rings on the bag’s exterior side. Pull it through, then thread it back through the slider. This creates the adjustable mechanism.
- Thread the remaining raw end of the strap through the other D-ring on the bag’s exterior side. Fold the raw end over 1 inch and stitch down securely. (There are many tutorials for adjustable straps online if you need a visual!)
10. Attach Flap to Exterior Bag
- Place the exterior denim bag (right side out). Align the raw, open edge of the flap to the center back top raw edge of the exterior bag. The flap should be facing down towards the bottom of the bag.
- Clip securely. Stitch the flap in place within the 1/2″ seam allowance.
11. Final Bag Assembly (Bag-in-a-Bag)
- Keep the exterior bag right side out (with flap attached) and the lining bag wrong side out.
- Insert the exterior bag into the lining bag. The right sides of both bags should now be facing each other. Align side seams and top raw edges. Clip securely all around the top opening.
- Stitch all the way around the top opening, using a 1/2″ seam allowance.
- Trim the top seam allowance down to 1/4″.
12. Turn Right Side Out & Finish!
- Reach through the opening in the lining’s bottom seam. Slowly and carefully pull the entire bag right side out. Push out corners and seams.
- Close Lining Opening: Press raw edges under 1/2″. Stitch closed by machine or hand.
- Push lining into exterior bag.
- Final Press & Topstitch: Press the entire top edge of the bag. Topstitch all around the entire top opening, about 1/8 inch from the edge. This secures the lining and gives a crisp finish.
- Install Second Magnetic Snap Half: Position the bag flap over the front of the bag to determine the precise placement for the second half of the magnetic snap. Install it onto the exterior front panel of the bag, ensuring it aligns perfectly with the snap on the flap.
Remember, these are detailed guides. Take your time, enjoy the process, and don’t be afraid to add your own personal touches, like decorative patches, embroidery, or different types of hardware. Your DIY denim bag will be a unique statement piece!


