

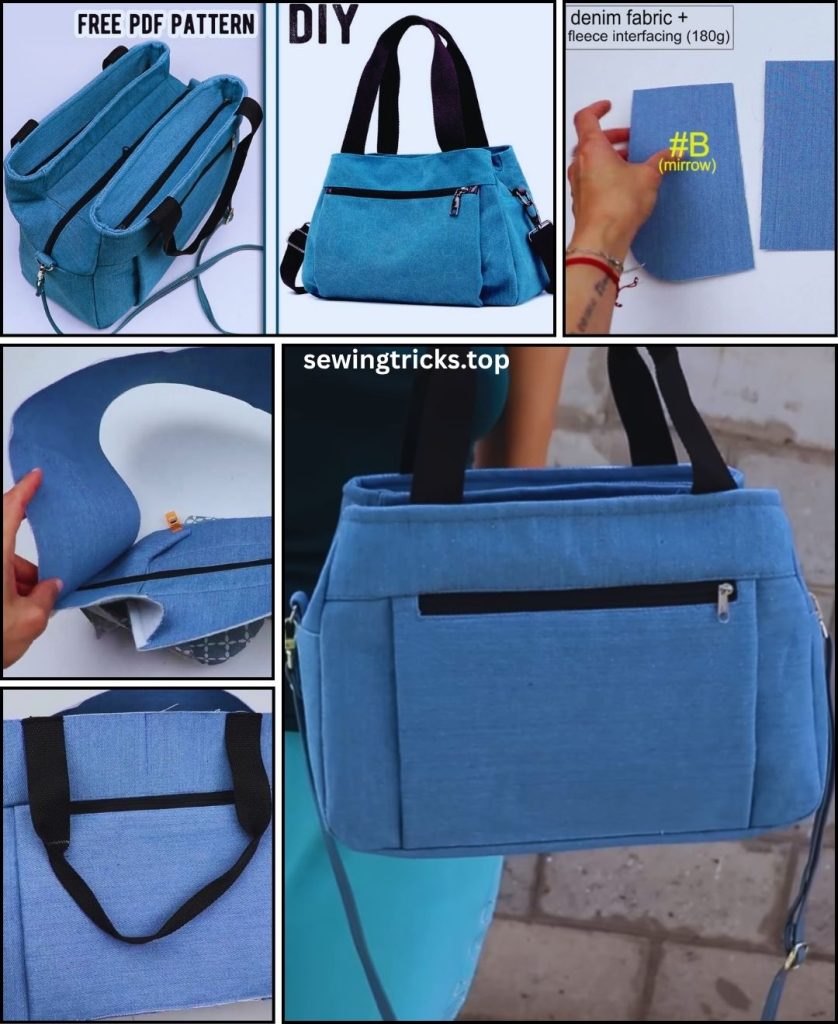
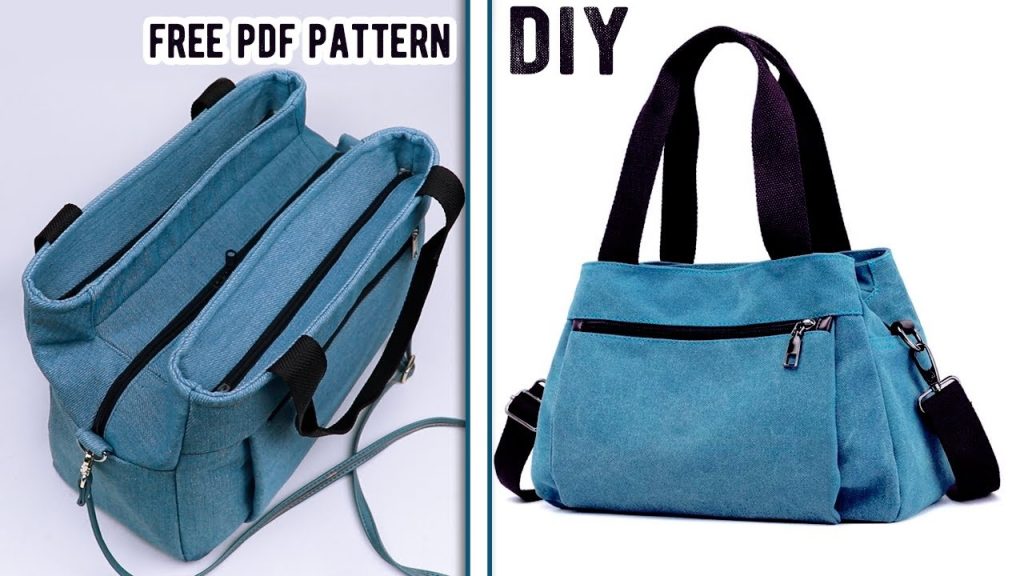
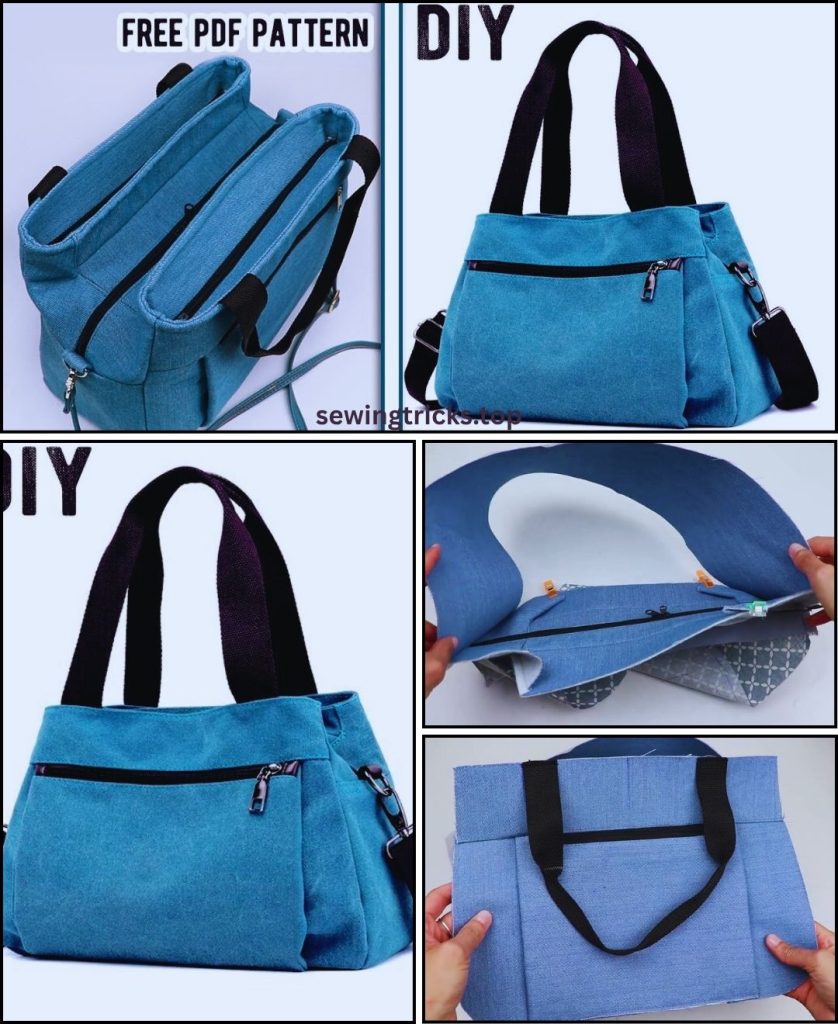
A “DIY Denim Triple Bag” often refers to a bag with three main compartments, or sometimes a single bag with a distinctive three-pocket design on the exterior, often utilizing the existing pockets of the jeans. The most popular design for a “triple bag” using denim is typically a multi-compartment pouch or cross-body bag.
This tutorial will focus on how to sew a DIY Denim Triple Pouch Bag, a popular and highly functional design featuring three zippered compartments. This design is excellent for organizing essentials like money, cards, keys, and cosmetics. It’s a fantastic way to upcycle old jeans, transforming them into a super useful accessory.
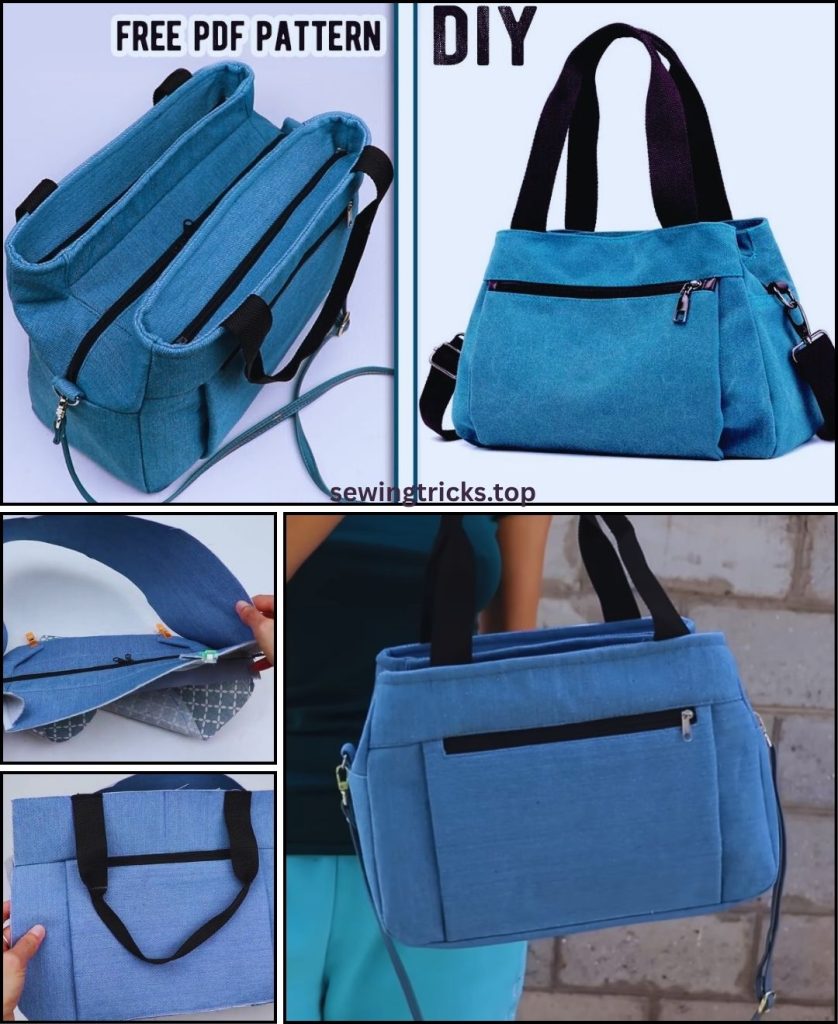
How to Sew a DIY Denim Triple Pouch Bag
This project is suitable for intermediate sewers due to the zipper installation, but detailed instructions will guide you through each step.
I. Understanding the Design
A “triple pouch” usually consists of:
- A central main zippered compartment.
- Two additional zippered compartments, one on the front and one on the back, often attached to the main compartment. This creates a slim yet highly organized bag.
II. Planning & Gathering Your Materials
Careful preparation of your materials is crucial for a smooth sewing process and a well-finished bag.
- Old Jeans:
- Quantity: 1-2 pairs of adult-sized jeans (depending on the size of your bag and the condition of the jeans). Look for sections of denim without excessive rips or distressing.
- Preparation: Wash and thoroughly dry your jeans before cutting. Deconstruct them by cutting off the legs and unpicking the inseams and outer seams to get the largest possible flat pieces of denim. Press them flat.
- Lining Fabric:
- Type: Quilting cotton or other durable woven cotton fabric. You can use contrasting colors or patterns for a fun pop.
- Quantity: About 1/2 yard (0.45 meters).
- Zippers:
- Quantity: 3 zippers.
- Length: Each zipper should be at least 1 inch (2.5 cm) longer than the width of your main bag panels. For example, if your bag panels are 10 inches wide, use 11-12 inch zippers. Nylon coil zippers are easiest to work with.
- Interfacing (Recommended for structure):
- Type: Medium-weight fusible interfacing. This will give your denim and lining more stability and a professional feel.
- Quantity: About 1/2 yard (0.45 meters).
- Matching Thread: All-purpose polyester thread. Consider a slightly stronger thread for denim if your machine handles it well.
- Basic Sewing Tools:
- Sewing machine (a denim needle or heavy-duty needle, size 14 or 16, is recommended).
- Zipper foot: Essential for sewing close to zipper teeth.
- Sharp Fabric Scissors or Rotary Cutter and Mat.
- Measuring Tape or Long Ruler.
- Fabric Chalk, Frixion Pen, or Mark-B-Gone Pen.
- Plenty of Pins or Fabric Clips (clips are great for thick denim).
- Iron and Ironing Board.
- Seam Ripper.
III. Cutting Your Fabric Pieces
For this tutorial, let’s aim for a finished bag size of approximately 10 inches (25 cm) wide x 7 inches (18 cm) tall. We’ll use a 3/8 inch (1 cm) seam allowance unless otherwise specified.
From your Denim (Exterior Fabric):
- Main Exterior Panels: Cut 2 rectangles, 10.75 inches wide x 7.75 inches tall (27.3 cm W x 19.7 cm H). (This includes seam allowance.)
- Zipper Panel Connectors (or Accent Strips): Cut 4 rectangles, 10.75 inches wide x 2 inches tall (27.3 cm W x 5 cm H).
From your Lining Fabric:
- Main Lining Panels: Cut 2 rectangles, 10.75 inches wide x 7.75 inches tall (27.3 cm W x 19.7 cm H).
- Zipper Pocket Lining Panels: Cut 4 rectangles, 10.75 inches wide x 7.75 inches tall (27.3 cm W x 19.7 cm H).
From your Interfacing:
- Cut 2 pieces for the Main Exterior Panels, slightly smaller than the fabric (e.g., 10.25″ W x 7.25″ H).
- Cut 4 pieces for the Zipper Panel Connectors, slightly smaller than the fabric (e.g., 10.25″ W x 1.5″ H).
- Cut 4 pieces for the Zipper Pocket Lining Panels, slightly smaller than the fabric (e.g., 10.25″ W x 7.25″ H).
Prepare Interfacing:
- Fuse the interfacing to the wrong side of all the corresponding denim and lining pieces according to the manufacturer’s instructions. This will give your bag structure.
IV. Step-by-Step Sewing Instructions
Remember to press your seams after each step for a professional finish. Use your zipper foot when sewing zippers.
Step 1: Prepare the Zipper Panel Connectors
- Take two of your denim zipper panel connectors (10.75″ x 2″).
- Place them right sides together, matching the short ends. Stitch these ends together to form a loop. Repeat for the other two denim zipper panel connectors. You now have two denim “rings.” Press seams open.
- (Alternative: You can keep these as separate strips if you prefer, and simply sew them to the zipper directly, then join the ends later. The loop method can simplify alignment).
Step 2: Install Zippers for the Front and Back Pockets (Outer Zippers)
You’ll be attaching zippers to the denim zipper panel connectors and the zipper pocket lining panels. You’ll do this process twice (once for the front pocket, once for the back pocket).
Let’s do the first outer zipper:
- Take one denim zipper panel connector loop (or strip). Lay it flat, right side up.
- Take one of your zippers. Lay the zipper right side down on top of one long edge of the denim connector, aligning the raw edges.
- Take one zipper pocket lining panel (10.75″ x 7.75″). Place it right side down on top of the zipper, aligning all three raw edges (denim, zipper, lining).
- Pin all three layers together.
- Using your zipper foot, stitch along this pinned edge, as close to the zipper teeth as possible.
- Open out the fabric so the denim and lining are wrong sides together, with the zipper visible between them. Press well.
- Topstitch: On the right side, topstitch close to the seam line, on the denim side. This secures the fabric away from the zipper teeth.
Now, attach the other side of this zipper: 8. Take the other long raw edge of the same denim zipper panel connector. 9. Lay the already attached zipper/denim/lining unit, so the denim zipper panel connector is right side up. 10. Place the other side of the zipper (right side down) on top of the raw edge of the denim connector, aligning raw edges. 11. Take another zipper pocket lining panel (10.75″ x 7.75″). Place it right side down on top of the zipper, aligning raw edges. 12. Pin and stitch. Open out the fabric, press, and topstitch on the denim side.
You now have a “tube” of denim and lining with a zipper in the middle. This is one of your outer pocket units. Repeat this entire Step 2 to create your second outer pocket unit using the remaining denim zipper panel connector loop, zipper, and two zipper pocket lining panels.
Step 3: Install the Center Zipper (Main Compartment Zipper)
This zipper will connect your two main exterior panels.
- Take one Main Exterior Panel (10.75″ x 7.75″). Lay it right side up.
- Take your third zipper. Lay the zipper right side down on top of one 10.75-inch edge of the exterior panel, aligning raw edges.
- Take one Main Lining Panel (10.75″ x 7.75″). Place it right side down on top of the zipper, aligning all three raw edges.
- Pin and stitch with your zipper foot. Open out, press, and topstitch on the denim side.
Now, attach the other side of this zipper to the other main exterior panel: 5. Take the second Main Exterior Panel (right side up). 6. Lay the already attached zipper/denim/lining unit so the zipper is right side up. 7. Place the second Main Exterior Panel (right side down) on top of the zipper, aligning the remaining raw edge of the zipper with the 10.75-inch edge of this second exterior panel. 8. Take the second Main Lining Panel (right side down). Place it on top of the exterior panel, aligning all raw edges. 9. Pin and stitch. Open out, press, and topstitch on the denim side.
You now have a “tube” consisting of the two main exterior panels connected by a zipper, with the two main lining panels on the other side.
Step 4: Attach the Outer Pocket Units to the Main Bag
This is where the “triple” design comes together.
- Lay your main bag unit flat, denim side up. The main zipper should be in the middle.
- Take one of your outer pocket units (the “tube” you made in Step 2). Make sure the denim side is facing up.
- Carefully align one long edge of the denim portion of the outer pocket unit with one of the denim main exterior panels. The zippers should run parallel. Pin the long edges together, right sides facing.
- Visualize: You’re essentially sewing the denim part of the pocket unit to the main denim panel of the bag. The lining of the pocket unit will remain free for now.
- Stitch this seam. Press the seam open or towards the main bag panel.
- Repeat this for the second outer pocket unit, attaching it to the other main exterior panel.
At this point, if you look at the inside of your bag, you’ll see a complex arrangement of denim and lining layers. Don’t worry, it will make sense!
Step 5: Finish the Outer Pockets (Sides and Bottom)
Now you’ll turn your outer pocket units into actual pockets.
- Turn the entire bag inside out.
- For one of the outer pockets, bring the two lining pieces of that pocket together, right sides facing. Align their side and bottom edges.
- Stitch down the two side seams and across the bottom seam of that pocket lining. Trim corners.
- Repeat for the other outer pocket lining.
- Crucial: Make sure you do not accidentally stitch through the main lining of the bag or any other part. Only stitch the two lining pieces of that specific pocket together.
Step 6: Close the Sides and Bottom of the Main Bag
This step forms the overall shape of your bag.
- With the bag still inside out, bring the two main denim exterior panels right sides together, aligning their side and bottom edges. Pin them together.
- Separate the main lining panels: The lining panels for the main compartment are still open at the sides and bottom. Bring these two main lining panels right sides together, aligning their side and bottom edges.
- Important: For the lining bottom seam, leave a 4-5 inch (10-12.7 cm) opening in the middle. This is for turning the bag right side out later. Backstitch securely at the beginning and end of this opening.
- Stitch the side seams of the main denim bag and the side and bottom seams of the main lining. Ensure you are stitching only through the relevant layers for each compartment, not accidentally catching other parts of the bag.
- Trim corners and excess fabric from seams.
Step 7: Box the Corners (Optional, but Recommended for a Roomy Bag)
This will give your bag a flat bottom.
- At each of the four bottom corners of your bag (two denim, two lining), pinch the corner so the side seam aligns with the bottom seam, forming a triangle.
- Measure from the tip of the triangle a desired distance (e.g., 3 inches / 7.6 cm for a 6-inch deep bag) and draw a line perpendicular to the seam.
- Stitch along this line. Trim the excess fabric triangle, leaving a 3/8-inch (1 cm) seam allowance.
- Repeat for all four corners.
Step 8: Turn Right Side Out & Finish
- Make sure all three zippers are at least partially unzipped. This is vital for turning the bag.
- Reach into the opening you left in the bottom seam of the main lining (from Step 6).
- Carefully pull the entire bag through this opening until it is completely right side out. This may take some gentle maneuvering.
- Push out all the corners and seams with a point turner or a blunt object to make them crisp and well-defined.
- Close the Lining Opening: Press the raw edges of the opening in the bottom of the main lining under by 3/8 inch (1 cm) so they meet neatly. Stitch this opening closed by machine (sewing very close to the folded edge for a neat finish) or by hand using an invisible ladder stitch for a truly seamless look.
- Push the lining fully into the main bag, ensuring all compartments are properly formed.
- Give your finished bag a good final press, paying attention to the zippers to ensure they lie flat.
Tips for Success:
- Go Slow with Zippers: Take your time when installing zippers. Pin carefully and use your zipper foot.
- Clip & Press: Clip threads as you go. Pressing after each seam is crucial for crisp, professional results, especially with multiple layers.
- Reinforce: Backstitch at the beginning and end of every seam. For added strength, especially on the side seams and where zippers attach, you can sew seams twice.
- Test Your Machine: If you’re new to sewing denim, test stitches on a scrap piece of denim first to ensure your machine’s tension is correct and the needle is strong enough.
You now have a functional and stylish DIY Denim Triple Pouch Bag! It’s perfect for keeping your essentials organized whether you’re heading to the beach, running errands, or simply keeping things tidy in a larger tote. Enjoy your new creation!


