
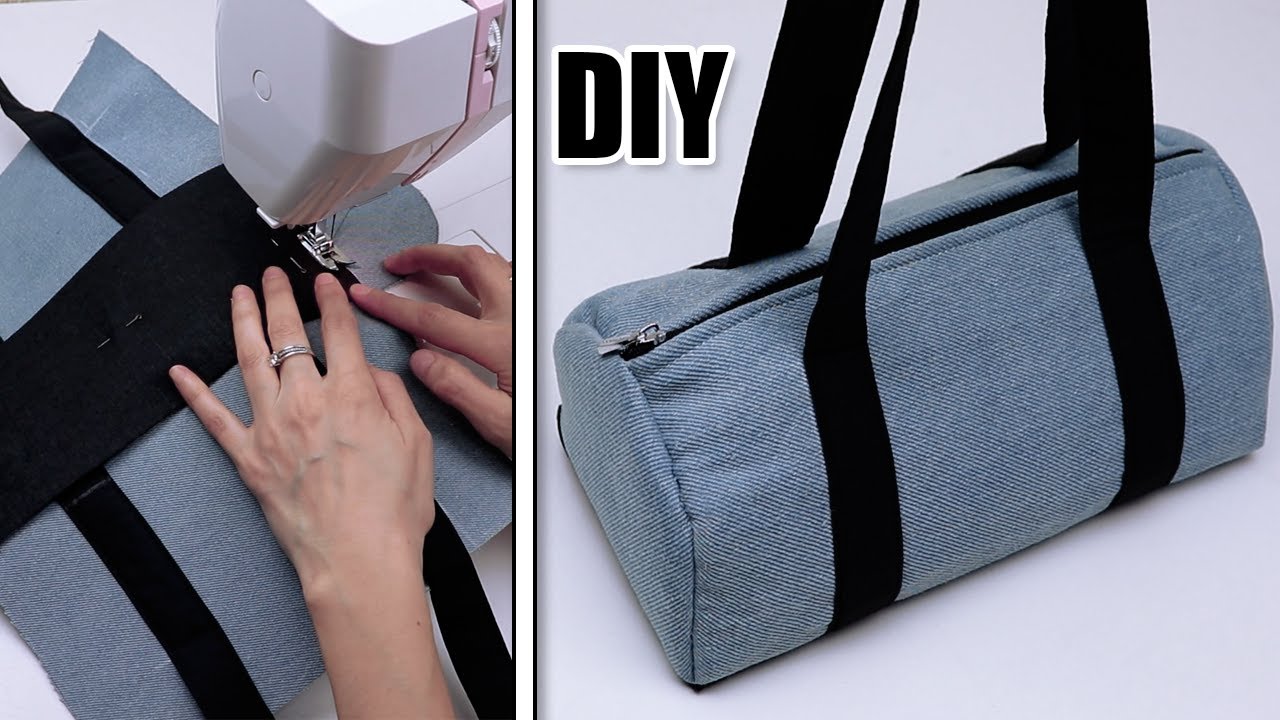
A DIY travel bag is a fantastic project that combines practicality with personal style. Whether you need a weekend getaway bag, a spacious carry-on, or an overnight tote, sewing your own allows for complete customization of size, fabric, and features.
This detailed tutorial will guide you through creating a sturdy and versatile duffle-style travel bag with a zippered top closure, exterior pockets, and comfortable handles. We’ll aim for a finished size of approximately 18 inches (45 cm) long, 10 inches (25 cm) tall, and 9 inches (23 cm) deep, a good general-purpose travel size.
How to Sew a DIY Travel Bag: Step-by-Step Tutorial
I. Planning Your Travel Bag
Careful planning is crucial for a successful bag project, especially one with multiple components like a travel bag.
- Fabric Choices:
- Exterior Fabric: Choose a durable, medium-to-heavy weight fabric.
- Excellent Choices: Canvas, duck cloth, denim, home decor fabric, outdoor fabric, or even upcycled sturdy curtains or old jeans (if pieced together).
- Quantity: Approximately 1.5 – 2 yards (1.4 – 1.8 meters) depending on print direction and bag size.
- Lining Fabric: A sturdy but lighter-weight fabric for the interior.
- Excellent Choices: Quilting cotton, broadcloth, ripstop nylon (for water resistance), or a contrasting canvas.
- Quantity: Approximately 1.5 – 2 yards (1.4 – 1.8 meters).
- Exterior Fabric: Choose a durable, medium-to-heavy weight fabric.
- Interfacing (Highly Recommended for Structure):
- Type: Medium to heavy-weight fusible interfacing (e.g., Pellon SF101 Shape-Flex for softer bags, or Pellon 809 Decor Bond for stiffer bags). This will give your bag body and help it hold its shape.
- Quantity: Approximately 2 yards (1.8 meters).
- Zipper:
- Type: A sturdy, nylon coil zipper is generally easier to sew and more durable for bags than a metal one.
- Length: At least 20 inches (51 cm) for the main top opening. Longer is fine, you’ll trim it.
- Webbing for Handles:
- Type: Cotton or polypropylene webbing, 1.5 inches (3.8 cm) wide.
- Quantity: Approximately 2 yards (1.8 meters) total (two 36-inch / 91 cm pieces).
- Optional Hardware: D-rings, swivel clips (if adding a detachable shoulder strap), strap adjusters.
- Matching Thread: All-purpose polyester thread. Consider heavy-duty thread for thicker fabrics or a topstitching thread for decorative seams.
- Basic Sewing Tools:
- Sewing machine (with a heavy-duty needle like size 16 or 18, and a zipper foot). A walking foot is highly recommended for sewing through multiple thick layers.
- Sharp Fabric Scissors or Rotary Cutter and Mat.
- Measuring Tape or Long Ruler.
- Fabric Chalk, Frixion Pen, or Mark-B-Gone Pen.
- Plenty of Pins or Fabric Clips (clips are excellent for bulky fabrics).
- Iron and Ironing Board.
- Seam Ripper (your essential companion!).
II. Cutting Your Fabric Pieces
Accuracy in cutting is crucial for a well-shaped bag. We’ll use a consistent 1/2-inch (1.27 cm) seam allowance throughout, unless otherwise specified.
From your Exterior Fabric:
- Main Body Panel: 1 piece, 27 inches (68.5 cm) long x 20 inches (51 cm) tall.
- End Panels: 2 pieces, 10 inches (25 cm) wide x 10 inches (25 cm) tall.
- Exterior Pocket Panel: 1 piece, 27 inches (68.5 cm) long x 9 inches (23 cm) tall.
From your Lining Fabric:
- Main Body Lining Panel: 1 piece, 27 inches (68.5 cm) long x 20 inches (51 cm) tall.
- End Lining Panels: 2 pieces, 10 inches (25 cm) wide x 10 inches (25 cm) tall.
- Interior Pocket Panel (Optional): 1 piece, 10 inches (25 cm) long x 16 inches (40 cm) tall.
From your Interfacing:
- Main Body Panel: 1 piece, 26 inches (66 cm) long x 19 inches (48 cm) tall.
- End Panels: 2 pieces, 9 inches (23 cm) wide x 9 inches (23 cm) tall.
- Exterior Pocket Panel: 1 piece, 26 inches (66 cm) long x 8 inches (20 cm) tall.
- Interior Pocket Panel (Optional): 1 piece, 9 inches (23 cm) long x 15 inches (38 cm) tall.
Prepare Interfacing:
- Fuse the interfacing to the wrong side of all the corresponding exterior fabric pieces and the interior pocket piece, following the manufacturer’s instructions. Center the interfacing so there’s about a 1/2-inch border of fabric exposed on all sides for the seam allowance. This adds stiffness and body.
III. Step-by-Step Sewing Instructions
Remember to press your seams after each step for a professional finish. Use your zipper foot for zippers and your walking foot for thick layers if you have one.
Step 1: Prepare the Exterior Pocket
- Take your Exterior Pocket Panel (27″ x 9″). Fold it in half lengthwise, wrong sides together, so it measures 27″ x 4.5″. Press the fold.
- Open it up. Along one of the long raw edges, fold the fabric down towards the wrong side by 1/2 inch (1.27 cm) and press. Fold it down again by another 1/2 inch and press. Stitch this hem in place, close to the inner fold. This is the top edge of your pocket.
- Place this pocket panel on top of the Main Body Exterior Panel (27″ x 20″), aligning the bottom raw edges of both pieces. Center it horizontally. Pin in place.
- Optional: Create multiple pockets: To create individual pockets, draw vertical lines with fabric chalk from the top hemmed edge to the bottom raw edge, dividing the pocket into sections (e.g., two lines for three pockets). Stitch along these lines, backstitching well at the top. This secures the pocket to the main body and creates compartments.

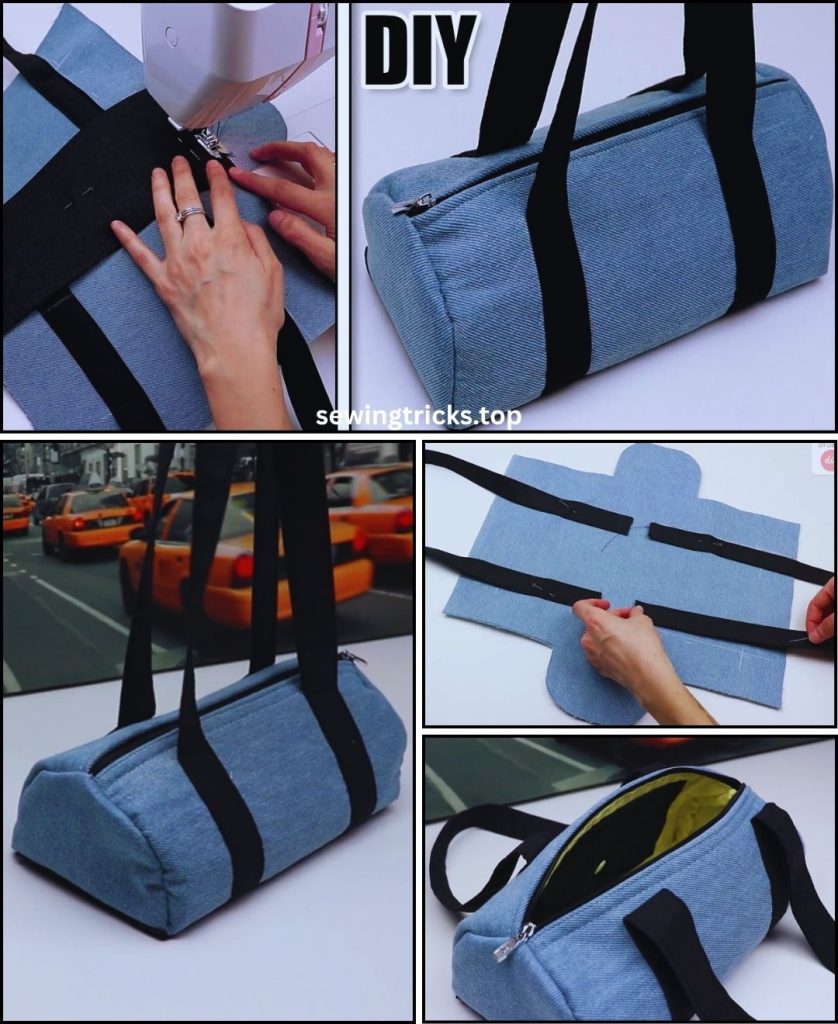
Step 2: Attach Handles to Exterior Body
- Lay your Main Body Exterior Panel (with pocket attached) right side up.
- Measure 5 inches (12.7 cm) in from each of the 20-inch side edges, along the top and bottom raw edges of the panel. Mark these points.
- Place the raw ends of one handle onto these marks on one side, aligning the raw edges of the handle with the raw edge of the panel. The handle loop should face inwards, towards the center of the panel. Pin securely.
- Stitch the handles in place with a strong reinforcing stitch (e.g., stitch a square with an “X” inside it) within the 1/2-inch (1.27 cm) seam allowance. This is crucial for handle strength.
- Repeat for the second handle on the opposite side of the Main Body Exterior Panel.
Step 3: Install the Main Zipper
- Lay the Main Body Exterior Panel (with pockets and handles) right side up.
- Place the zipper right side down along one of the 27-inch top edges of the panel, aligning the raw edge of the zipper tape with the raw edge of the fabric. The zipper pull should be facing inwards (towards the pocket). Center the zipper horizontally. Pin in place.
- Take the Main Body Lining Panel (27″ x 20″). Place it right side down on top of the zipper/exterior fabric sandwich, aligning all three raw edges (exterior fabric, zipper, lining fabric).
- Pin all three layers together.
- Using your zipper foot, stitch along this pinned edge, as close to the zipper teeth as possible. Backstitch at the beginning and end.
- Open out the fabric so the exterior and lining are wrong sides together, with the zipper visible between them. Press well.
- Topstitch: On the right side of the exterior fabric, topstitch close to the seam line, just above the zipper. This secures the fabric away from the zipper teeth and gives a neat finish.
- Repeat this process for the other side of the zipper, attaching it to the remaining 27-inch raw edges of the Main Body Exterior Panel and Main Body Lining Panel.
- Lay out the partially assembled bag. Bring the remaining raw edge of the exterior panel to the other side of the zipper. Place the remaining raw edge of the lining panel to the other side of the zipper. Pin, stitch, open, press, and topstitch.
You should now have a complete “tube” with the zipper running down the center. Crucially, open the zipper halfway at this point! This is essential for turning the bag right side out later.
Step 4: Assemble the End Panels
- For each of your Exterior End Panels (10″ x 10″), and each of your Lining End Panels (10″ x 10″), create an optional boxed corner.
- At one bottom corner, pinch the fabric so the raw side edge aligns with the raw bottom edge, forming a triangle.
- Measure from the point of the triangle inward along the seam line a distance equal to half of your desired bag depth (e.g., for a 9-inch deep bag, you’ll measure 4.5 inches / 11.4 cm).
- Draw a straight line across this measurement. Stitch along this line. Trim the excess fabric triangle, leaving a 1/2-inch seam allowance.
- Repeat for the other bottom corner of each end panel.
Step 5: Attach End Panels to Main Body (Exterior Bag)
- Turn the Main Body Exterior Panel tube inside out.
- Take one Exterior End Panel. Align one of its edges with one of the 20-inch raw ends of the Main Body Exterior Panel. The handles should be tucked inside the bag.
- Match the center of the End Panel’s top edge with the zipper seam.
- Match the center of the End Panel’s bottom edge with the center bottom seam of the Main Body Exterior Panel.
- Pin the End Panel all around the opening of the Main Body Exterior Panel. This is a crucial step that requires careful pinning, especially around the curves of the boxed corners.
- Stitch all the way around this connection, using a 1/2-inch (1.27 cm) seam allowance. Go slowly around the curves. Reinforce the stitches, especially where handles are attached.
- Repeat for the other Exterior End Panel on the other side of the Main Body Exterior Panel.

Step 6: Assemble the Lining Bag
- Optional Interior Pocket: If you’re adding an interior pocket, take your Interior Pocket Panel (10″ x 16″).
- Fold it in half (10″ x 8″). Hem the top raw edge as you did for the exterior pocket (1/2″ double fold hem).
- Place this pocket onto the Lining Main Body Panel, centering it horizontally about 4 inches (10 cm) down from what will be the top edge. Stitch around the sides and bottom of the pocket, reinforcing at the top corners. You can add vertical stitching to create compartments.
- Take your Lining Main Body Panel (with optional pocket) and your two Lining End Panels.
- Crucial: On one of the Lining End Panels, or along the bottom of the Lining Main Body Panel, mark a 4-5 inch (10-12.7 cm) turning opening. You will leave this unstitched in the next step.
- Stitch the Lining End Panels to the Lining Main Body Panel using the same method as in Step 5 for the exterior bag. Be sure to leave the turning opening unstitched, backstitching securely at the beginning and end of the opening.
Step 7: Combine Exterior and Lining
- Keep the exterior bag turned right side out.
- Keep the lining bag turned inside out.
- Carefully insert the exterior bag into the lining bag, so that the right sides of both bags are facing each other.
- Align the top raw edge of the exterior bag (where the zipper is) with the top raw edge of the lining bag. Make sure the side seams of the exterior match up with the side seams of the lining. The handles of the exterior bag should be tucked down between the exterior and lining layers.
- Pin securely all around the top raw edge (where the zipper tape meets the fabric, but do not sew into the zipper teeth).
Step 8: Sew Top Edge and Finish
- Stitch all the way around the top edge of the bag, using a 1/2-inch (1.27 cm) seam allowance. Backstitch at the beginning and end.
- Clip curves/trim bulk: Clip into the seam allowance around the end panel curves (without cutting stitches) to help the seam lie flat when turned. Trim any excess bulk from the seam allowance, especially where the handles are attached.
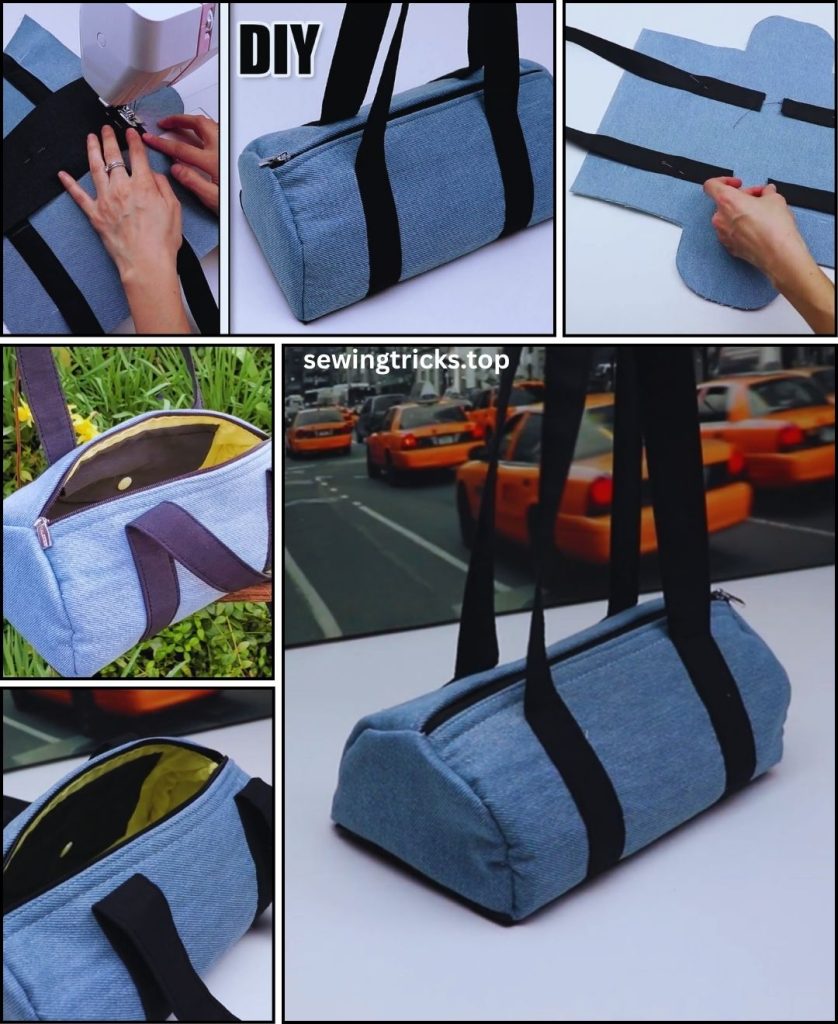
Step 9: Turn Bag Right Side Out & Close Opening
- Reach into the opening you left in the bottom seam of the lining (from Step 6).
- Slowly and carefully pull the entire bag (exterior, lining, handles – everything!) through this opening until it is completely right side out. This can be a tight squeeze, so be patient.
- Gently push out all the corners and seams with a point turner or a blunt object (like a chopstick) to make them crisp and well-defined.
- Close the Lining Opening: Go to your ironing board. Press the raw edges of the opening in the bottom of the lining under by 1/2 inch (1.27 cm) so they meet neatly. Align these pressed edges and pin or clip them together. Stitch this opening closed by machine (sewing very close to the folded edge for a neat finish) or by hand using an invisible ladder stitch for a truly seamless look.
- Finally, push the lining down into the main bag, ensuring it sits smoothly inside and the corners align perfectly.
- Give your finished bag a good final press to remove any wrinkles and make it look crisp.
Congratulations! You’ve successfully sewn a durable and stylish DIY Travel Bag! It’s ready for your next adventure, carrying your essentials in custom-made style.


