
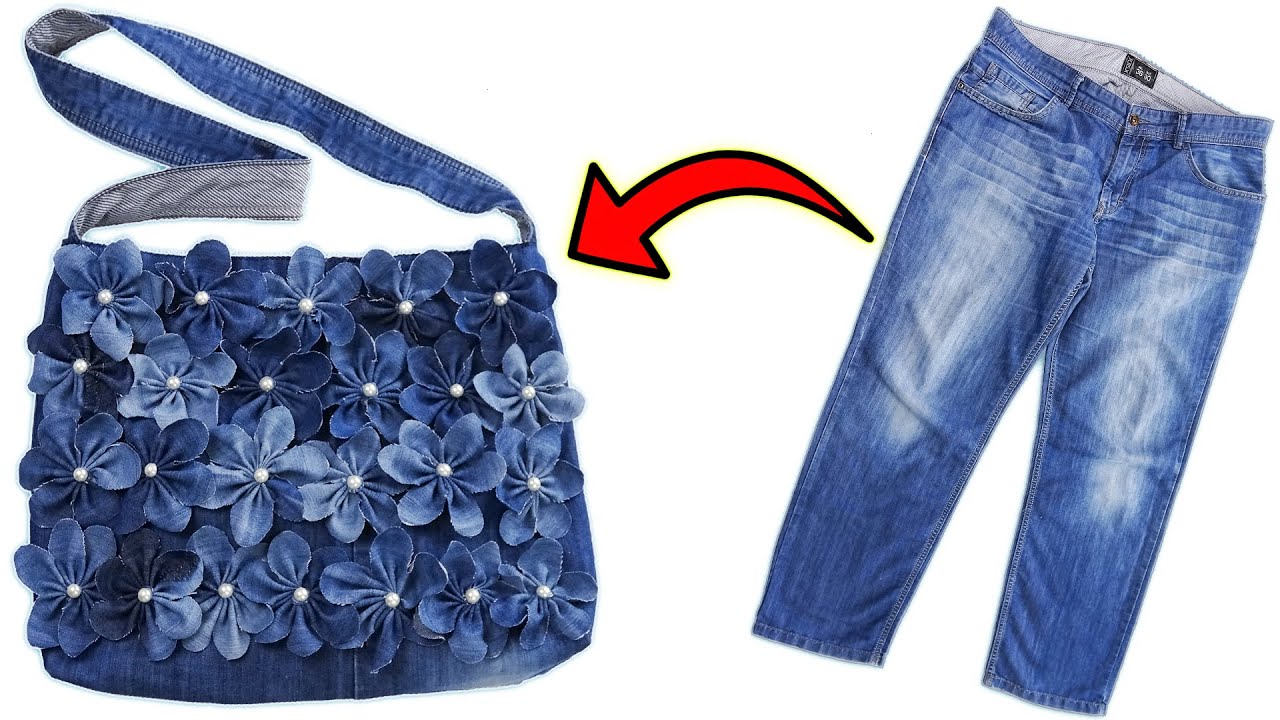
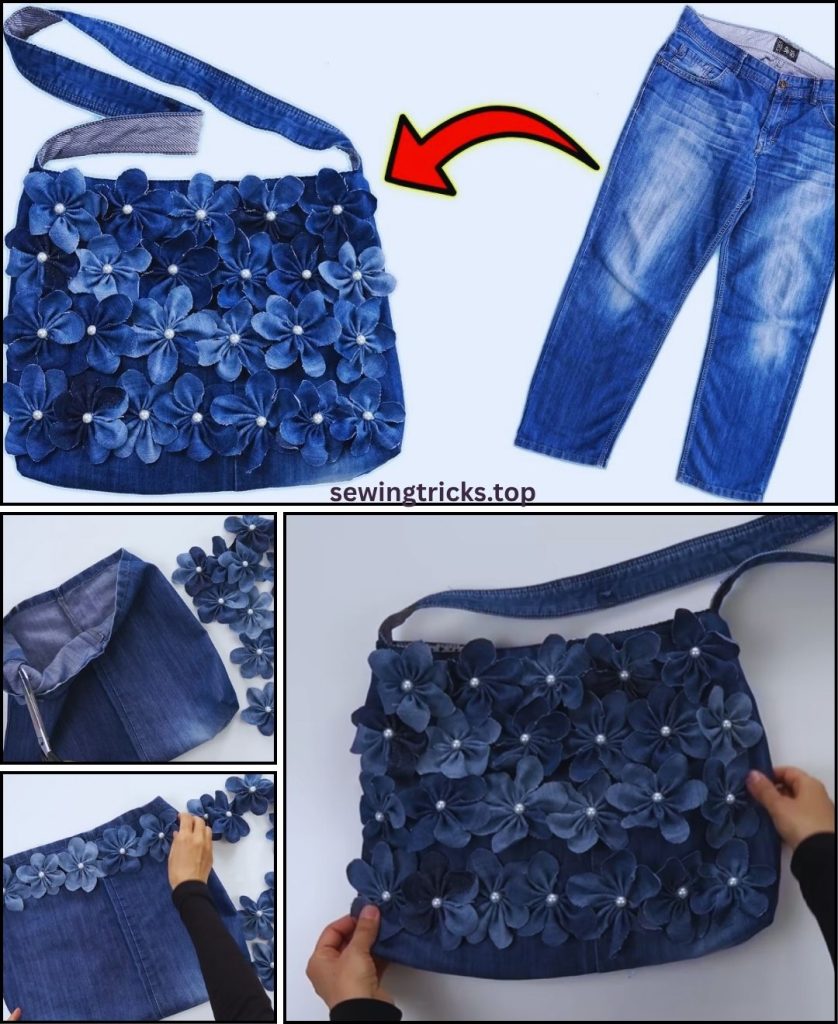
Creating a denim tote bag with a flower embellishment from old jeans is a delightful way to blend practical upcycling with artistic expression! The flower adds a touch of charm and personality to a classic, sturdy denim tote. This project is great for showcasing different denim washes and textures from your old jeans.
This tutorial will guide you through making a classic tote bag with a flat bottom and a prominent denim flower appliqué. We’ll aim for a finished bag size of approximately 14 inches (35 cm) wide, 12 inches (30 cm) tall, and 4 inches (10 cm) deep.
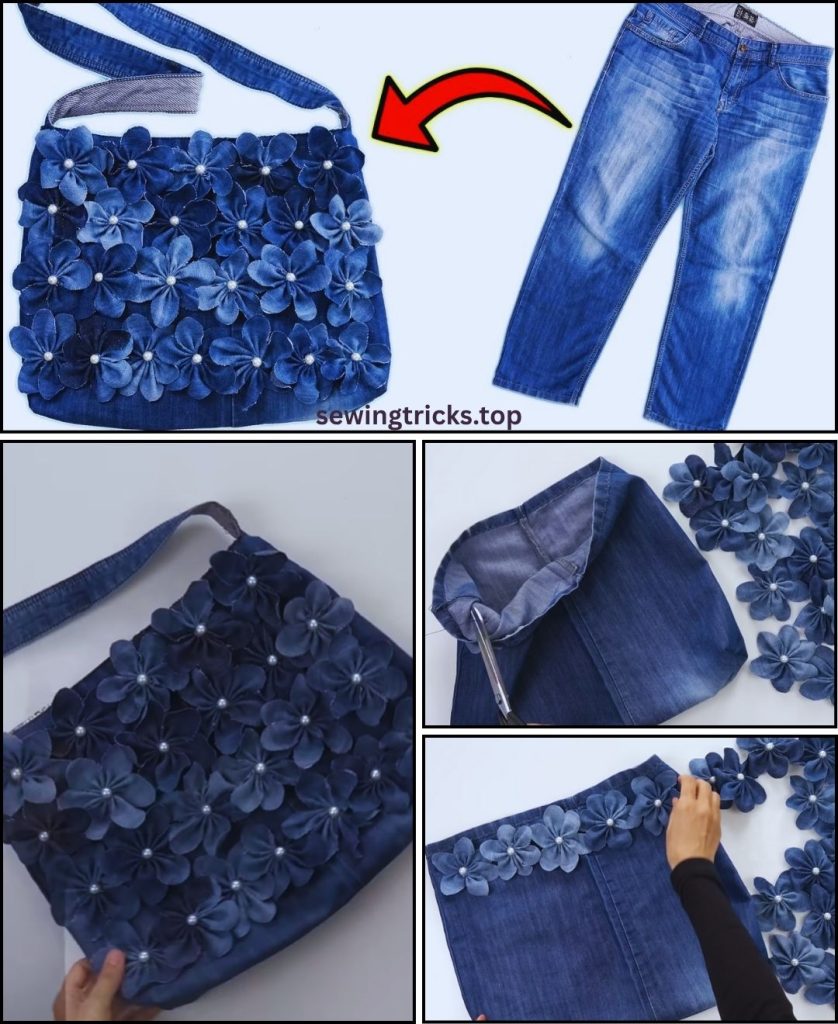
How to Sew a Denim Tote Bag with a Flower Embellishment from Old Jeans
This project is suitable for intermediate sewers due to the appliqué work and potential for thicker denim layers. However, the steps are detailed to guide you through successfully.
I. Planning & Gathering Your Materials
Careful planning ensures a smooth process and a beautiful finished bag.
- Old Jeans/Denim Scraps:
- Quantity: 1-2 pairs of adult-sized jeans (depending on the size of your bag and the consistency of denim you desire). You’ll need larger flat pieces for the main bag body and smaller scraps for the flower petals and center. Different washes (light, dark, faded) can add depth to your flower!
- Type: Sturdy, non-stretch or low-stretch denim works best.
- Preparation: Wash and thoroughly dry your jeans before cutting. This prevents shrinkage later and makes them easier to work with. Deconstruct them by unpicking seams to get the largest possible flat pieces.
- Lining Fabric:
- Type: A durable woven cotton, like quilting cotton, broadcloth, or even an old cotton sheet. A contrasting color or playful pattern can add a fun pop.
- Quantity: Approximately 1 yard (0.9 meters).
- Preparation: Wash and iron.
- Interfacing (Recommended for Structure):
- Type: Medium-weight fusible interfacing (e.g., Pellon SF101 Shape-Flex). This will give your denim and lining more stability and help the bag hold its shape.
- Quantity: Approximately 1 yard (0.9 meters).
- Webbing for Handles:
- Type: Cotton or polypropylene webbing, 1 inch (2.5 cm) wide.
- Quantity: Approximately 1.5 yards (1.4 meters) total (two 26-inch / 66 cm pieces).
- Matching Thread: All-purpose polyester thread. A stronger, heavy-duty thread (like topstitching thread) is highly recommended for sewing through multiple layers of denim and for topstitching. Use a thread color for the flower that stands out or blends, depending on your desired effect.
- Optional – Fusible Webbing (for Flower Appliqué):
- Type: Wonder-Under, Heat’n Bond Lite, or similar. This helps hold the denim flower pieces in place before stitching.
- Quantity: Small scrap.
- Basic Sewing Tools:
- Sewing machine (a denim needle or heavy-duty needle, size 16 or 18, is essential).
- Walking foot (optional but highly recommended): This attachment helps feed multiple thick layers of fabric evenly.
- Sharp Fabric Scissors or Rotary Cutter and Mat.
- Measuring Tape or Long Ruler.
- Fabric Chalk, Frixion Pen, or Mark-B-Gone Pen.
- Plenty of Pins or Fabric Clips (clips are invaluable for holding thick denim!).
- Iron and Ironing Board.
- Seam Ripper (your essential companion!).
II. Prepare & Cut Your Fabric Pieces
Accuracy in cutting is crucial for a well-shaped bag. We’ll use a consistent 1/2-inch (1.27 cm) seam allowance throughout, unless otherwise specified.
1. Cut Main Bag Panels (Denim & Lining)
- From your Denim (Exterior Fabric):
- Main Exterior Panels: 2 pieces, 15 inches wide x 13 inches tall (38 cm W x 33 cm H). (These will be your front and back).
- Side/Bottom Band: 1 long rectangle, 33 inches long x 5 inches tall (84 cm L x 12.7 cm H). This piece will form the continuous side and bottom of your tote.
- From your Lining Fabric:
- Main Lining Panels: 2 pieces, 15 inches wide x 13 inches tall (38 cm W x 33 cm H).
- Side/Bottom Lining Band: 1 long rectangle, 33 inches long x 5 inches tall (84 cm L x 12.7 cm H).
- Interior Pocket Panel (Optional): 1 piece, 14 inches tall x 10 inches wide (35.6 cm T x 25.4 cm W).
- From your Interfacing:
- Cut pieces slightly smaller (e.g., 1/2 inch smaller on each side) than all corresponding denim exterior panels (Main Exterior Panels and Side/Bottom Band). Also cut for the Main Lining Panels and Interior Pocket.
- Fuse Interfacing: Following the manufacturer’s instructions, fuse the interfacing to the wrong side of all the corresponding denim and lining pieces. Center the interfacing so there’s a 1/2-inch border of fabric exposed on all sides for the seam allowance.

2. Prepare Handles
- Webbing Handles: Cut two pieces of webbing, each 26 inches (66 cm) long.
3. Cut Denim Flower Pieces
- From denim scraps (different washes can be cool!):
- Petals: Cut 5-7 rounded or tear-drop shapes. Varying sizes can create depth (e.g., 3 larger petals, 2-4 smaller ones). A good size for the largest petal might be 3-4 inches (7.6-10 cm) long.
- Center: Cut 1 circle, approximately 1.5-2 inches (3.8-5 cm) in diameter.
- From fusible webbing (if using): Cut corresponding shapes for each petal and the center.
III. Step-by-Step Sewing Instructions
Use your denim needle and heavy-duty thread for all denim sections. A walking foot is highly recommended. Backstitch at the beginning and end of every seam for reinforcement.
Step 1: Create the Denim Flower Appliqué
- Prepare Petals: If using fusible webbing, follow its instructions to adhere it to the wrong side of each denim petal and the center circle. Trim excess fusible webbing.
- Arrange Flower: On one of your Main Exterior Panels (this will be the front of your bag), decide where you want the flower. A good spot is slightly above the vertical center, but you can place it anywhere you like.
- Arrange the denim petals in a circular pattern, overlapping them slightly to form a flower shape. Experiment with different denim washes for contrast. Once you’re happy with the arrangement, press them lightly to activate the fusible webbing (if used) and hold them in place.
- Stitch Petals: Using your sewing machine, stitch around the outer edge of each petal. You can use a straight stitch, a small zigzag stitch, or even a decorative stitch. Use matching thread for subtle detail or contrasting thread for a bolder look. Stitch through the petal and the main denim panel.
- Stitch Center: Place the denim circle in the center of your flower. Stitch around its edge to secure it. You can even embroider a small design or add a button to the center for extra flair.
Step 2: Prepare Interior Pocket (Optional)
- Take your Interior Pocket Panel (14″ x 10″). Fold it in half (wrong sides together) to measure 7″ x 10″. Press.
- Hem the top raw edge (what will be the top of the pocket) by folding 1/2 inch (1.27 cm) down towards the wrong side, pressing, then folding another 1/2 inch and pressing. Stitch this hem in place, close to the inner fold.
- Place this pocket onto one of your Main Lining Panels, centering it horizontally about 3-4 inches (7.6-10 cm) down from what will be the top edge of the lining. Pin in place.
- Stitch around the sides and bottom of the pocket, very close to the edge. Reinforce the top corners with a small triangle or bar tack for durability. You can add vertical stitching to create compartments if desired.
Step 3: Attach Handles to Exterior Panels
- Take one Main Exterior Panel (the one with the flower) and lay it right side up.
- Measure 4 inches (10 cm) in from each of the 15-inch (width) side edges, along the top raw edge of the panel. Mark these points.
- Place the raw ends of one webbing handle onto these marks, aligning the raw edges of the webbing with the raw top edge of the bag panel. The handle loop should face downwards onto the bag panel.
- Pin securely. Stitch the handles in place with a strong reinforcing stitch (e.g., stitch a square with an “X” inside it), within the 1/2-inch (1.27 cm) seam allowance. This is crucial for handle strength.
- Repeat for the second handle on the second Main Exterior Panel.
Step 4: Assemble the Exterior Bag Body
- Take your Side/Bottom Band (33″ x 5″). Stitch its short ends together (right sides facing) to form a loop. Press seam open. This will be the center bottom seam of your bag.
- Place one Main Exterior Panel (the one with the flower and handles) right sides together with the Side/Bottom Band. Align the bottom corner of the exterior panel with one end of the band.
- Pin the exterior panel to the band, working your way around the bottom and sides. You’ll need to clip into the seam allowance of the band slightly at the corners of the main panel to help it curve smoothly.
- Stitch all the way around this connection, using a 1/2-inch (1.27 cm) seam allowance. Go slowly around the corners.
- Repeat this process to attach the second Main Exterior Panel to the remaining end of the Side/Bottom Band.
- Trim excess seam allowance if bulky, and finish raw edges with a zigzag stitch or serger. Press all seams open. This forms the complete exterior shell of your bag.
Step 5: Assemble the Lining Bag
- Take your Lining Side/Bottom Band (33″ x 5″). Stitch its short ends together (right sides facing) to form a loop. Press seam open.
- Follow the same steps as in Step 4 to attach the two Main Lining Panels (one with pocket) to the Side/Bottom Lining Band.
- Crucial: Leave a 5-6 inch (12.7-15 cm) opening in the center of the bottom seam of your Side/Bottom Lining Band. This opening is essential for turning the bag right side out later. Backstitch securely at the beginning and end of this opening.
- Do NOT turn the lining bag right side out. Keep it inside out.
Step 6: Combine Exterior and Lining
- Keep the exterior denim bag turned right side out.
- Keep the lining bag turned inside out.
- Carefully insert the exterior denim bag into the lining bag, so that the right sides of both bags are facing each other.
- Align the top raw edges of the denim bag’s opening with the top raw edges of the lining bag. Make sure all seams match up (side seams of exterior to side seams of lining). All handles should be tucked down between the exterior and lining layers.
- Pin securely all around the top raw edge of the bag.
Step 7: Sew Top Edge and Finish
- Stitch all the way around the top opening of the bag, using a 1/2-inch (1.27 cm) seam allowance. Backstitch at the beginning and end.
- Topstitch (Recommended): Turn the bag right side out (through the lining opening, see next step). Push out all corners and seams. On the exterior of the bag, topstitch around the entire top opening, about 1/4 inch (0.6 cm) from the edge, using your topstitching thread and a longer stitch length. This gives it a polished, professional finish and helps the top lie flat.
Step 8: Turn Bag Right Side Out & Close Opening
- Reach into the opening you left in the bottom seam of the lining (from Step 5).
- Slowly and carefully pull the entire bag (exterior, lining, handles – everything!) through this opening until it is completely right side out. This can be a tight squeeze due to the denim and interfacing, so be patient and gentle.
- Gently push out all the corners and seams with a point turner or a blunt object (like a chopstick) to make them crisp and well-defined.
- Close the Lining Opening: Go to your ironing board. Press the raw edges of the opening in the bottom of the lining under by 1/2 inch (1.27 cm) so they meet neatly. Align these pressed edges and pin or clip them together. Stitch this opening closed by machine (sewing very close to the folded edge for a neat finish) or by hand using an invisible ladder stitch for a truly seamless look.
- Finally, push the lining down into the main bag, ensuring it sits smoothly inside.
- Give your finished bag a good final press.
Congratulations! You’ve successfully sewn a durable and charming DIY Denim Tote Bag with a Flower Embellishment from Old Jeans! This unique tote is perfect for everyday use, shopping, or carrying your essentials, showcasing your creativity and commitment to upcycling.
Did you use different denim washes for your flower petals, or did you stick to one consistent color for the whole bag?


