
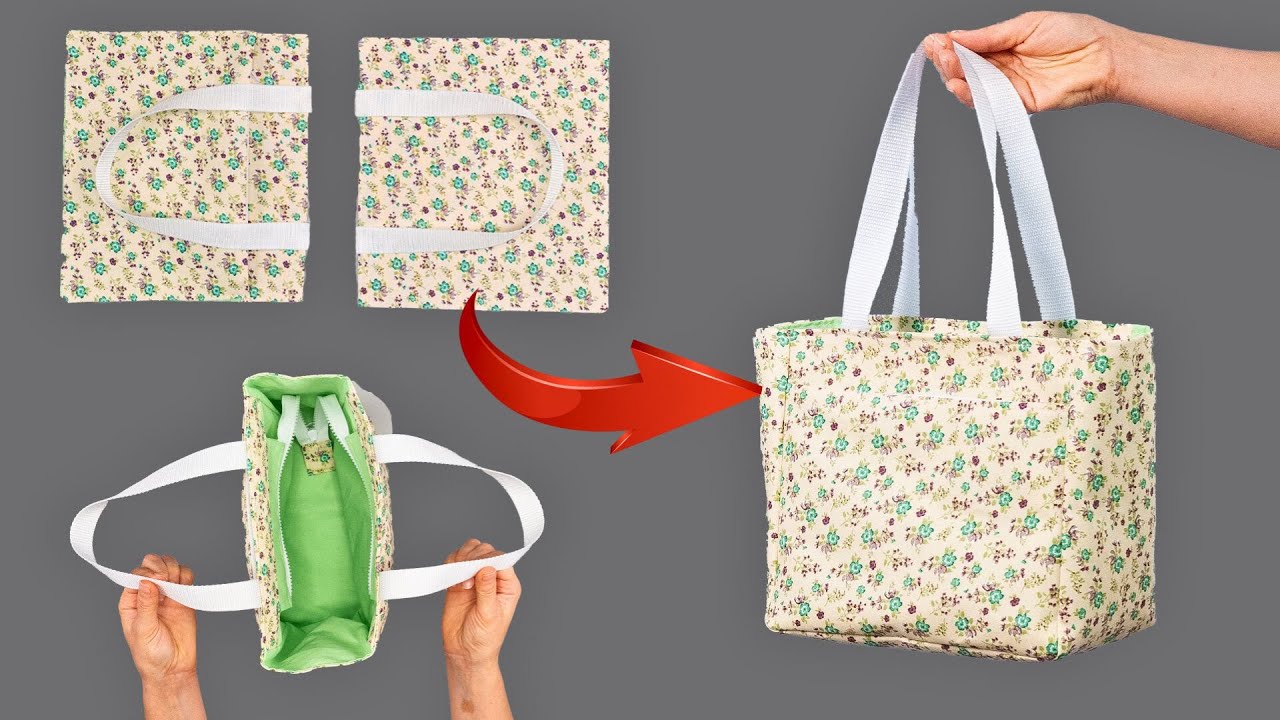
Here is a detailed, long-form article and tutorial on how to sew a stylish and functional Korean-style tote bag with a front pocket. This guide is designed to be beginner-friendly, walking you through every step with clear explanations.
Master the Minimalist Aesthetic: A Detailed Guide to Sewing a Korean-Style Tote Bag with a Front Pocket
The charm of Korean design lies in its beautiful simplicity, clean lines, and focus on functionality. These principles extend to their fashion accessories, particularly bags, which are often minimalist, durable, and effortlessly chic. They are the perfect blend of style and practicality, ideal for carrying everything from a laptop to market groceries.
This comprehensive tutorial will guide you, step-by-step, through the process of creating your very own Korean-inspired tote bag. We will focus on a classic design featuring a useful front pocket, a fully lined interior for a professional finish, and sturdy straps. Don’t worry if you’re new to sewing; every stage is broken down into easy-to-follow instructions.
Let’s gather our materials and begin crafting a bag you’ll be proud to carry everywhere!
Part 1: Gathering Your Materials & Tools
Proper preparation is the key to a smooth sewing experience. Before you start, gather the following items.
Fabric Choices:
The key to achieving the authentic Korean design look is choosing the right fabric. Opt for sturdy, medium-to-heavyweight woven fabrics.
- Outer Fabric: You will need approximately 0.75 meters (or 3/4 yard).
- Recommended: Canvas, duck cloth, denim, corduroy, or a thick linen blend. These fabrics provide structure and durability. Choose a solid, neutral color like beige, olive green, charcoal grey, or navy for a classic look.
- Lining Fabric: You will need approximately 0.75 meters (or 3/4 yard).
- Recommended: Standard quilting cotton is perfect. It’s easy to work with and comes in endless colors and patterns. You can choose a fabric that complements your outer fabric or a fun, contrasting print for a hidden pop of personality.
- Interfacing (Optional but Recommended): About 0.5 meters (or 1/2 yard) of medium-weight fusible interfacing.
- Purpose: Interfacing is ironed onto your fabric pieces to give them extra stiffness and structure. This is highly recommended if you are using a lighter-weight canvas or want a bag that stands up on its own.
Essential Tools:
- Sewing Machine: A standard machine with a straight stitch is all you need.
- Fabric Scissors or Rotary Cutter & Mat: Essential for cutting clean, precise lines.
- Thread: An all-purpose polyester thread that matches your outer fabric.
- Ruler or Measuring Tape: A clear acrylic ruler is especially helpful.
- Fabric Marker or Chalk: For marking your cutting lines and sewing guides.
- Pins or Sewing Clips: To hold your fabric pieces together while you sew.
- Iron and Ironing Board: Crucial for pressing seams and getting a crisp, professional finish. Do not skip the pressing!
- Seam Ripper: Your best friend for correcting any mistakes.
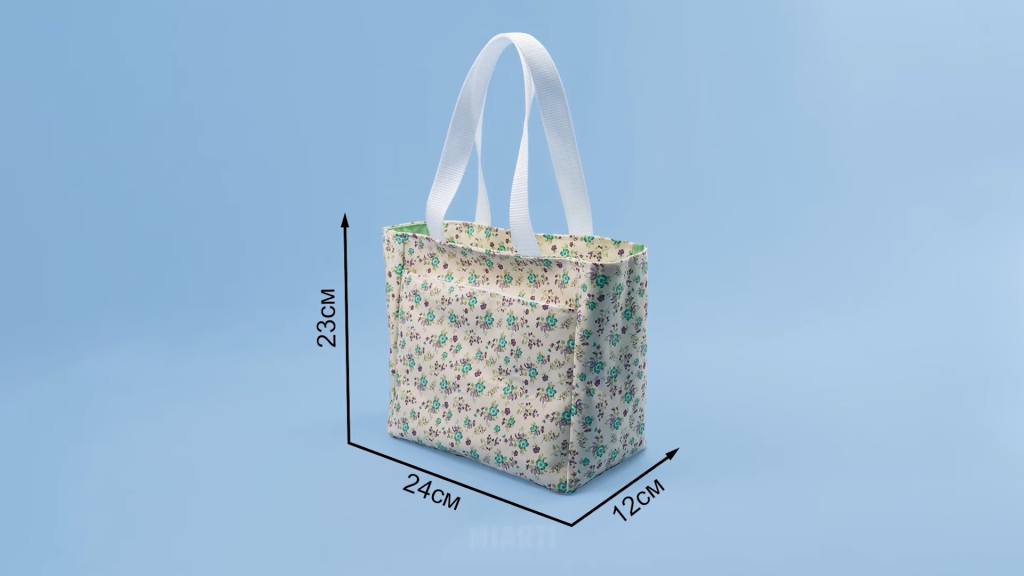
Part 2: The Pattern & Cutting Guide
This pattern creates a generously sized tote bag, approximately 38cm wide by 40cm tall with an 8cm base. A seam allowance of 1cm (83 inch) is included in these measurements unless stated otherwise.
Cut the following pieces from your fabrics:
- Main Body Panels (Outer Fabric):
- Cut 2 pieces
- Dimensions: 40cm wide ×42cm tall (15.7″×16.5″)
- Main Body Panels (Lining Fabric):
- Cut 2 pieces
- Dimensions: 40cm wide ×42cm tall (15.7″×16.5″)
- Front Pocket (Outer Fabric):
- Cut 1 piece
- Dimensions: 25cm wide ×22cm tall (9.8″×8.7″)
- Straps (Outer Fabric):
- Cut 2 pieces
- Dimensions: 10cm wide ×60cm long (4″×23.6″)
(Optional) Interfacing: If you are using interfacing, cut 2 pieces for the Main Body Panels and 2 pieces for the Straps, using the same dimensions. Iron the interfacing onto the wrong side of your outer fabric pieces before you begin sewing, following the manufacturer’s instructions.

Part 3: The Step-by-Step Sewing Tutorial
Let’s begin sewing! Remember to backstitch at the beginning and end of every seam to secure your stitches.
Step 1: Prepare the Front Pocket
- Finish the Top Edge: Take your single pocket piece. On the top 25cm edge, fold the raw edge down towards the wrong side by 1cm and press with your iron. Fold it down again by 2cm to encase the raw edge, and press firmly.
- Topstitch: Sew along the bottom edge of this folded hem, about 1.8cm from the top fold. This creates a neat, durable opening for your pocket.
- Press the Other Edges: On the remaining three sides of the pocket, fold the raw edges in towards the wrong side by 1cm and press well.
Step 2: Attach the Front Pocket
- Position the Pocket: Take one of your main outer body panels. This will be the front of your bag. Place your prepared pocket on top of it, right side up.
- Measure for Placement: Position the pocket so it is centered horizontally. For a 40cm wide panel and a 25cm pocket, there will be 7.5cm of space on either side. Measure from the top edge of the main panel down to the top of your pocket; a placement of around 8cm from the top looks balanced.
- Pin and Sew: Pin the pocket securely in place. Sew the pocket onto the main panel by stitching very close to the edge along the two sides and the bottom. Remember to backstitch at the top corners to reinforce them, as this area will see the most stress.
Step 3: Prepare the Straps
- Fold and Press: Take one of your long strap pieces. Fold it in half lengthwise with the wrong sides together and press to create a center crease.
- Enclose Raw Edges: Open the piece back up. Now, fold each long raw edge into that center crease you just made. Press again.
- Final Fold: Fold the entire strap in half along the original center crease. The raw edges are now neatly tucked inside. You should have a long strap that is now 2.5cm (1″) wide.
- Topstitch for Strength: Sew along both long edges of the strap, about 2−3mm from the edge. This is called an “edge stitch” and it adds strength and a professional look.
- Repeat: Repeat this entire process for the second strap piece.
Step 4: Assemble the Outer Bag
- Sew the Body: Place your two outer body panels (the one with the pocket and the plain one) with their right sides facing each other. Pin along the sides and the bottom edge. Leave the top edge open.
- Stitch: Sew down one side, across the bottom, and up the other side with a 1cm seam allowance.
- Box the Corners: This step creates the bag’s 3D shape and flat bottom.
- At one of the bottom corners, pinch the fabric so the side seam and the bottom seam line up, forming a triangle.
- Measure 4cm in from the tip of the triangle and draw a line straight across.
- Sew directly on this line.
- Trim the excess fabric from the corner, leaving about 1cm of seam allowance.
- Repeat this process for the other bottom corner.
- Turn the outer bag right side out and admire your work! The corners should now be boxed and the pocket should be on the front.
Step 5: Assemble the Lining
- Sew the Body: Place the two lining fabric pieces with their right sides facing each other. Pin along the sides and the bottom.
- Stitch with a Gap: Sew down one side, across the bottom, and up the other side, BUT leave a 15cm (6-inch) gap in the middle of the bottom seam. This unsewn gap is crucial for turning the bag right side out later. Remember to backstitch on either side of the gap.
- Box the Corners: Follow the exact same procedure as you did for the outer bag (Step 4, part 3) to box the corners of the lining.
- Do NOT turn the lining right side out. Leave it with the wrong side facing out.
Step 6: Attach the Straps and Join the Layers
- Position the Straps: Take your outer bag, which should be right side out. Place the ends of one strap onto the top edge of the front panel. The strap should be positioned so the outside edge of the strap is about 8cm from the side seam on each side. The raw ends of the strap should be aligned with the raw top edge of the bag, with the loop of the strap pointing down towards the bottom of the bag. Pin securely.
- Check for Twists: Make sure the strap is not twisted! Repeat for the second strap on the back panel.
- Combine the Layers: Keep the outer bag right side out. Keep the lining bag wrong side out. Now, place the outer bag inside the lining bag. The right sides of the outer bag and the lining should now be facing each other.
- Align and Pin: Line up the top raw edges of both the outer bag and the lining. Match the side seams together. Pin all the way around the top opening, securing the straps in place between the two layers.
- Sew the Top: Sew around the entire top opening of the bag with a 1cm seam allowance.
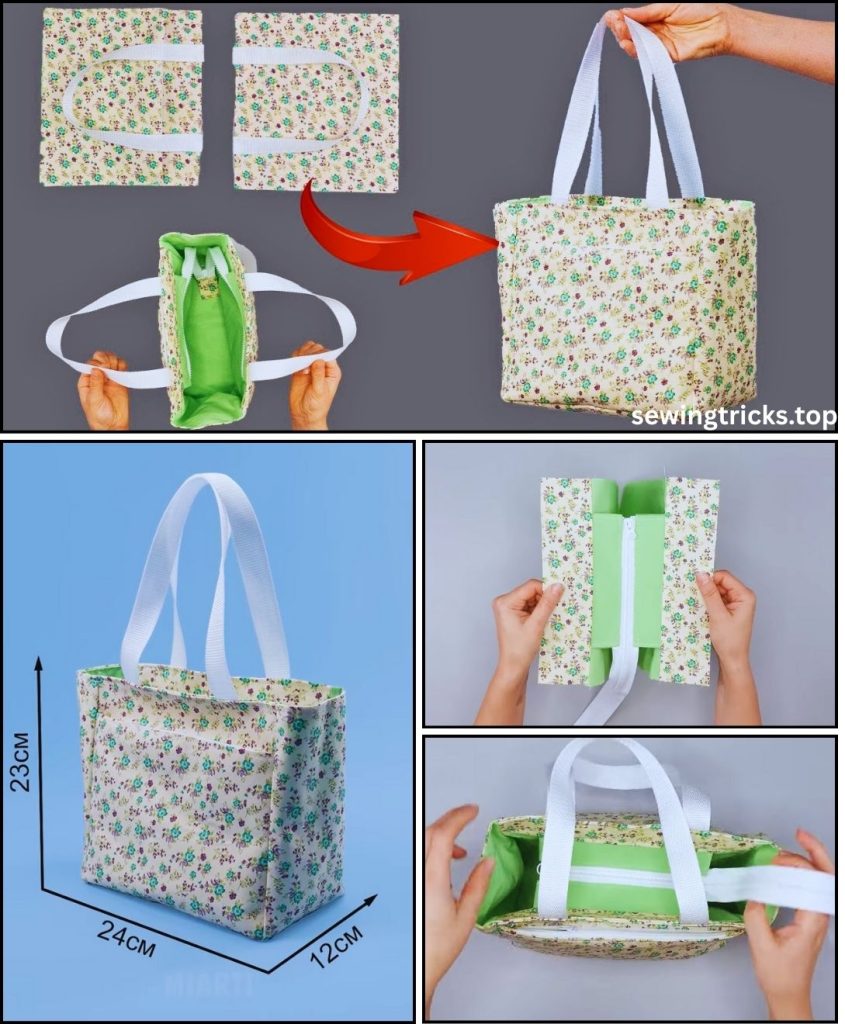
Step 7: The Final Reveal
- Birth the Bag: Reach into the gap you left in the bottom of the lining. Grab the outer bag and begin pulling it all the way through this hole. It will feel messy, but be patient.
- Shape the Bag: Once the entire bag is pulled through, you’ll have the right side of the bag and lining showing, but it will be inside out. Use a chopstick or a dull pencil to gently poke out the corners of both the outer bag and the lining to make them sharp.
- Close the Gap: Find the opening in the lining. Tuck the raw edges inside and press. Sew the hole closed very close to the edge. This can be done by machine or with an invisible hand stitch (ladder stitch) for a cleaner finish.
- Final Press and Topstitch: Push the lining down inside the outer bag. Press the top edge of the bag very well with your iron to create a crisp, clean seam. To secure the lining and give the bag a final professional touch, topstitch all the way around the top opening of the bag, about 1cm from the edge. This will also add another layer of reinforcement for the straps.
Congratulations!
You have successfully created a beautiful, durable, and stylish Korean-style tote bag. You’ve learned how to create a professional-looking pocket, box corners for depth, fully line a bag, and create sturdy straps.
Customization Ideas:
- Add a Closure: Sew a magnetic snap into the top center of the lining before you sew the outer and lining bags together.
- Internal Pocket: Create a simple patch pocket (the same way you made the front pocket) and sew it onto one of the lining panels before you assemble the lining.
- Play with Color: Use a contrasting color for the straps or pocket for a unique design.
- Add Hardware: Consider adding metal rivets to the straps for an industrial-chic look and extra strength.
Enjoy your new handmade bag! Use it with pride, knowing you made it yourself. Happy sewing!


