
Here is a detailed article and tutorial on how to sew a stylish DIY round bag. This guide is designed to be comprehensive, walking you through everything from drafting the pattern to the final finishing touches.
Sew Your Own Style: A Detailed Guide to Creating a Chic DIY Round Bag
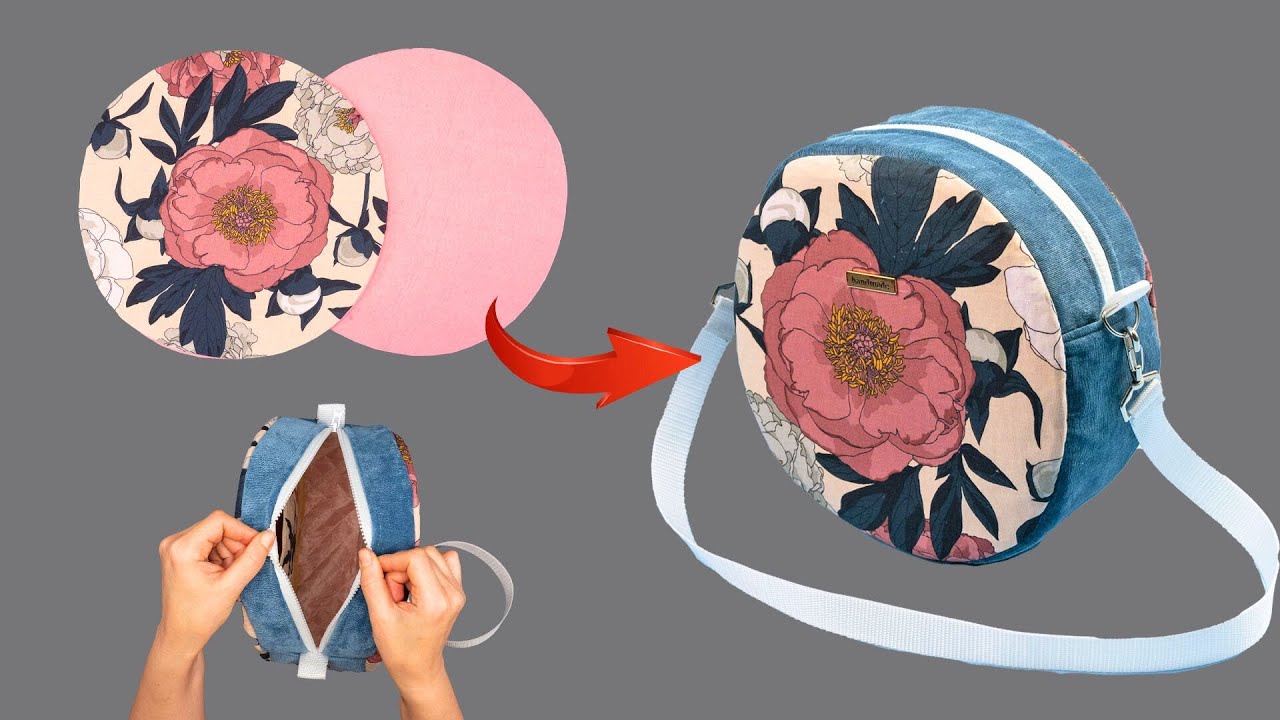
The round bag, often called a circle bag or canteen bag, is a timeless accessory. It’s chic, versatile, and adds a touch of playful sophistication to any outfit. While designer versions can be costly, the satisfaction of making your own is priceless. This comprehensive tutorial will guide you step-by-step through the process of creating a professional-looking, stylish round bag from scratch.
This project is perfect for an adventurous beginner or an intermediate sewer looking for a satisfying make. We will cover drafting your own custom pattern, installing a zipper on a curve, and assembling the bag for a clean, durable finish. Let’s get started!
Part 1: Gather Your Materials & Tools
Proper preparation is the key to a smooth sewing experience. Having everything ready before you start will make the process much more enjoyable.
Essential Materials:
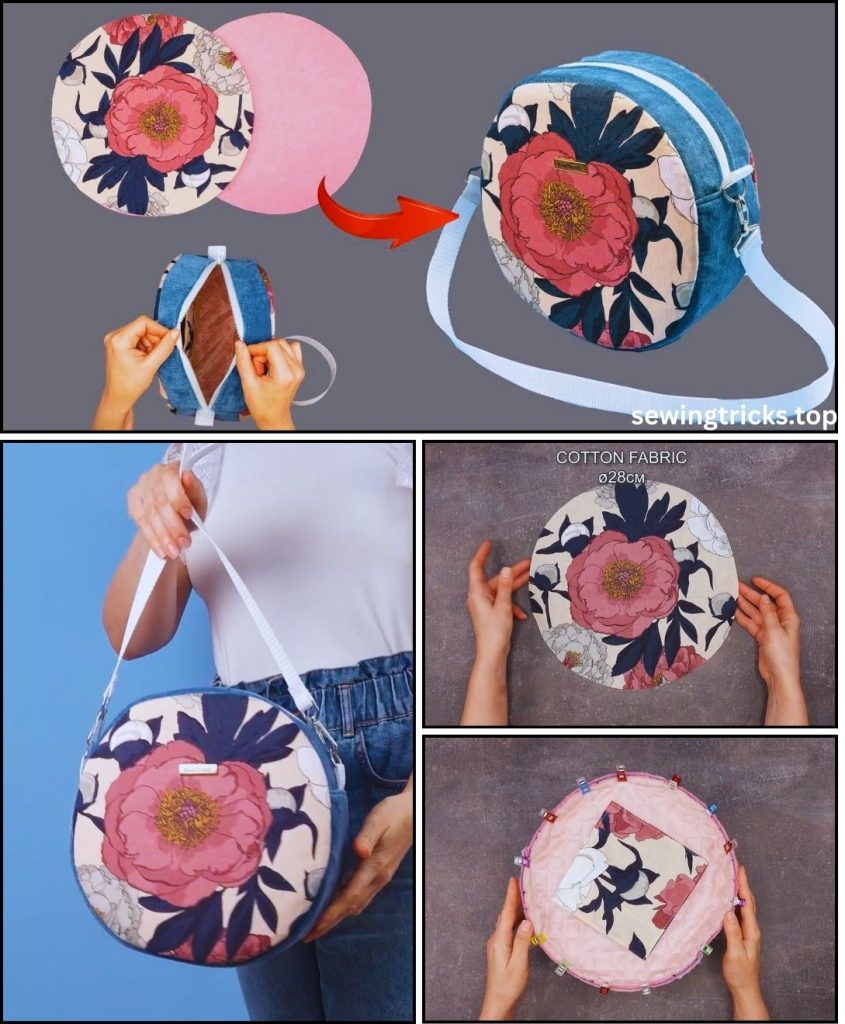
- Outer Fabric (1/2 yard or 0.5 meter): Choose a sturdy, medium to heavyweight fabric. This will give your bag structure and durability.
- Excellent choices: Canvas, denim, corduroy, home décor fabric, faux leather, or sturdy cotton twill.
- Lining Fabric (1/2 yard or 0.5 meter): A standard quilting cotton or lightweight canvas works perfectly. This is a great place to add a fun pop of color or a surprise print!
- Fusible Interfacing (1 yard or 1 meter): This is non-negotiable for a professional finish. It gives the fabric body and prevents the bag from being floppy.
- Recommendation: A medium-weight woven fusible interfacing like Pellon SF101 Shape-Flex. For a very structured bag (like one made from faux leather), you might consider a fusible foam like Pellon Flex-Foam.
- All-Purpose Zipper (14-16 inches or 35-40 cm): A nylon coil zipper is best as it’s flexible and easy to sew around a curve. Choose a color that complements or contrasts with your outer fabric. A slightly longer zipper is easier to work with; you can trim it down later.
- Webbing for Strap (1.5 – 2 yards or 1.5 – 2 meters): Cotton or nylon webbing is ideal. The standard width is 1 inch (2.5 cm) or 1.5 inches (3.8 cm).
- Hardware (Matching your webbing width):
- 2 x D-Rings: To attach the strap to the bag.
- 2 x Swivel Clasps/Lobster Clasps: For a detachable strap.
- 1 x Strap Slider/Adjuster: To make your strap adjustable in length.
- All-Purpose Thread: Choose a thread that matches your outer fabric.
Essential Tools:
- Sewing Machine (with a standard foot and a zipper foot)
- Fabric Scissors or a Rotary Cutter & Mat
- Iron and Ironing Board
- Pins and/or Sewing Clips (Clips are highly recommended for curves and thick layers)
- Fabric Marker or Tailor’s Chalk
- Measuring Tape or Ruler
- A large plate, bowl, or compass for drawing your circle
- Seam Ripper (just in case!)
Part 2: Drafting Your Custom Pattern
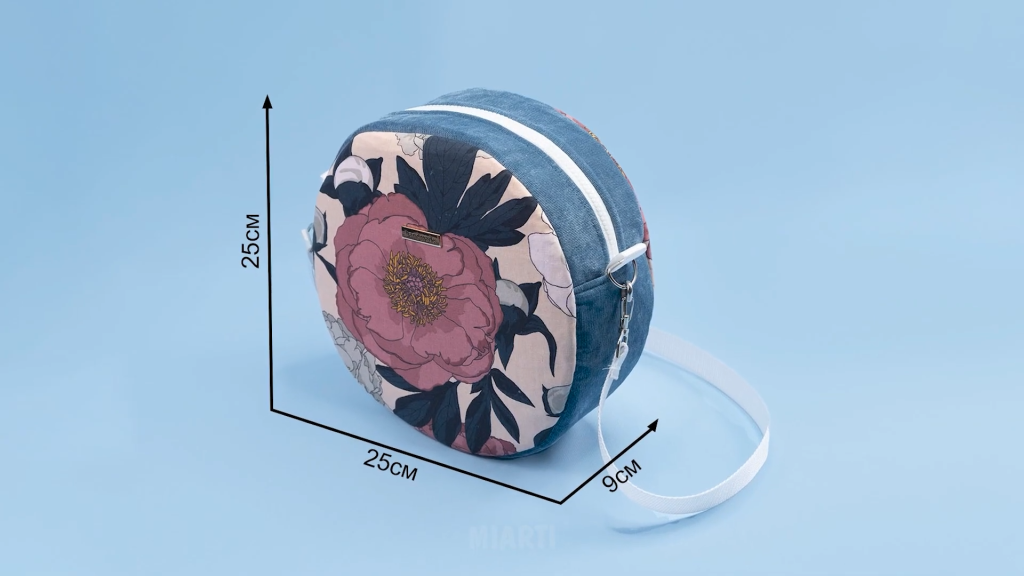
One of the best parts of this project is that you don’t need a printed pattern. You can easily draft it yourself to any size you like! For this tutorial, we will create a bag that is approximately 10 inches (25 cm) in diameter.
Seam Allowance: We will use a 1/2 inch (1.25 cm) seam allowance throughout this project unless otherwise stated.
Step A: Draft the Main Bag Circles
- Find a round object that is 10 inches (25 cm) in diameter, like a dinner plate. Alternatively, use a compass or a pencil tied to a string measuring 5 inches (12.5 cm) to draw a perfect circle.
- Trace this circle onto a large piece of paper (or directly onto your fabric if you feel confident).
- This is your Main Panel Pattern Piece.
Step B: Draft the Gusset (The Side Panels)
The gusset is the long strip of fabric that runs around the circumference of the bag, giving it depth. It’s made of two parts: the zipper panel and the bottom panel.
- Calculate the Circumference: We need to know the total length of the gusset. The formula for circumference is C=π×d.
- Our diameter (d) is 10 inches.
- C=3.14159×10 inches=31.41 inches.
- Let’s round this to 31.5 inches for a little ease.
- Now, we add our seam allowance to the two short ends where the gusset will join: 31.5 inches+(2×0.5 inch)=32.5 inches.
- Your total gusset length is 32.5 inches (approx. 82.5 cm).
- Determine Gusset Width: A good width for a bag this size is 4 inches (10 cm). This includes the seam allowances for attaching it to the main panels.
- Divide the Gusset: We’ll split the gusset to accommodate the zipper. A good ratio is to have the zipper take up about two-thirds of the top.
- Zipper Panel Length: Let’s make this section 20 inches long.
- Bottom Gusset Length: This will be the remaining length: 32.5−20=12.5 inches.
- Create the Zipper Panel Pieces:
- The zipper panel is made of two identical strips. Take the total width (4 inches) and divide by two = 2 inches. Then add a 1/2 inch seam allowance to the side where the zipper will be attached. So, the width of each strip is 2.5 inches.
- Zipper Panel Piece: Cut two rectangles measuring 20 inches long x 2.5 inches wide.
- Create the Bottom Gusset Piece:
- The width is the full 4 inches. The length is 12.5 inches.
- Bottom Gusset Piece: Cut one rectangle measuring 12.5 inches long x 4 inches wide.
Step C: Draft the Small Pieces
- Strap Tabs: These will hold the D-rings.
- Cut two rectangles measuring 4 inches long x 3 inches wide. The width should be double your D-ring width.
- Interior Pocket (Optional but recommended):
- Cut one rectangle measuring 7 inches wide x 9 inches tall.
Summary of Pattern Pieces to Cut:
- Main Panels:
- Cut 2 from Outer Fabric
- Cut 2 from Lining Fabric
- Cut 2 from Fusible Interfacing
- Zipper Panels:
- Cut 2 from Outer Fabric
- Cut 2 from Lining Fabric
- Cut 2 from Fusible Interfacing
- Bottom Gusset:
- Cut 1 from Outer Fabric
- Cut 1 from Lining Fabric
- Cut 1 from Fusible Interfacing
- Strap Tabs:
- Cut 2 from Outer Fabric
- Cut 2 from Fusible Interfacing
- Interior Pocket:
- Cut 1 from Lining Fabric
Part 3: Preparation & Sewing
Now for the fun part! Let’s start sewing.
Step 1: Fusing and Cutting
- Cut out all your fabric and interfacing pieces according to the list above.
- Following the manufacturer’s instructions, fuse the interfacing to the wrong side of all your Outer Fabric pieces and the Strap Tab pieces. This is a crucial step for a structured bag.
Step 2: Create the Interior Pocket
- Take your 7×9 inch pocket piece. Fold the top edge down by 1/2 inch, press, and then fold it down another 1 inch and press again to create a clean hem.
- Stitch along the bottom edge of this fold to secure it.
- Fold and press the remaining three sides in by 1/2 inch.
- Center the pocket on the right side of one of your Lining Main Panels. Pin it in place.
- Stitch the pocket to the lining panel along the two sides and the bottom, close to the edge. Backstitch at the start and end to secure.
Step 3: Assemble the Zipper Gusset
- Switch to the zipper foot on your sewing machine.
- Create two “zipper sandwiches.” For the first one, place one Outer Zipper Panel right side up. Place your zipper on top of it, right side down, aligning the top edges. Finally, place one Lining Zipper Panel on top of the zipper, right side down. The zipper is now sandwiched between the outer and lining fabrics.
- Pin or clip all three layers together.
- Sew along this edge using your zipper foot, getting as close to the zipper teeth as you comfortably can.
- Repeat this process for the other side of the zipper with the remaining Outer and Lining Zipper Panels.
- Open up the panels and press the fabric away from the zipper teeth.
- Topstitch along both sides of the zipper, about 1/8 inch (3 mm) away from the seam. This keeps the fabric from catching in the zipper and gives a professional look. Your zipper gusset is now complete.
Step 4: Create the Full Gusset Loop
- Take your Outer Bottom Gusset piece and your now-assembled Outer Zipper Gusset. With right sides together, pin one short end of the bottom gusset to one short end of the zipper gusset.
- Sew together with a 1/2 inch seam allowance.
- Repeat for the other side to create a complete loop. Press the seams open.
- Do the exact same thing with your Lining Bottom Gusset and the lining side of the zipper panel to create a matching lining gusset loop.
Step 5: Prepare and Attach the Strap Tabs
- Take your two interfaced Strap Tab pieces. Fold them in half lengthwise (hotdog style) with wrong sides together and press.
- Open them up, then fold the long raw edges in to meet at the center crease. Press again.
- Fold it in half along the original center crease. You now have a sturdy strap that is 4 inches long and 1.5 inches wide.
- Topstitch along both long edges.
- Slide a D-ring onto each tab, and fold the tab in half, encasing the D-ring.
- On your Outer Gusset Loop, find the center of the Bottom Gusset piece and mark it. Place your two strap tabs on the right side of the gusset, one on each side seam where the zipper panel meets the bottom panel. The raw edges of the tabs should align with the raw edge of the gusset.
- Baste (sew with a long stitch length) the tabs in place within the seam allowance (e.g., at 1/4 inch). This holds them securely for the next step.

Step 6: Attaching the Gusset to the Main Panels
This is where the bag takes its shape! It can be tricky, so take your time. The key is to use lots of clips or pins.
- Mark Quarter Points: Fold your Outer Main Panel circle in half and mark the top and bottom with a pin or chalk. Fold it in half the other way and mark the sides. You now have four evenly spaced quarter points. Do the same for your Outer Gusset Loop. (Your quarter points will be the two side seams and the center top/bottom of the zipper and bottom panels).
- Unzip the Zipper: Open the zipper on your gusset at least halfway! This is very important for turning the bag later.
- Pin the Gusset: With right sides together, match the quarter points of the gusset loop to the quarter points on the main panel. The top of the zipper should match the top mark on the circle. Clip or pin at these four points first.
- Ease and Clip: Continue adding clips all the way around the circle, gently easing the fabric of the gusset to fit the curve of the panel. Don’t be shy—use a clip every inch or so.
- Sew Slowly: Using a 1/2 inch seam allowance, slowly sew the gusset to the main panel. Go slow, pivot the fabric under the needle frequently, and make sure there are no puckers on the other side.
- Repeat: Attach the second Outer Main Panel to the other side of the gusset loop in the same manner. You now have the exterior of your bag!
- Assemble the Lining: Repeat steps 1-6 for your lining pieces. CRITICAL: When you sew the second lining panel to the lining gusset, leave a 4-5 inch (10-12 cm) gap at the bottom. This is for turning the bag right side out later. Backstitch securely at the start and end of this opening.
Step 7: The Final Assembly
- Turn the Outer Bag right side out. Keep the Lining Bag inside out.
- Place the Outer Bag (which is right side out) inside the Lining Bag (which is inside out).
- The right sides of the outer bag and the lining bag should now be facing each other.
- This step is no longer possible as you have a closed loop. Correction: This standard bag-making step doesn’t apply here due to the full gusset construction. We will birth the bag through the lining. Let’s proceed to finishing.
(Correction and Clarification) – With the exterior fully assembled and the lining fully assembled (with the turning gap), we are ready to finish.
Step 8: The Grand Reveal – Turning the Bag
- Reach through the gap you left in the lining. Grab the outer bag and pull it all the way through the opening.
- It will look like a strange mess at first, but keep pulling gently.
- Once the entire bag is turned right side out, push the lining down inside the outer bag.
- Use your fingers or a point turner to push out all the seams and give the bag its round shape.
Step 9: Finishing Touches
- Close the Lining: Pull the lining back out slightly. Find the opening you left. Fold the raw edges inward and press. Stitch this opening closed very close to the edge, either by hand with a ladder stitch (for an invisible finish) or carefully with your machine.
- Press the Bag: Push the lining neatly back inside the bag. Give the entire bag a good press with your iron, paying special attention to the seams to make them crisp. Be careful around the zipper and any faux leather.
- Create and Attach the Strap:
- Take your webbing. Thread one end through your strap slider, folding it over on itself by about an inch and stitching it down securely.
- Take the other end of the webbing and thread it through one of the swivel clasps.
- Continue threading that same end up through the slider (over the first layer of webbing) and then back down.
- Finally, thread the raw end through your second swivel clasp, fold it over, and stitch it down securely.
- Clip your new adjustable strap onto the D-rings on your bag.
Congratulations!
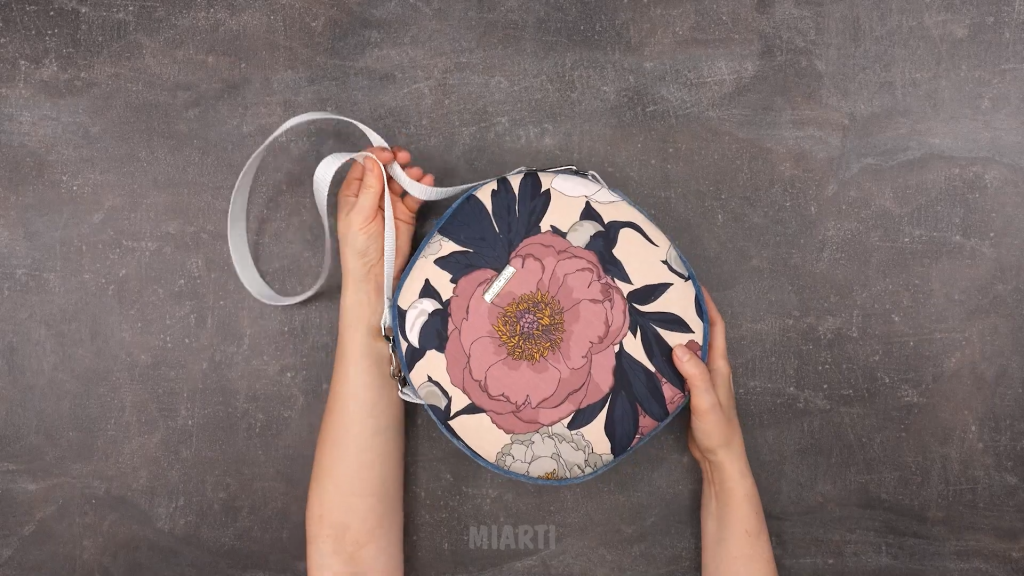
You have just created a beautiful, stylish, and fully-lined round bag. Take a moment to admire your work. Fill it with your essentials and wear it with pride, knowing you made it with your own two hands. Experiment with different fabrics, hardware colors, and sizes to create a whole collection of custom bags for every occasion. Happy sewing!


