
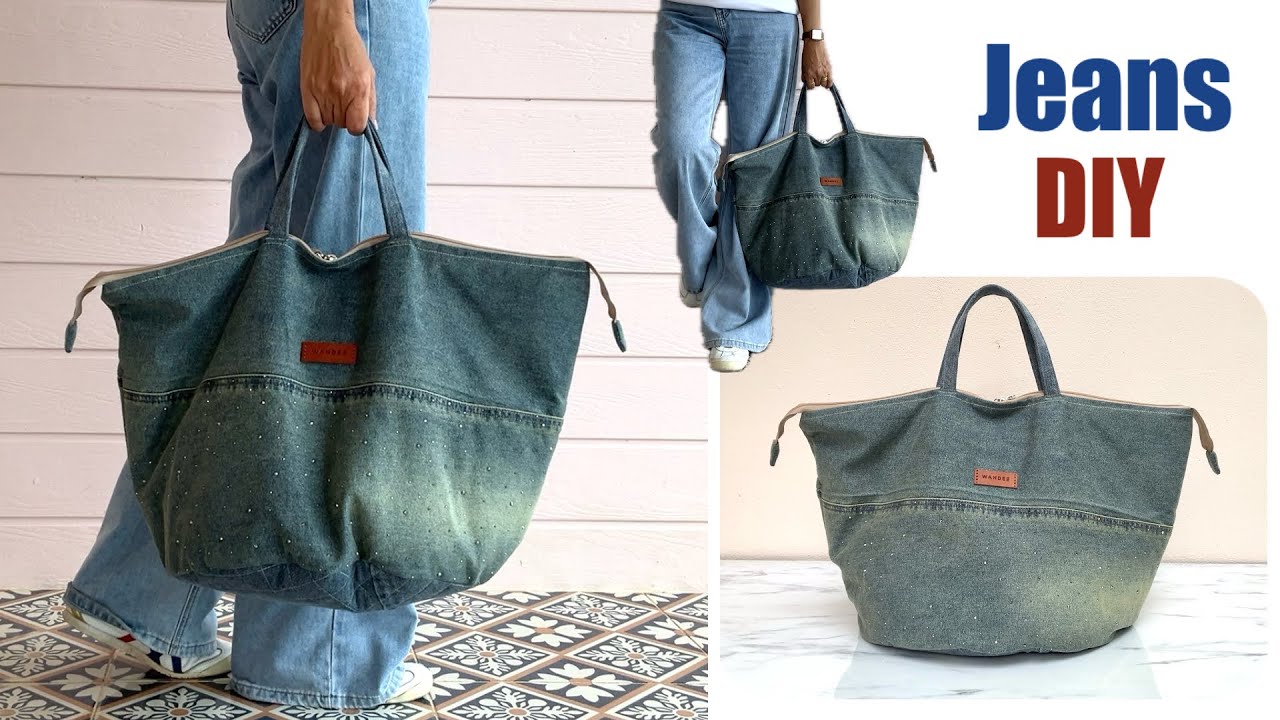
There’s a special kind of satisfaction that comes from transforming something old and forgotten into something new, functional, and stylish. A pair of old, beloved jeans, too worn to wear but too sentimental to toss, is the perfect candidate for an upcycling project. This tutorial will guide you, in meticulous detail, through the process of creating a durable, chic, and incredibly practical denim tote bag, complete with a secure zipper closure and a trendy circular bottom.
This project is a fantastic way to practice several essential sewing skills: working with heavy fabric, installing a zipper, and sewing curves. The result is a one-of-a-kind bag that’s perfect for the market, the library, or everyday use.
Skill Level: Ambitious Beginner to Intermediate
While the steps are broken down simply, this project involves some techniques that might be challenging for an absolute first-timer, such as installing a zipper and setting in a circular base. If you’ve sewn a few basic projects before, you’re ready for this rewarding challenge!
Part 1: Gathering Your Materials & Tools
Proper preparation is the key to a smooth sewing experience. Let’s gather everything you’ll need.
Essential Materials:
- Old Jeans: You’ll need at least one pair of adult-sized jeans. Two pairs are even better, as this gives you more fabric to work with, allowing you to be selective about which parts you use and to create a patchwork look if you desire. Look for non-stretch or low-stretch denim for the best structure.
- Lining Fabric: About 1 yard (or 1 meter) of cotton, canvas, or quilting cotton. A fun print can add a surprising pop of personality when you open your bag.
- Medium-Weight Fusible Interfacing: About 1 yard (or 1 meter). This is crucial! It will give the lining and the denim bottom the necessary structure and stability, preventing your bag from being too floppy.
- All-Purpose Zipper: A 16-inch to 18-inch (40-45 cm) zipper is a good size for the top of a tote. Choose a color that complements your denim. A nylon coil zipper is generally easier to work with than a metal one.
- Heavy-Duty Thread: Denim or upholstery thread is highly recommended. It will hold up to the thickness of the denim. You’ll want a color that matches your denim (like navy or gold) and one that matches your lining.
- Optional Hardware for Strap:
- Two 1.5-inch D-rings or O-rings if you want detachable straps.
- One 1.5-inch strap slider/adjuster if you want an adjustable strap.
Essential Tools:
- Sewing Machine: A machine that can handle heavier fabrics is best.
- Denim/Jeans Needle: This is non-negotiable. A standard needle will likely break. Use a size 90/14 or 100/16.
- Zipper Foot: This specialized presser foot is essential for sewing close to the zipper teeth.
- Fabric Scissors or Rotary Cutter & Mat: A rotary cutter is especially helpful for cutting a perfect circle.
- Seam Ripper: For deconstructing the jeans and fixing any mistakes.
- Measuring Tape & Ruler: A clear acrylic quilting ruler is extremely useful.
- Fabric Marker or Tailor’s Chalk: For marking your pattern pieces.
- Pins and/or Sewing Clips: Clips are particularly useful for holding thick layers of denim together.
- Iron & Ironing Board: Pressing your seams as you go is the secret to a professional-looking finish.
Part 2: Planning, Deconstructing, and Cutting
This is the “measure twice, cut once” phase. Take your time here for the best results.
Step 1: Draft Your Pattern Pieces
We will draft the pattern directly onto the fabric or onto paper first. Here are the dimensions for a medium-sized tote. You can adjust these to your preference.
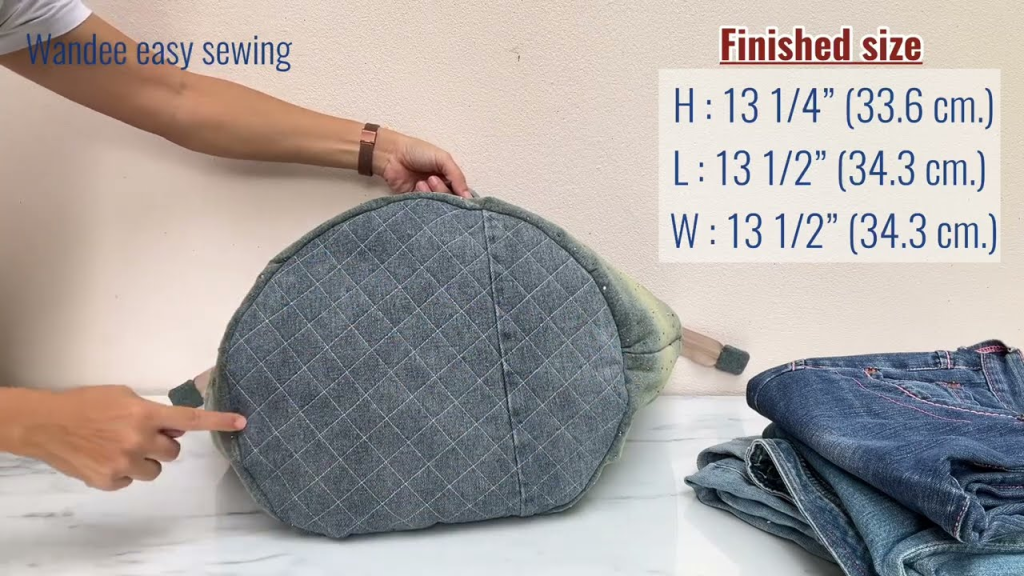
- Circular Bottom: A circle with a diameter of 10 inches (25 cm).
- Main Bag Body: A rectangle. To calculate the width, you need the circumference of your circle. The formula is Circumference=π×diameter.
- For our 10-inch circle: 3.14159×10 inches=31.42 inches.
- We need to add a seam allowance. Let’s use a 1/2 inch (1.25 cm) seam allowance. So, the total width will be 31.42+(2×0.5)=32.42 inches. Let’s round this up to 32.5 inches for simplicity.
- The height of the bag is your choice. Let’s make it 15 inches tall.
- Main Bag Body Piece Dimensions: 32.5 inches (width) x 15 inches (height).
- Strap: A long rectangle, 4 inches wide by 40-50 inches long (or your desired length).
- Interior Pocket (Optional but Recommended): A rectangle, 8 inches wide by 9 inches tall.
- Zipper Tabs: Two small rectangles, 1.5 inches wide by 3 inches tall.
Step 2: Deconstruct the Jeans
- Lay the jeans flat. Use your seam ripper or a sharp pair of scissors to carefully cut up the inseam (the seam running down the inside of the legs).
- Continue cutting all the way up through the crotch to separate the two legs.
- Cut off the thick, flat-felled seams on the outside of the legs. This will leave you with large, flat panels of denim.
- Cut off the waistband and the bottom hems.
- Save Everything! Pockets can be repurposed as exterior pockets, and belt loops can be used as key fobs or decorative elements.
Step 3: Cut Your Fabric Pieces
- From Denim:
- (1) Main Bag Body (32.5″ x 15″) – You may need to piece together denim from the legs to get a piece this large. This is a great opportunity for a cool patchwork design!
- (1) Circular Bottom (10″ diameter)
- (1) Strap (4″ x 40-50″)
- (2) Zipper Tabs (1.5″ x 3″)
- From Lining Fabric:
- (1) Main Bag Body (32.5″ x 15″)
- (1) Circular Bottom (10″ diameter)
- (1) Interior Pocket (8″ x 9″)
- From Interfacing:
- (1) Main Bag Body (cut slightly smaller than the fabric piece, so it’s not in the seam allowance)
- (1) Circular Bottom (cut to the exact size)
Step 4: Apply Interfacing
Follow the manufacturer’s instructions to iron the fusible interfacing onto the wrong side of your lining pieces (Main Body and Circular Bottom). This will make your bag sturdy from the inside out.
Part 3: The Sewing Process – Step-by-Step
Let’s bring this bag to life! Remember to backstitch at the beginning and end of every seam. Use a 1/2 inch seam allowance unless stated otherwise.
Step 1: Prepare the Interior Pocket
- Take your 8″ x 9″ lining pocket piece. Fold the top edge down by 1/2 inch, then another 1/2 inch, and press.
- Stitch along this folded edge to create a clean, finished top hem.
- Fold and press the other three sides in by 1/2 inch.
- Center the pocket on the right side of your main lining body piece, placing it a few inches down from the top edge. Pin it in place.
- Stitch the pocket onto the lining along the sides and bottom, close to the edge.
Step 2: Prepare the Strap
- Take your long denim strap piece.
- Fold it in half lengthwise, wrong sides together, and press to create a center crease.
- Open it up. Fold each long raw edge into the center crease and press again.
- Fold the whole thing in half along the original center crease. You should now have a long, 1-inch wide strap with four layers of fabric and no raw edges showing.
- Topstitch along both long edges, about 1/8 inch from the edge, for a strong and professional finish.
Step 3: Install the Zipper
This is the most detailed part. Read carefully.
- Prepare Zipper Tabs: Take one 1.5″ x 3″ denim tab. Fold it in half crosswise (so it becomes 1.5″ x 1.5″). Place the folded edge over one end of your zipper tape, sandwiching the zipper end inside. Stitch it in place. Repeat for the other end of the zipper. Trim the tabs so they are flush with the sides of the zipper tape. This gives your zipper a clean, finished look.
- Create the Zipper Sandwich:
- Lay your main denim body piece on your table, right side up.
- Place the zipper on top of it, along one of the long (32.5″) edges, with the zipper pull facing down. Align the top edge of the zipper tape with the raw edge of the denim.
- Now, place your main lining body piece on top of the zipper, right side down. The lining’s right side should be facing the denim’s right side.
- You now have a sandwich: Lining (right side down), Zipper (right side down), Denim (right side up). Pin or clip all three layers together along this top edge.
- Sew the First Side: Attach the zipper foot to your machine. Sew along this pinned edge, getting as close to the zipper teeth as you can without sewing over them.
- Press and Topstitch: Open up the fabric so the denim and lining are wrong sides together, with the zipper in the middle. Press both fabrics away from the zipper teeth. Topstitch on the denim side, about 1/8 inch away from the zipper seam. This keeps the fabric from getting caught in the zipper later.
- Repeat for the Other Side: Now, bring the other long raw edge of the denim piece up to meet the other side of the zipper tape (right sides together). Then, bring the other long raw edge of the lining piece up to meet it as well, creating another sandwich. Pin/clip and sew just as you did before.
- Press and Topstitch Again: Press this second side away from the zipper and topstitch it. You should now have a long tube of fabric with the zipper installed in the middle.
Step 4: Sew the Bag Body
- Turn the tube inside out so the lining is on the outside. Match the side seams, with the denim right-sides-together on one side of the zipper and the lining right-sides-together on the other.
- IMPORTANT: Open the zipper halfway! This is crucial for turning the bag later.
- Sew the side seam of the denim part, from the bottom of the zipper tab down to the bottom raw edge.
- Now, sew the side seam of the lining, but leave a 5-6 inch opening in the middle of the seam. This is your turning hole. Backstitch at the start and end of this opening to secure it.
Step 5: Attach the Circular Bottom
- Mark Quarters: Take your denim circular bottom piece. Fold it in half and make a small snip or chalk mark at the folds. Fold it in half the other way and mark those folds. You now have four equidistant marks (like North, South, East, West on a compass).
- Do the exact same thing to the bottom opening of your denim bag tube. One mark will be on the side seam, and the other will be opposite it. Find the other two by folding it flat the other way.
- Pin the Bottom: With the denim bag body still wrong-side-out, match the four marks on the circular bottom piece to the four marks on the bag tube opening, right sides together. Pin at these four points.
- Ease and Pin More: Now, gently ease the fabric of the tube to fit the curve of the circle between the pins. Don’t be shy—use a lot of pins or clips to prevent puckering. It might seem like it doesn’t fit, but it will.
- Sew the Circle: Slowly and carefully, sew the circle to the bag body, removing pins as you go. Try to keep the fabric as flat as possible under the needle.
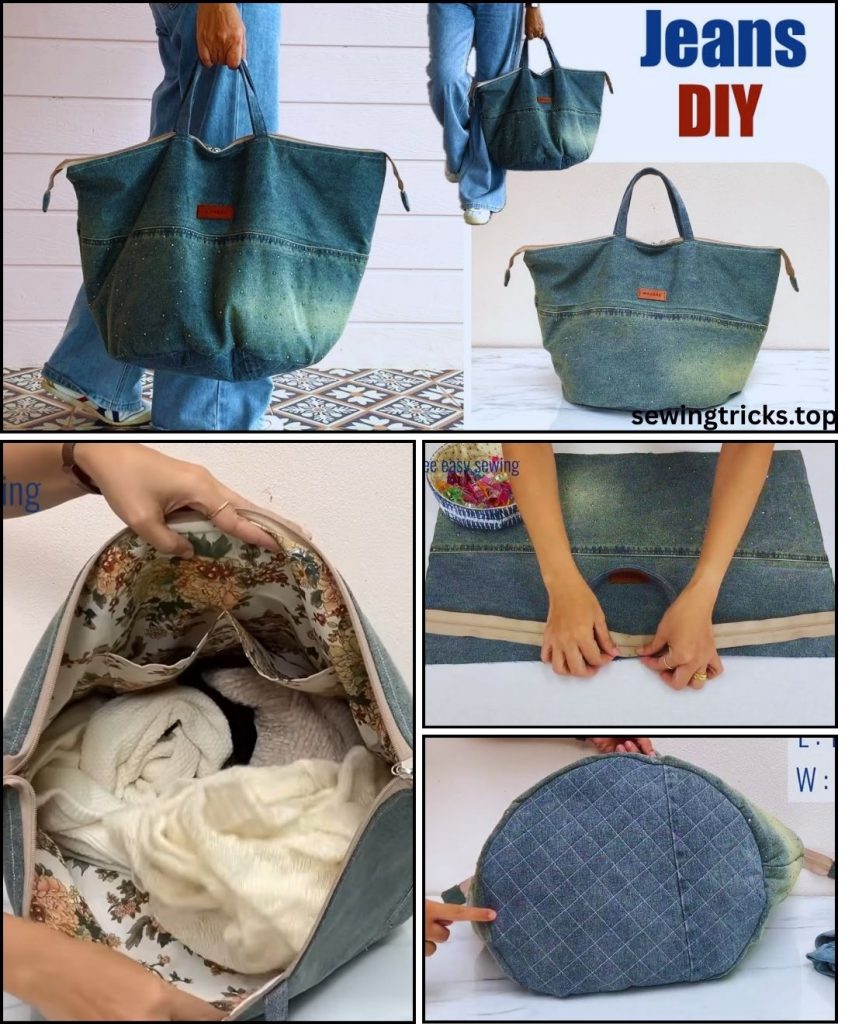
- Repeat for the Lining: Follow the exact same process (steps 1-5) to attach the lining circular bottom to the lining tube. You do not need to leave a turning hole here.

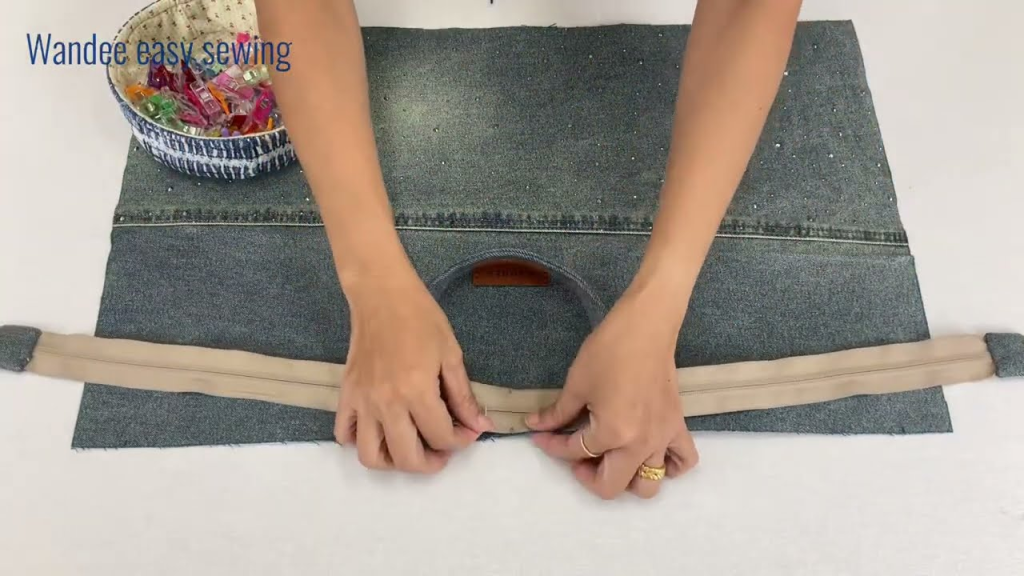
Step 6: Attach the Strap
- Turn the denim outer bag right-side-out.
- Decide where you want your straps. A good placement is about 3-4 inches in from each side seam.
- Pin the raw ends of your strap to the top edge of the bag, on the outside (denim side), ensuring the strap isn’t twisted. The ends of the strap should point downwards, towards the bottom of the bag.
- Baste the straps in place by sewing them on with a 1/4 inch seam allowance. This just holds them securely for the final assembly.
Step 7: Final Assembly
- Keep the denim outer bag right side out.
- Keep the lining bag wrong side out.
- Place the denim outer bag (with straps attached and tucked inside) inside the lining bag.
- Line up the top edges (where the zipper is) and the side seams. The right sides of the denim and lining should be facing each other.
- Pin all the way around the top opening.
- Sew around this entire top opening, sewing over the top of the zipper. This will encase all raw edges.
Step 8: The Birth of the Bag
- Reach through the opening you left in the lining’s side seam.
- Grab the denim part of the bag and gently pull the entire bag through the hole. It will feel like a magic trick.
- Keep pulling until the entire bag is right-side-out.
- Use a blunt object like a chopstick to push out all the seams for a crisp finish.
Step 9: Finishing Touches
- Find the opening in the lining. Tuck the raw edges in and press. Stitch the opening closed very close to the edge (this is called an edge stitch). You can also hand-sew it closed with a ladder stitch for an invisible finish.
- Push the lining down inside the denim bag.
- Press the entire bag, especially the top edge around the zipper.
- For the final professional touch, topstitch all the way around the top opening of the bag, about 1/4 inch from the edge. This keeps the lining from peeking out and gives a beautiful, crisp finish.
Congratulations!
You’ve successfully transformed a pair of old jeans into a stunning, custom-made zipper tote bag. You’ve tackled curves, zippers, and heavy fabric to create a durable and eco-friendly accessory that you can be proud of. Now, go fill it up and show it off!


