
Here is a detailed, long-form article on how to sew a cute and functional bag from a single rectangular piece of fabric. This tutorial is designed to be beginner-friendly but also offers tips for more experienced sewers.
The Magic of One Rectangle: A Detailed Tutorial to Sew Your Own Lined Tote Bag
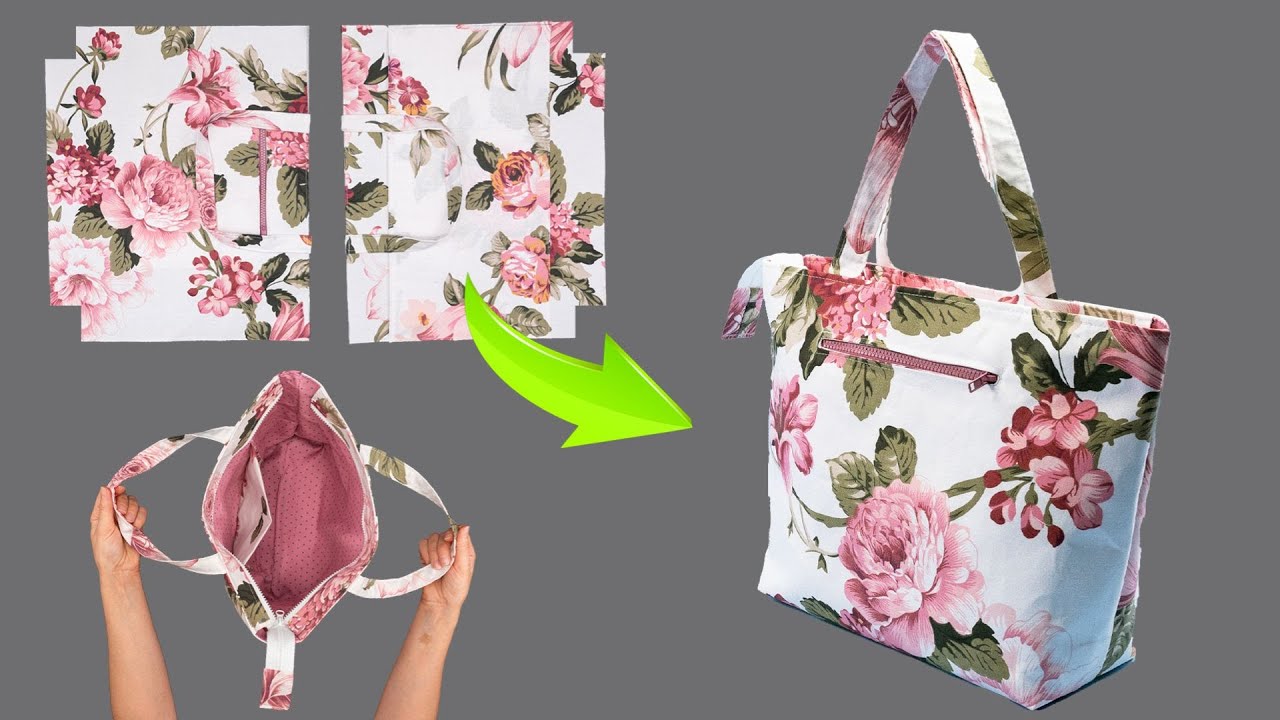
There is a special kind of magic in taking a simple, flat piece of fabric and transforming it into something three-dimensional, functional, and beautiful. If you’ve ever wanted to sew your own bag but felt intimidated by complex patterns with multiple pieces, this tutorial is your perfect starting point.
We are going to create a surprisingly sturdy, fully-lined tote bag with professional-looking boxed corners and comfortable straps, all from a single rectangular piece of cloth. This method is ingenious because the lining and the outer bag are created simultaneously, minimizing cutting and complex alignments. It’s a project you can complete in an afternoon and one that will leave you with a beautiful bag you’ll be proud to carry.
Let’s dive in and unlock the secrets of the one-rectangle tote!
Part 1: Gathering Your Supplies
Preparation is key to a smooth sewing experience. Before you begin, gather the following materials and tools.
Fabric & Notions:
- Main Fabric (One Rectangle): This is the star of the show.
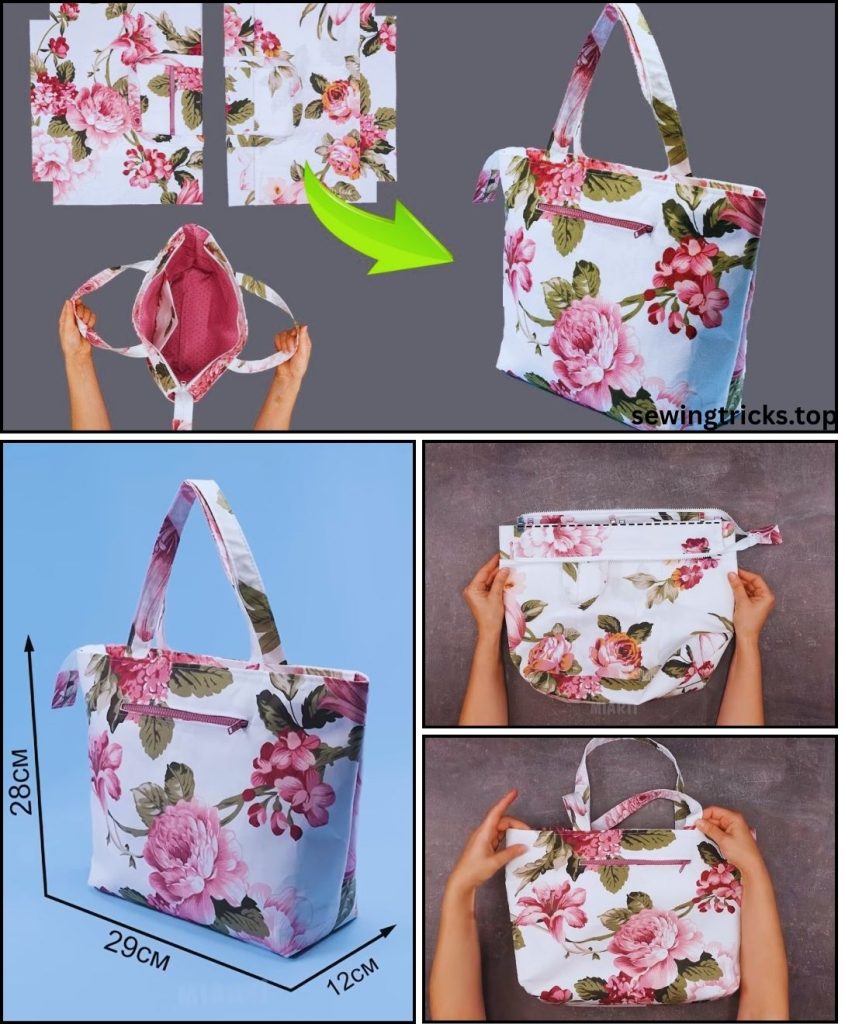
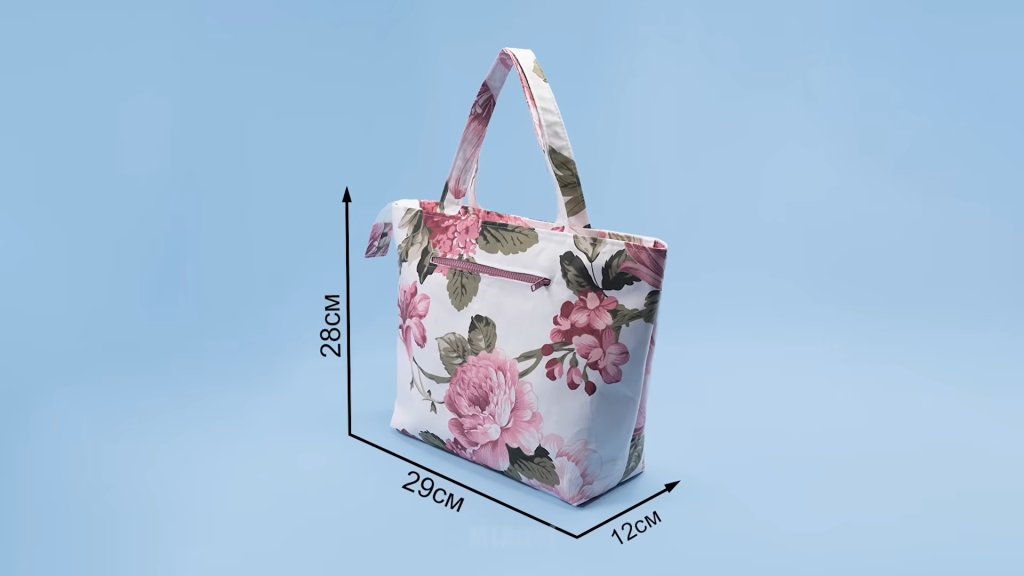
- Size: For a versatile, medium-sized tote bag (approximately 15″ wide x 13″ tall x 4″ deep), a good starting dimension for your rectangle is 42 inches long x 18 inches wide (42″×18″). You can easily adjust these dimensions for a larger or smaller bag.
- Type: A medium-weight, non-stretch woven fabric is ideal. Consider these options:
- Canvas or Duck Cloth: Incredibly durable, perfect for a workhorse tote.
- Denim: Stylish and strong.
- Corduroy: Adds a lovely texture.
- Home Décor Fabric: Often comes in wider widths and beautiful, sturdy prints.
- Quilting Cotton: Excellent for beginners. It’s easy to handle and comes in endless patterns. If you use quilting cotton, I highly recommend using interfacing to give it more body.
- Interfacing (Optional but Recommended):
- If you’re using a lighter fabric like quilting cotton, fusible fleece or a medium-weight woven interfacing will add structure and stability to your bag, preventing it from being too floppy. You would need a piece the same size as your main fabric.
- Fabric for Straps:
- You’ll need two strips of fabric, each 24 inches long x 4 inches wide (24″×4″). You can use the same fabric as your bag or a contrasting one for a pop of color. Webbing (1″ to 1.5″ wide) is a great, sturdy, no-sew alternative for straps.
- All-Purpose Thread: Choose a color that matches or contrasts with your fabric, depending on the look you want.
Tools of the Trade:
- Sewing Machine: A basic machine with a straight stitch is all you need.
- Fabric Scissors or a Rotary Cutter & Mat: A rotary cutter provides very straight, clean cuts, but sharp scissors work perfectly well.
- Ruler or Measuring Tape: A long, clear quilting ruler is especially helpful.
- Fabric Marker or Tailor’s Chalk: For marking lines that will disappear or wash away.
- Pins or Sewing Clips: To hold your fabric pieces together while you sew.
- Iron and Ironing Board: Absolutely essential! Pressing your seams as you go is the secret to a professional-looking finish.
- Seam Ripper: For those inevitable “oops” moments. Don’t be afraid to use it!
Part 2: Understanding the Concept – The Fold
Before we cut, let’s understand how this works. Imagine your long rectangle. The two short ends will be sewn together to form a tube. This tube is then folded in a specific way so that one half becomes the outer bag and the other half becomes the lining, with the bottom of the bag being a single, seamless fold. It’s a clever piece of fabric geometry!
Part 3: The Step-by-Step Sewing Process
Take your time with each step, press your seams, and enjoy the process. For this tutorial, we will use a seam allowance of 1/2 inch unless otherwise stated.
Step 1: Prepare and Cut Your Fabric
- Pre-wash and Iron: Always pre-wash and dry your fabric the same way you intend to launder the finished bag. This prevents shrinking and warping later on. Once dry, give it a thorough press with your iron to remove all wrinkles.
- Cut Your Main Rectangle: Carefully measure and cut your main fabric to your desired size. For our example, this is 42″×18″.
- Cut Your Strap Pieces: Cut two pieces of fabric, each measuring 24″×4″.
- (Optional) Apply Interfacing: If you are using interfacing, follow the manufacturer’s instructions to fuse it to the wrong side of your main fabric rectangle now.
Step 2: Sewing the Main Body
- Fold and Pin: Take your large fabric rectangle and fold it in half widthwise (also called a “hot dog” fold), bringing the two short (18″) ends together. You should now have a rectangle that is 21″×18″. Crucially, the right sides of the fabric should be facing each other.
- Sew the Side Seams: Pin along the two raw-edged sides (the 21″ edges). Sew down both sides using a 1/2 inch seam allowance. Remember to backstitch at the beginning and end of each seam to lock your stitches in place.
- You now have a tube of fabric with a fold at the bottom and a seam on each side.
Step 3: Creating the Boxed Corners (The Magic Part!)
Boxed corners give your bag depth and allow it to stand up on its own. We will do this for both the outer bag and the lining at the same time.
- Press Seams Open: Turn your fabric tube so one of the side seams is facing up. Use your iron to press this seam open. This reduces bulk and makes the next step easier. Do this for both side seams.
- Align for the Corner: Now, reach inside the tube and pinch one of the bottom corners. Pull the sides apart so that the side seam you just sewed lines up perfectly on top of the bottom fold. The corner should now form a point, like a triangle. Flatten this triangle.
- Mark Your Line: We want to create a 4-inch deep base. To do this, use your ruler to measure down from the very tip of the triangle. Place your ruler perpendicular to the seam line. Mark a straight line across the corner that is 4 inches long. This line will be 2 inches away from the tip.
- Sew the Corner: Sew directly on top of the line you just drew. Backstitch at the beginning and end for strength.
- Repeat: Do the exact same thing for the other bottom corner. You now have two “ears” or triangles sewn at the bottom of your bag. You can leave these as is or trim them to about 1/2 inch from the seam line to reduce bulk.
(Imagine a simple line drawing showing a corner being flattened into a triangle, with a line drawn across it.)
Step 4: Forming the Lining and Outer Bag
- Find the Center: Lay your fabric tube flat. Find the horizontal center of the tube. This is where your outer bag will end and your lining will begin. For our 42″ starting piece (which is now 21″ tall), the center is at 10.5″. You can make a small mark with your chalk on the side seams if you wish.
- Fold the Lining Down: Now, fold the top half of the tube down and into the bottom half. Tuck it in neatly, aligning the side seams. Push it all the way down until the top raw edge of the fabric meets the bottom (now boxed) corners. What you have now should look like a bag with its lining. The wrong sides of the fabric are facing each other (the pretty sides are out on both the inside and outside).
- Press the Top Edge: Carefully align the top raw edges of the outer bag and the lining. Press this top edge firmly with your iron to create a sharp crease. This will be your guide for a beautiful top-stitch later.
Step 5: Making the Straps
- Fold and Press: Take one of your 24″×4″ strap pieces. Place it wrong side up on your ironing board. Fold it in half lengthwise (“hot dog” style) and press to create a center crease.
- Fold Again: Open the fabric up. Now fold each long raw edge into that center crease you just made. Press firmly.
- Final Fold: Fold the entire strip in half along the original center crease. The raw edges are now completely enclosed. You should have a sturdy strap that is 1 inch wide and 24 inches long. Press it one last time.
- Edge-Stitch: To secure the strap and give it a professional look, sew a straight stitch close to the edge down both long sides of the strap. This is called edge-stitching.
- Repeat the entire process for the second strap piece.
Step 6: Attaching the Straps and Finishing the Bag
- Unfold the Top: Unfold the top edge of your bag that you just pressed. The lining will now be pulled up and out from the main bag body. The top raw edges of both layers are exposed.
- Position the Straps: Lay the bag flat. Measure in from each side seam along the top edge of the outer bag layer. A good placement is 3 inches from each side seam.
- Pin the Straps: Take one strap. Place one end at the 3-inch mark, with the raw edge of the strap lined up with the raw edge of the bag. The main loop of the strap should be pointing down, towards the bottom of the bag. Pin it securely in place. Take the other end of the same strap and pin it at the 3-inch mark on the same side of the bag. Make sure the strap isn’t twisted!
- Repeat for the other side of the bag with the second strap.
- Fold Lining Back Over: Now, carefully fold the lining back over the straps, sandwiching the strap ends between the outer bag and the lining. Re-align the top raw edges and pin or clip everything in place all the way around the top of the bag. The straps are now hidden on the inside.
- Sew the Top Seam: Using your sewing machine, sew all the way around the top circle of the bag with a 1/2 inch seam allowance. IMPORTANT: Leave a 4 to 5-inch gap unsewn on one side, between the straps. This is your turning hole. Be sure to backstitch thoroughly at the beginning and end of this seam.
- The Big Reveal: Reach into the turning hole you left. Grab the inner fabric and begin pulling the entire bag through the hole. It will feel like a jumbled mess at first, but keep going! Pull it all the way out.
- Final Touches: Use a blunt object like a chopstick or a point-turner to gently poke out the corners and ensure everything is turned properly. Tuck the lining neatly inside the outer bag. The straps should now be pointing up, perfectly attached.
- Press and Top-stitch: Take the bag back to your ironing board. Press the top edge flat, making sure the seam allowance at the turning hole is tucked in neatly and is flush with the rest of the seam. To close the hole and give your bag a crisp, professional finish, top-stitch all the way around the top opening, about 1/4 inch from the edge. This will catch the turning hole and seal it shut.
Part 4: Customization and Creative Ideas
Now that you’ve mastered the basic technique, here are some ways to make your next bag even more unique:
- Add a Pocket: Before you sew the main side seams in Step 2, you can add a simple patch pocket to what will be either the outer bag or the lining.
- Contrasting Fabrics: Use a fun, bright print for the lining that peeks out from the top.
- Add a Closure: Before you sew the top seam in Step 6, you can sew in the halves of a magnetic snap to the center of the outer bag and lining.
- Different Strap Styles: Use cotton webbing, leather straps, or even rope for a different aesthetic.
- Embellishments: Add appliqué, embroidery, or fabric paint to the outer bag panel before you begin construction.
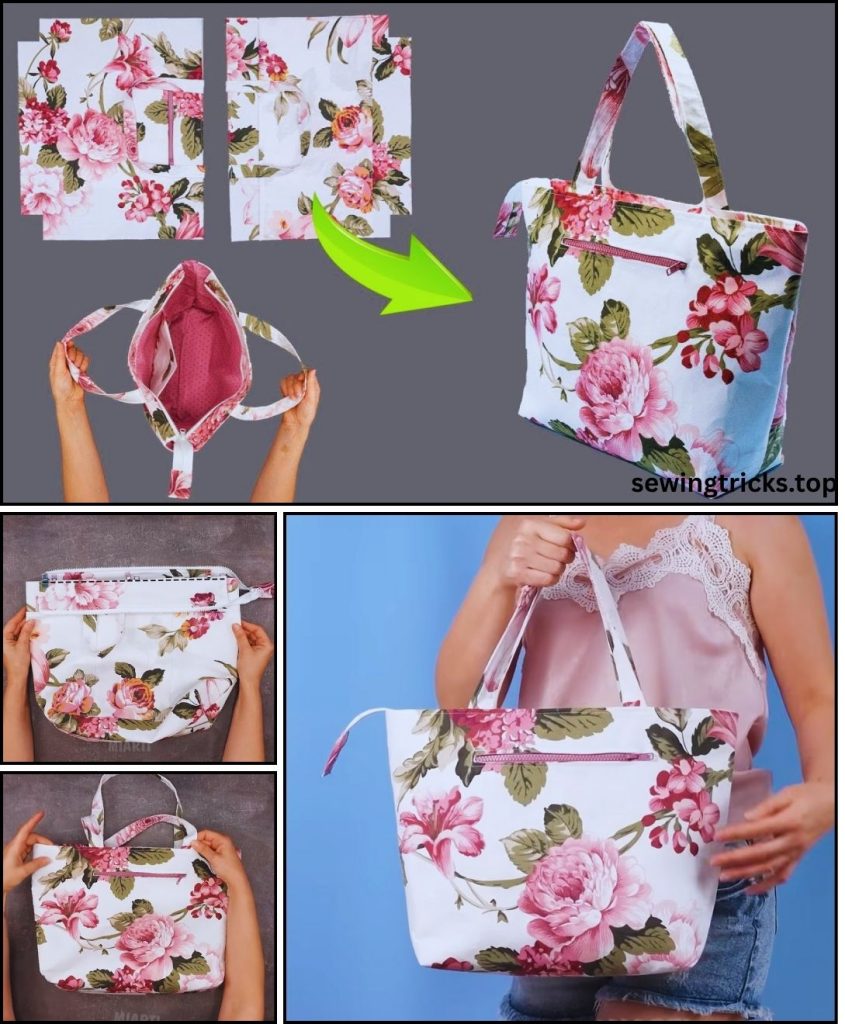
You have now successfully created a beautiful, durable, and fully-lined tote bag from a single piece of fabric. This versatile pattern can be adapted for anything from a small project bag to a large beach tote, all by simply changing the dimensions of your initial rectangle. Happy sewing!


