
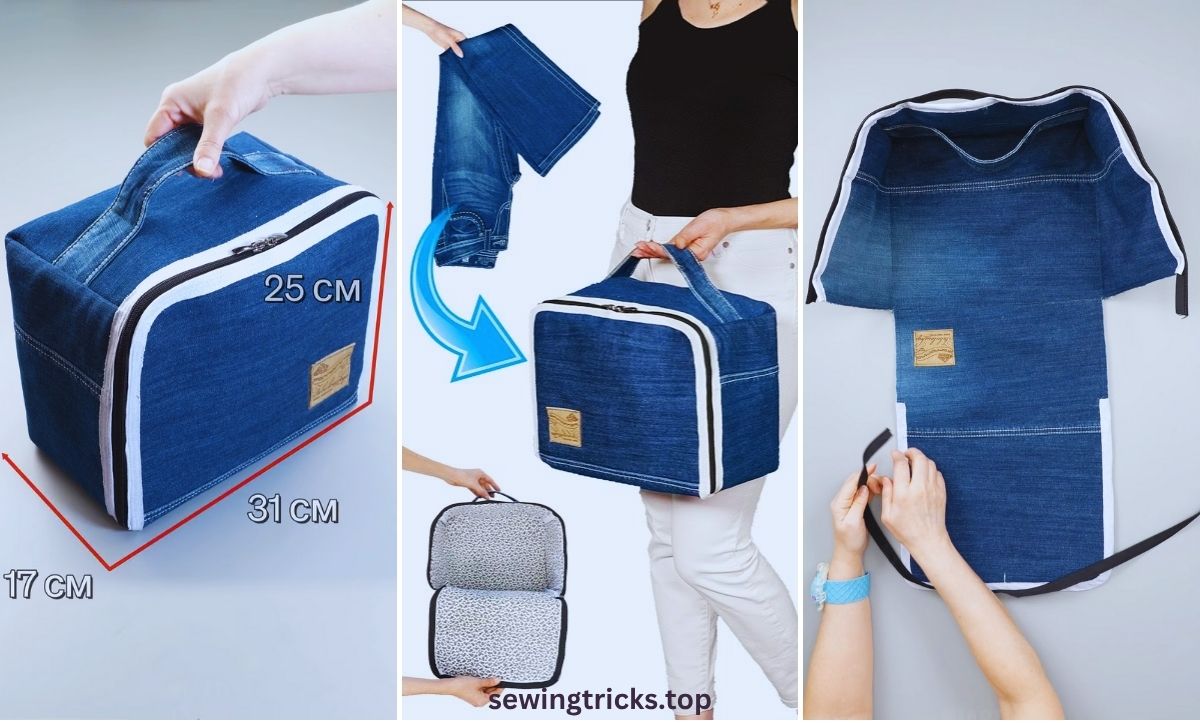
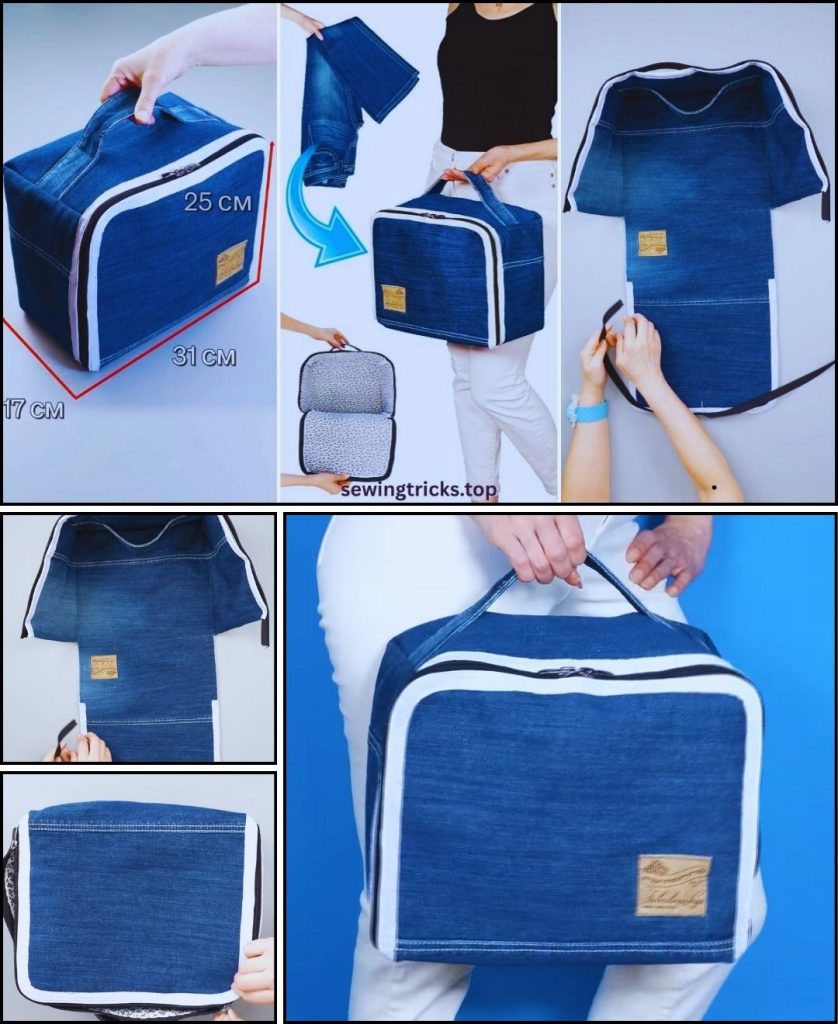
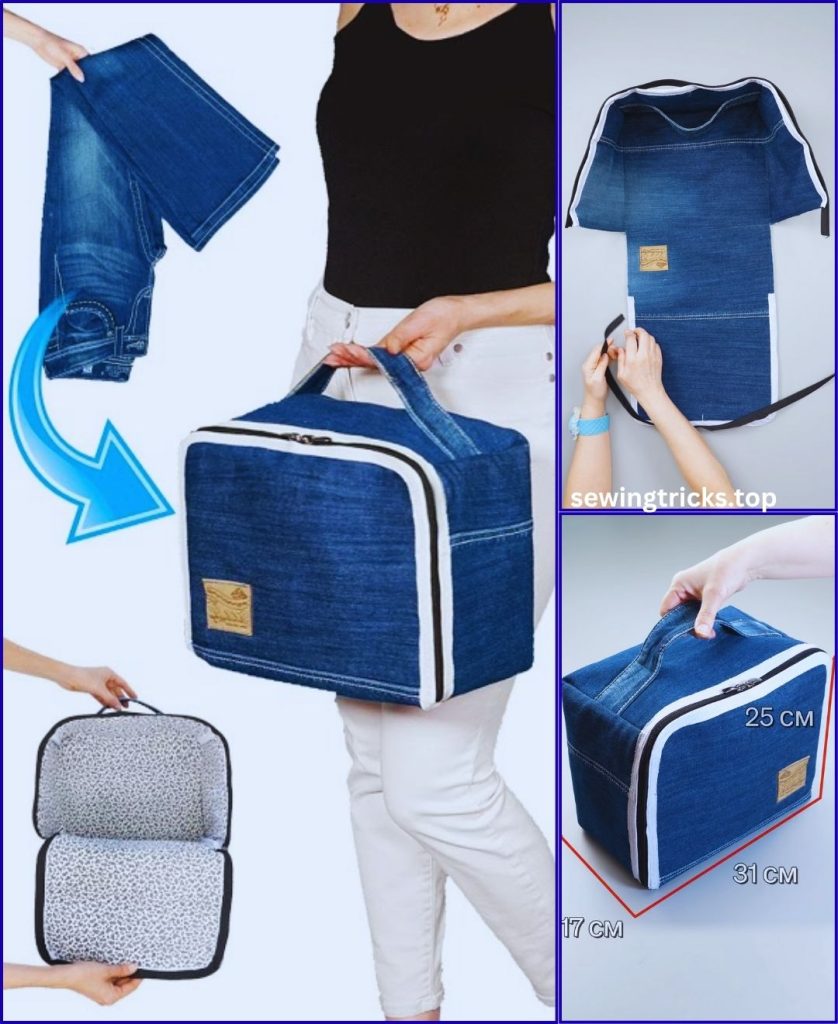
There’s a unique satisfaction that comes from creating something beautiful and functional with your own hands. This project combines the joy of sewing with the eco-conscious practice of upcycling. That old pair of jeans sitting in the back of your closet—the one with the perfect fade but a worn-out knee—is the ideal candidate for a new life. Its sturdy denim fabric is perfect for a durable, stylish, and incredibly useful small travel bag.
This detailed tutorial will guide you through every step of the process, from deconstructing your jeans to the final stitch. We’ll create a simple, self-drafted pattern for a classic zippered pouch with boxed corners, giving it a professional structure perfect for toiletries, makeup, electronic gadgets, or art supplies. Whether you’re a seasoned sewist or a confident beginner, you’ll find this project both rewarding and practical.
Why Use Old Jeans for This Project?
Before we dive in, let’s appreciate why denim is such a fantastic material for this bag:
- Durability: Denim was born to be tough. It can withstand the rigors of travel, protecting your belongings inside.
- Character: Every pair of old jeans tells a story through its fades, wear patterns, and textures. This built-in character translates into a one-of-a-kind bag that is uniquely yours.
- Sustainability: Upcycling textiles is one of the best ways to reduce fashion waste. You’re giving a discarded item a new purpose instead of sending it to a landfill.
- Cost-Effective: The main fabric for your project is essentially free!
- Hidden Features: You can creatively incorporate existing jean pockets, belt loops, and seams into your design for extra flair and functionality.
Part 1: Gathering Your Materials & Tools
Preparation is key to a smooth sewing experience. Gather everything you need before you start.
Materials:
- An Old Pair of Jeans: A single adult-sized pair will be more than enough. Non-stretch or low-stretch denim works best as it provides more stability.
- Lining Fabric: About a quarter yard (or a “fat quarter”) of cotton or quilting fabric. Choose a fun print or a solid color that complements your denim.
- All-Purpose Zipper: A 9-inch or 10-inch zipper is a good size for this bag. You can always use a longer zipper and shorten it.
- Medium-Weight Fusible Interfacing: This is crucial for giving the bag structure and preventing the denim from stretching. You’ll need a piece the same size as your lining fabric.
- All-Purpose Sewing Thread: Choose a color that matches your denim (for a subtle look) or a classic gold/contrast color (for a traditional jeans look).
Tools:
- Sewing Machine: A standard machine with a straight stitch is all you need.
- Zipper Foot: This specialized presser foot is essential for sewing close to the zipper teeth.
- Sharp Fabric Scissors or a Rotary Cutter & Mat: For clean, precise cuts.
- Ruler or Measuring Tape: A clear acrylic sewing ruler is especially helpful.
- Fabric Marker, Chalk, or a Pen: To mark your cutting lines.
- Pins or Sewing Clips: To hold your fabric pieces together.
- Seam Ripper: An indispensable tool for undoing any mistakes (and for deconstructing the jeans!).
- Iron & Ironing Board: Pressing your seams as you go is the secret to a professional finish.
Part 2: The Pattern – Measuring & Cutting Your Fabric
This project uses a simple, self-drafted pattern based on rectangles. We are aiming for a finished bag that is roughly 9 inches wide by 7 inches tall with a 2-inch depth.
Step 1: Deconstruct the Jeans
First, you need to harvest the fabric. Use your seam ripper and scissors to cut open the inseam of the jean legs. Cut off the thick side seams and the hem. Your goal is to create large, flat pieces of denim. Press these pieces flat with your iron.
Step 2: Cut Your Fabric Pieces
From your prepared fabrics, cut the following rectangular pieces. The measurements below include a 1/2-inch seam allowance.
- From the Denim (Outer Bag):
- Cut TWO (2) pieces measuring 10 inches wide x 8 inches tall.
- From the Lining Fabric:
- Cut TWO (2) pieces measuring 10 inches wide x 8 inches tall.
- From the Fusible Interfacing:
- Cut TWO (2) pieces measuring 10 inches wide x 8 inches tall.
- From a Denim Scrap (Zipper Tabs):
- Cut TWO (2) pieces measuring 2 inches wide x 4 inches tall.
Pro-Tip: When cutting your denim, try to avoid the very thick felled seams unless you are intentionally incorporating them as a design element.
Step 3: Apply the Interfacing
Place one piece of interfacing on the wrong side of one of your denim pieces, with the bumpy (glue) side facing the fabric. Following the manufacturer’s instructions, press with a hot, dry iron to fuse it in place. The interfacing adds body and prevents the denim from warping. Repeat for the second denim piece.
Part 3: Step-by-Step Sewing Instructions
Now for the fun part! We’ll construct the bag step by step. Remember to backstitch at the beginning and end of every seam to secure your stitches. Use a 1/2-inch seam allowance unless otherwise stated.
Step 1: Prepare the Zipper
Creating fabric tabs on the ends of the zipper gives your bag a clean, high-end finish.
- Take one of your small 2×4-inch denim tabs. Fold it in half lengthwise (so it’s 2×2 inches) and press. Unfold.
- Fold the raw edges into the center crease you just made and press again. It should now be a 1×4-inch strip.
- Cut this strip in half to create two 1×2-inch tabs.
- Place one end of your zipper inside the fold of one tab. Pin or clip it in place.
- Stitch across the tab, close to the folded edge, securing the zipper inside. You may need to sew over the zipper teeth slowly and carefully. Trim any excess zipper tape that sticks out.
- Repeat for the other end of the zipper. Trim the finished zipper assembly so its total length is 10 inches (the same width as your fabric panels).
Step 2: Attach the Zipper to the First Panel (The Zipper Sandwich)
- Lay one piece of the outer denim fabric right side up on your table.
- Place the prepared zipper on top of the denim, right side down, aligning the top edge of the zipper tape with the top raw edge of the denim.
- Lay one piece of the lining fabric on top of the zipper, right side down. The top edges of all three layers (denim, zipper, lining) should be perfectly aligned.
- Pin or clip these three layers together along the top edge.
- Attach the zipper foot to your sewing machine. Sew along this pinned edge, getting as close to the zipper teeth as you can without sewing over them.
Step 3: Press and Topstitch
- Open up the fabric so the denim and lining are now wrong sides together, with the zipper in the middle.
- Press the fabric away from the zipper teeth firmly.
- Topstitch along the denim, about 1/8-inch away from the zipper. This crucial step keeps the lining fabric from getting caught in the zipper later.
Step 4: Attach the Second Panel
Now, repeat the process for the other side.
- Lay your remaining denim piece right side up.
- Place the sewn unit on top, right side down, so the unsewn edge of the zipper tape aligns with the top edge of the new denim piece.
- Lay the remaining lining piece on top of that, right side down.
- Pin, sew with your zipper foot, press, and topstitch just as you did for the first side.
You should now have a flat piece with the zipper in the middle, denim on both “outsides” and lining on both “insides”.
Step 5: Assemble the Bag
- CRITICAL STEP: Unzip your zipper at least halfway! If you forget this, you won’t be able to turn your bag right-side-out.
- Open up your project and rearrange it so that the two outer denim pieces are right sides together on one side, and the two lining pieces are right sides together on the other.
- Pin or clip all the way around the perimeter. Make sure the seams where the fabric meets the zipper are aligned perfectly.
- Sew all the way around the perimeter with a 1/2-inch seam allowance. BUT, leave a 3−4 inch gap in the bottom edge of the LINING. This is the turning hole.
Step 6: Box the Corners
This step creates the bag’s 3D shape and allows it to stand on its own.
- Start with one of the lining corners. Pinch the corner so that the side seam and the bottom seam meet, forming a triangle. The seams should lie directly on top of each other.
- Use your ruler to measure down 1.5 inches from the tip of the triangle. Draw a line straight across.
- Sew directly on that line. Backstitch at the start and end.
- Trim the excess triangle corner off, leaving about a 1/4-inch seam allowance.
- Repeat this process for all four corners (the other lining corner and the two denim corners).
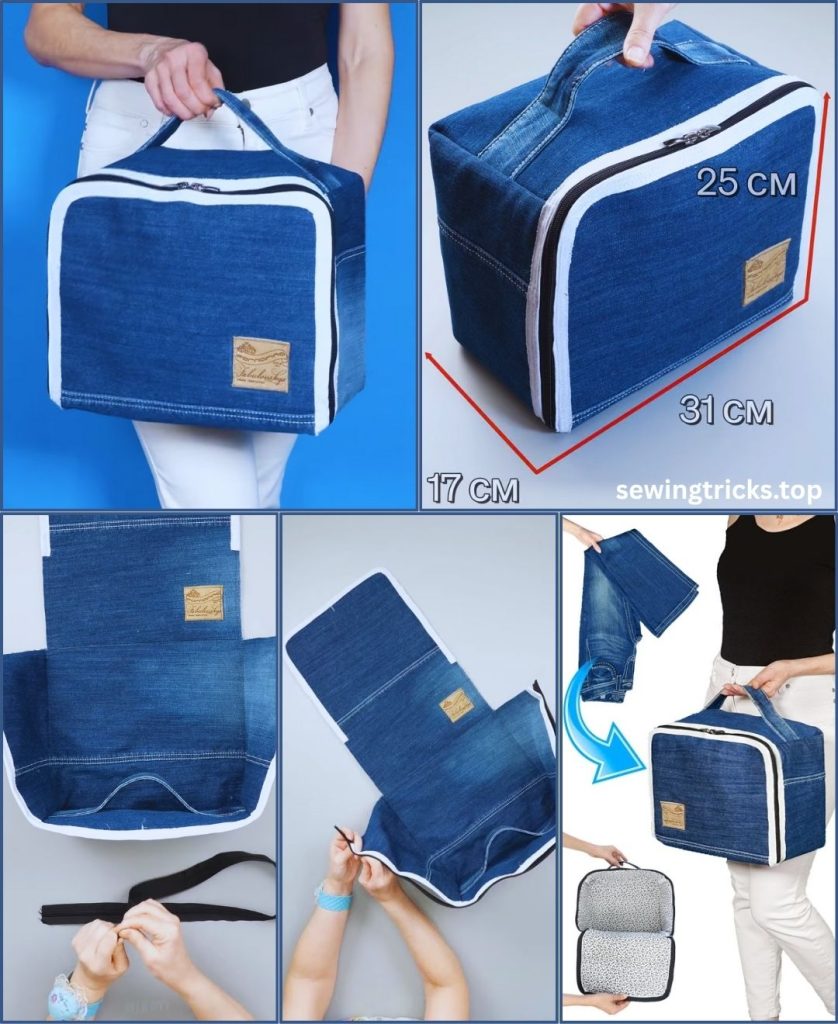
Step 7: The Big Reveal!
- Reach through the gap you left in the lining and grab the denim part of the bag.
- Gently pull the entire bag through the hole. It will feel like a mess at first, but keep going!
- Use a blunt tool like a chopstick or a point turner to gently poke out all the corners so they are crisp and defined.
- Tuck the lining into the denim bag. Give the entire bag a final, thorough press with your iron, paying special attention to the zipper and top edges.
Step 8: Close the Gap
The last step is to close the hole in the lining.
- Tuck the raw edges of the opening into the hole and press them flat.
- You can either hand-sew the opening closed using an invisible ladder stitch, or for a quicker method, simply topstitch it closed on your machine, sewing very close to the folded edge. Since this is on the inside of the bag, a machine stitch is perfectly fine.
Part 4: Customization & Pro-Tips
You’ve now completed your bag! Here are some ideas to make your next one even more unique:
- Incorporate a Jean Pocket: When cutting your initial denim pieces, strategically cut one of them to include the original back pocket of the jeans for an instant outer pocket.
- Add a Wrist Strap: Use a long scrap of denim to create a loop. Fold it like we did the zipper tabs, topstitch it, and sandwich it into the side seam (near the zipper) during assembly.
- Patchwork: Use smaller scraps from different pairs of jeans to create a patchwork panel before cutting out your main bag pieces.
- Embellish: Add embroidery, fabric paint, or patches to personalize your bag.
- Water-Resistant Lining: For a toiletries bag, consider using a waterproof fabric like PUL or laminated cotton for the lining.
Conclusion
Congratulations! You have successfully transformed an old, forgotten garment into a stylish, durable, and incredibly practical travel bag. This project not only hones your sewing skills—like installing a zipper and boxing corners—but also connects you to the powerful movement of sustainable crafting. Every time you use your new bag, you can feel proud of the creativity, resourcefulness, and care you stitched into every seam. Happy sewing!


