
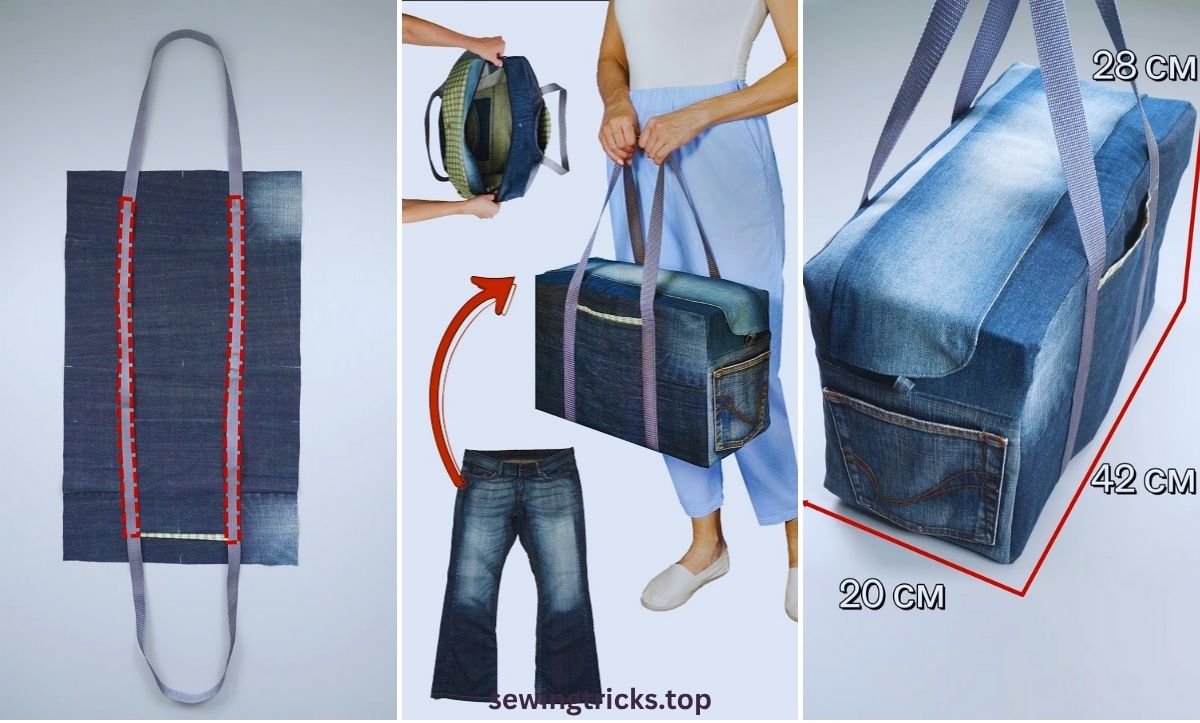
Upcycling old jeans into a stylish and durable travel bag is a fantastic “thrift flip” project. Denim is inherently strong, making it an excellent material for luggage or utility bags. This detailed tutorial will guide you through creating a sturdy, medium-sized travel duffel/barrel bag from old jeans, showcasing how to utilize various parts of the denim for structure and style.
We will focus on a clean, cylindrical design that uses the pockets for easy exterior storage and incorporates strong handles for travel. We’ll aim for a finished size of approximately 16 inches long, 8 inches high, and 8 inches deep (diameter).
I. Planning & Gathering Your Materials
Careful preparation is essential for handling the thick, recycled denim fabric.
- Old Jeans:
- Quantity: 2 pairs of adult-sized jeans (required for enough flat, large denim pieces). Look for sturdy, non-stretch or low-stretch denim.
- Preparation: Wash, dry, and iron all jeans. Deconstruct them by unpicking seams to get the largest possible flat pieces.
- Lining Fabric:
- Quantity: 1.5 yards of a durable woven cotton or nylon/water-resistant fabric.
- Interfacing/Stabilizer (Crucial):
- Type: Heavy-weight fusible stabilizer (e.g., Pellon 809 Decor Bond) for the main body panels.
- Quantity: Approximately 1 yard.
- Zipper:
- Type: A sturdy, thick nylon or plastic coil zipper, at least 20 inches long.
- Webbing for Handles/Strap:
- Type: Heavy-duty cotton or polypropylene webbing, 1.5 inches wide.
- Quantity: 2 yards for handles and an optional shoulder strap.
- Hardware (Optional): Two D-rings and a slide buckle for an adjustable shoulder strap.
- Thread:
- All-purpose thread: For lining.
- Heavy-duty/Topstitching thread: In a contrasting color (like gold) for visible seams and handle attachment.
- Basic Sewing Tools: Sewing machine with a denim needle (size 16 or 18), zipper foot, rotary cutter, ruler, fabric marker, and plenty of heavy-duty clips (pins won’t work well on this thickness).
II. Prepare & Cut Your Fabric Panels
Accuracy in cutting is important, especially for the round side panels. We will cut slightly larger to allow for seams and patchwork.
1. Denim/Exterior Panels
- Main Body Panel: 1 piece, 26 inches long by 10 inches tall. (You may need to patchwork smaller denim pieces together to achieve this size. Press seams open!)
- End/Side Circles: 2 pieces (circles), 9 inches in diameter. (Again, piece denim scraps together as needed, then cut the circle templates).
- Exterior Pockets: Harvest two back pockets from the jeans, leaving a 1/2-inch allowance around the stitched edges.
2. Lining Panels
- Lining Body Panel: 1 piece, 26 inches long by 10 inches tall.
- Lining End/Side Circles: 2 pieces, 9 inches in diameter.
3. Stabilize
- Fuse the heavy-weight stabilizer to the wrong side of the Main Denim Body Panel and both Denim End Circles.
- Fuse medium-weight interfacing to all lining pieces.
III. Step-by-Step Sewing Instructions
We will use a consistent 1/2-inch seam allowance throughout this tutorial.
1. Prepare and Attach Exterior Pockets
- Center the two harvested back pockets vertically on the stabilized Main Denim Body Panel.
- Position them so they are centered horizontally on the panel.
- Stitch the pockets onto the panel, sewing close to the existing stitched edges. Reinforce the top corners with a small triangle or bar tack stitch for extra durability.
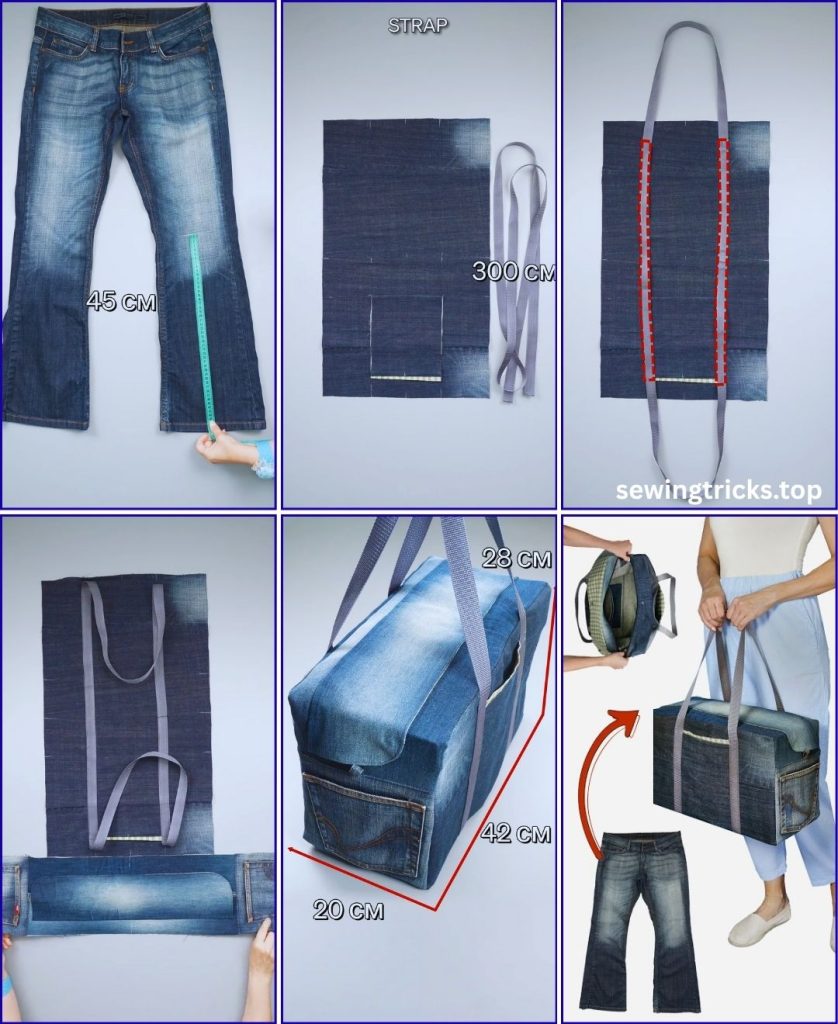
2. Prepare and Attach Handles
- Cut two pieces of webbing, each 20 inches long, for the main handles.
- On the Main Denim Body Panel, measure 3 inches in from each side edge. Pin the raw ends of the handles onto these marks. The handle loops should drape toward the center of the bag.
- Stitch the handles in place with a strong reinforcing box stitch within the 1/2-inch seam allowance.
3. Install the Zipper and Close the Body Seam
- Attach Zipper: Lay the Main Denim Body Panel right side up. Lay the zipper right side down along one long 26-inch edge. Sew with a 1/2-inch seam allowance (using a zipper foot).
- Close the Tube: Bring the two 26-inch edges of the Main Denim Panel together (right sides facing). The remaining free edge of the zipper is now aligned with the other long edge of the panel. Pin and sew the zipper in place to close the panel into a cylinder (a tube).
- Topstitch: Turn the denim tube right side out and press the zipper seams. Topstitch on both sides of the zipper for a professional, finished look.
4. Assemble the Lining
- Take the Lining Body Panel and sew the two 26-inch edges together with a 1/2-inch seam allowance to form a tube. Leave a 5-inch opening in the middle of this seam for turning later.
- Take the lining end circles and pin them into the circular openings of the lining tube. Sew carefully all the way around, making small clips in the seam allowance of the tube to help it ease around the curve.
5. Insert Lining and Finish the Ends
- Pin the Ends: Place the lining (still inside out) over the denim exterior (right side out). Align the end circles and pin the raw edges together, all the way around the circular opening. Ensure the zipper is open!
- Sew the Ends: Stitch the lining to the exterior all the way around the circular raw edge with a 1/2-inch seam allowance.
- Repeat: Repeat this process for the circular opening on the other side of the bag.
6. Final Turn and Closure
- Turn: Reach through the zippered top and pull the entire bag right side out through the 5-inch opening in the lining’s bottom seam.
- Finish: Push out the curves and corners. Press the seam allowances of the lining opening under and stitch it closed securely.
- Push the lining fully into the bag. Give the entire duffel a final press.
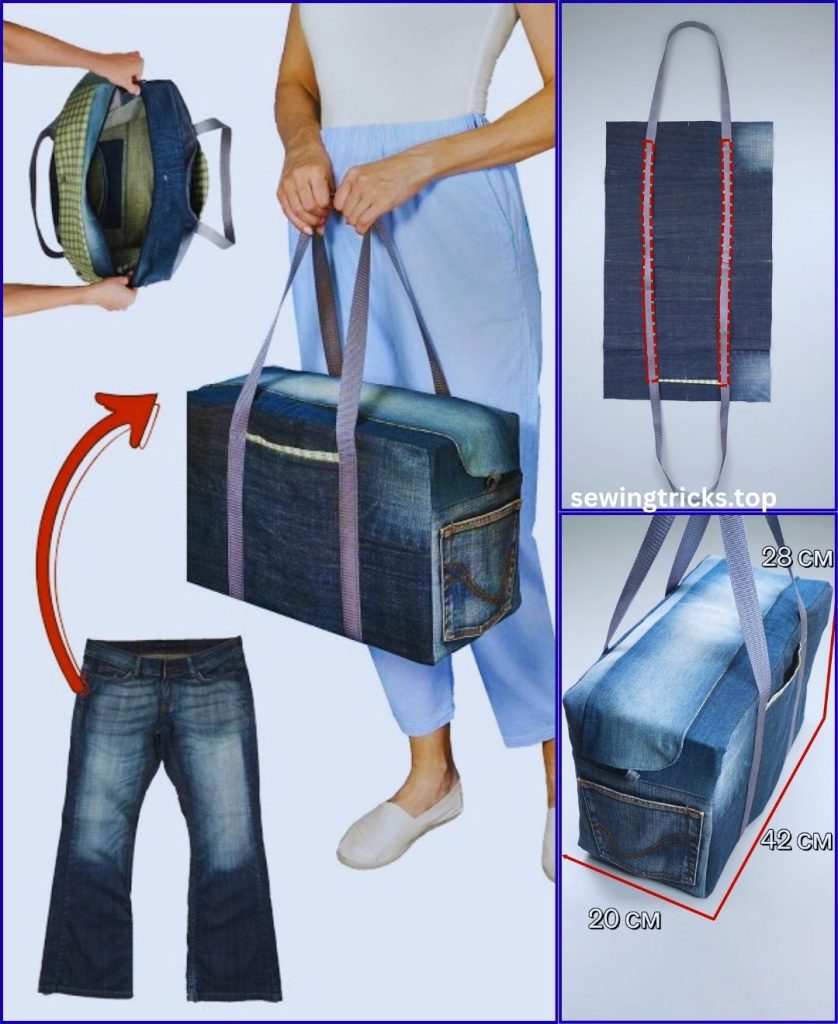
Congratulations! You have successfully created a sturdy and unique travel duffel bag from old jeans.


