
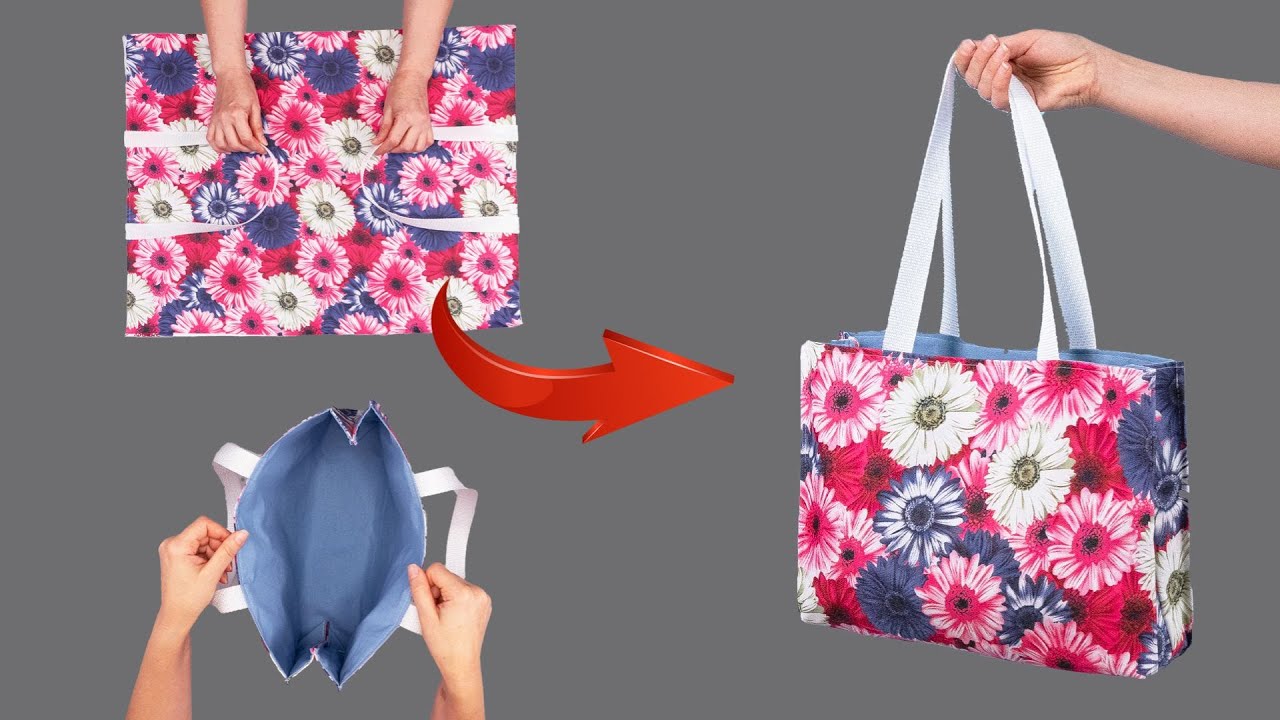
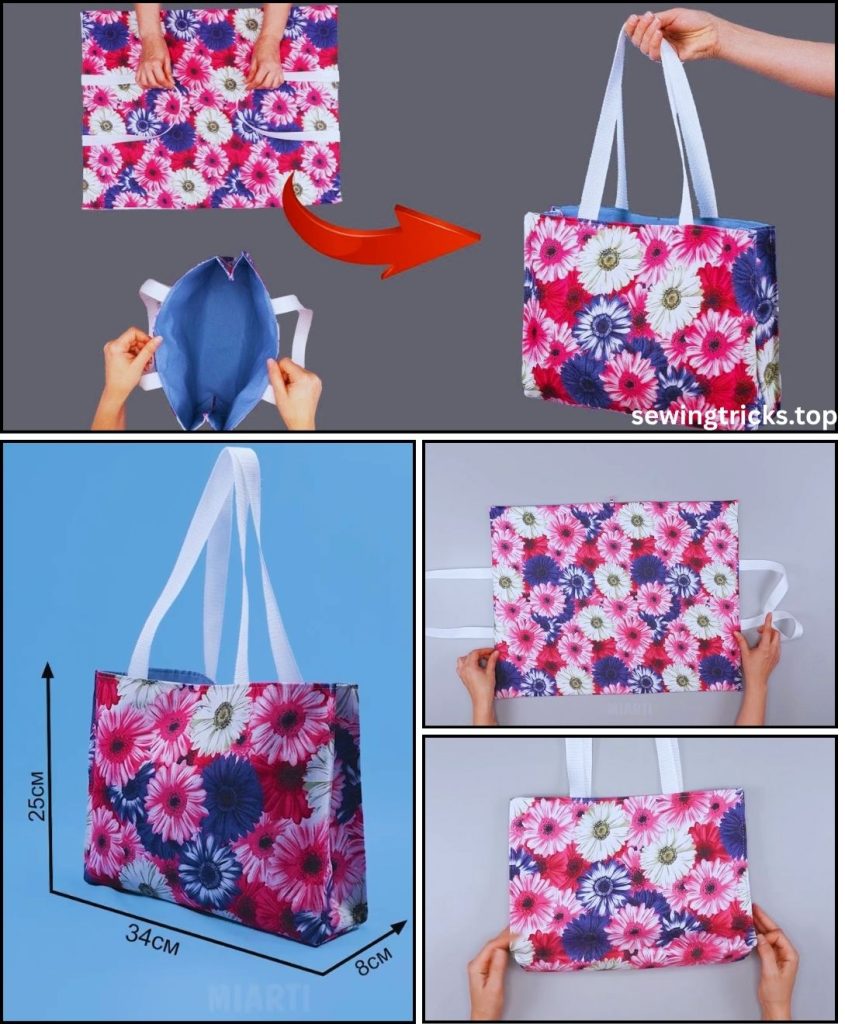
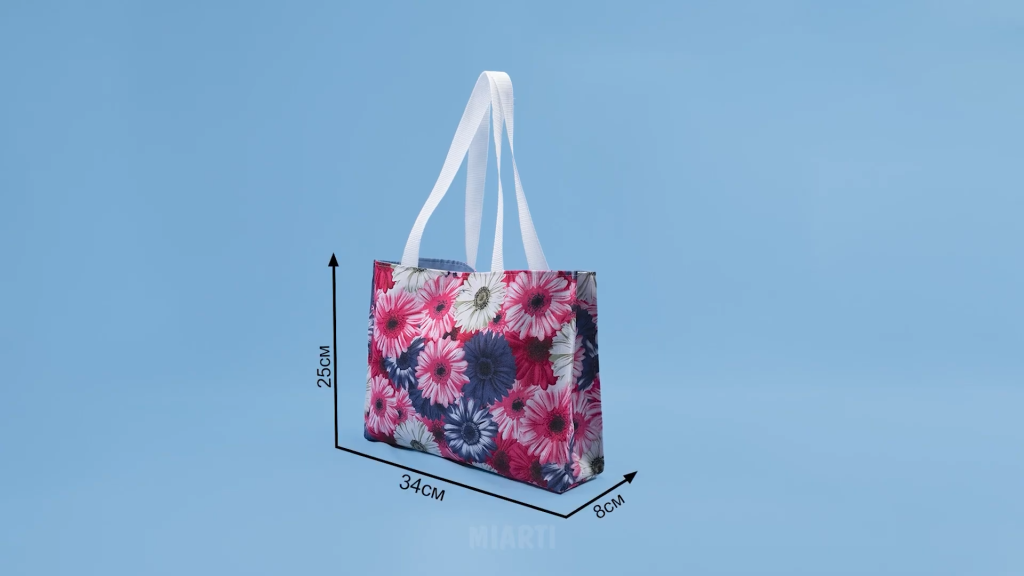
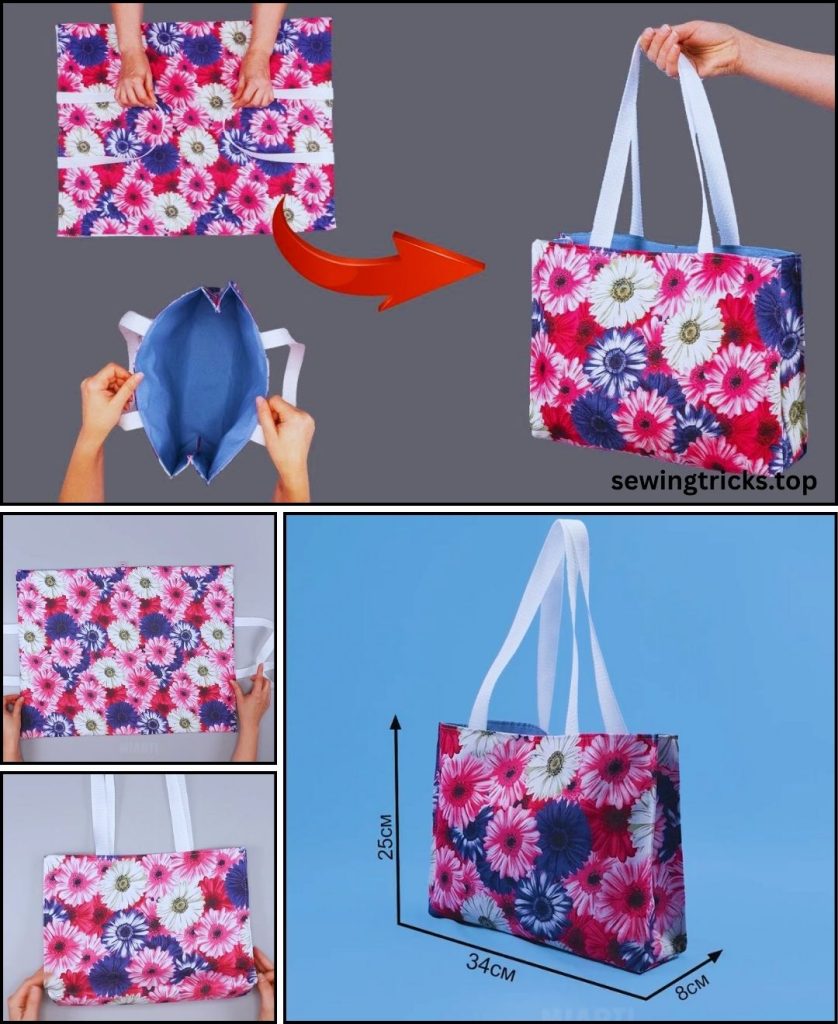
Here is a detailed tutorial on how to sew a beautiful and functional floral-print tote bag with the finished dimensions of 34 cm (width)×8 cm (depth)×25 cm (height). This guide is designed to be comprehensive, perfect for a confident beginner or intermediate sewist.
Sew Your Own Stylish Floral Tote Bag: A Detailed Step-by-Step Tutorial
Welcome to your next favorite sewing project! A handmade tote bag is not only a practical accessory for carrying everything from groceries to library books, but it’s also a fantastic way to express your personal style. This tutorial will guide you through every step of creating a sturdy, lined tote bag featuring a beautiful floral print. The final bag will have a clean, professional finish with boxed corners that give it structure and depth.
The finished dimensions will be approximately:
- Width: 34 cm
- Depth: 8 cm
- Height: 25 cm
Let’s gather our materials and begin creating something wonderful!
Section 1: Gathering Your Materials & Tools
Proper preparation is the key to a smooth sewing experience. Before you cut into your fabric, make sure you have everything you need on hand.
Fabric & Interfacing:
- Outer Fabric (Floral Print): You will need approximately 0.5 meters of a sturdy, non-stretch fabric. Great choices include:
- Cotton Canvas
- Duck Cloth
- Upholstery-weight Cotton
- Denim or Corduroy
- Tip: Choose a medium-weight fabric that can hold its shape well.
- Lining Fabric: You will need approximately 0.5 meters of a standard cotton fabric.
- Quilting Cotton or Broadcloth are perfect. You can choose a solid color that complements your floral print or a contrasting pattern for a fun surprise inside.
- Medium-Weight Fusible Interfacing: You will need approximately 0.5 meters. This is a non-negotiable item for a professional-looking tote. Interfacing is ironed onto the back of your outer fabric pieces to give them stability, structure, and durability. It prevents the bag from being floppy.
Tools & Notions:
- Sewing Machine: A standard machine with a universal needle (size 80/12 or 90/14) will be perfect.
- All-Purpose Thread: Choose a color that matches your outer floral fabric.
- Fabric Scissors or a Rotary Cutter & Mat: Essential for accurate cutting.
- Clear Ruler or Measuring Tape: A long acrylic ruler is especially helpful.
- Fabric Marker or Tailor’s Chalk: For marking your cutting lines.
- Pins or Sewing Clips: To hold your fabric pieces together while sewing.
- Iron and Ironing Board: Crucial for pressing seams and fusing the interfacing. Do not skip the pressing steps!
- Seam Ripper: Your best friend for correcting any mistakes.
Section 2: The Pattern – Measuring & Cutting Your Pieces
This tote bag is constructed from simple rectangles, making it a very accessible pattern. The key is to cut accurately.
Important First Step: Before cutting, pre-wash, dry, and iron all of your fabrics. This prevents any shrinkage or distortion after your bag is finished.
We will use a seam allowance of 1.5 cm throughout this project. This is slightly larger than standard, which adds extra strength to the bag’s seams.
Cutting Dimensions:
From your OUTER FABRIC (floral print), cut:
- (A) Main Body Panels: Two (2) rectangles measuring 37 cm (width)×29.5 cm (height).
- (B) Strap Panels: Two (2) rectangles measuring 8 cm (width)×60 cm (length).
From your LINING FABRIC, cut:
- (C) Lining Panels: Two (2) rectangles measuring 37 cm (width)×29.5 cm (height).
- (D) Optional Interior Pocket: One (1) rectangle measuring 20 cm (width)×15 cm (height).
From your FUSIBLE INTERFACING, cut:
- (E) Interfacing Panels: Two (2) rectangles measuring 37 cm (width)×29.5 cm (height).
Preparing the Boxed Corners:
To create the 8 cm depth, we will cut small squares from the bottom corners of our main panels.
- Take your four main body panels (two outer, two lining).
- From each of the bottom two corners of all four panels, measure and cut out a 4 cm×4 cm square.
- Your main panels will now have a notched shape at the bottom.
Section 3: The Sewing Tutorial – Step-by-Step Instructions
Now for the exciting part! Follow these steps carefully for a beautifully finished tote. Remember to backstitch at the beginning and end of every seam to secure your stitches.
Step 1: Apply the Interfacing
- Take your two outer fabric main body panels (A).
- Place them wrong side up on your ironing board.
- Position an interfacing panel (E) on top of each one, with the bumpy (adhesive) side of the interfacing facing down onto the wrong side of the fabric.
- Following the manufacturer’s instructions for your interfacing, press with a hot, dry iron. Press and hold for 10-15 seconds in each spot, then lift and move the iron. Do not glide the iron as this can shift the glue.
- Your outer panels should now feel noticeably stiffer and more substantial.
Step 2: Create the Straps
- Take one of your strap panels (B).
- Fold it in half lengthwise with wrong sides together and press firmly to create a center crease.
- Open the fabric back up.
- Now, fold each long raw edge into that center crease you just made. Press well.
- Finally, fold the entire strip in half along the original center crease. The raw edges will now be enclosed inside. Press firmly. You should have a strap that is 2 cm wide.
- Topstitch along both long edges of the strap, sewing about 0.3 cm from the edge. This secures the folds and adds a professional look.
- Repeat this entire process for the second strap panel. Set your finished straps aside.
Step 3: Assemble the Outer Bag
- Place your two interfaced outer panels (A) right sides together.
- Pin or clip along the two sides and the bottom edge. The notched corners and the top edge should remain open.
- Sew along the two sides and the bottom with a 1.5 cm seam allowance.
Step 4: Create the Boxed Corners (Outer Bag)
- This step creates the 3D shape of the bag.
- Take one of the bottom corners. Pinch and pull the fabric so that the side seam and the bottom seam you just sewed meet and align perfectly. The fabric will form a triangle with the seam running down the middle.
- The raw edges of the 4 cm cutout should now form a straight line.
- Pin this opening and sew straight across with a 1.5 cm seam allowance. Reinforce with a backstitch.
- Repeat for the other bottom corner.
- Turn the outer bag right side out. You should now have a structured bag shape with defined corners. Admire your work!
Step 5: Assemble the Lining
- Place your two lining panels (C) right sides together.
- Pin or clip along the two sides and the bottom, just as you did for the outer bag.
- Sew along the two sides.
- Now, sew along the bottom edge, but LEAVE A 10-12 CM GAP in the middle of the bottom seam. Remember to backstitch at the start and end of this opening. This gap is essential for turning the bag right side out later.
- Create the boxed corners on the lining exactly as you did in Step 4.
- Do not turn the lining right side out. Leave it with the wrong side facing out.
Step 6: Attach the Straps and Join the Bags
- Take your outer bag (which is right side out) and your straps.
- Position one strap on one side of the bag. The raw ends of the strap should align with the top raw edge of the bag.
- Place the straps so that the outer edge of each end is about 8 cm in from the side seam. Use a ruler to ensure they are placed symmetrically. Make sure the straps are not twisted!
- Pin the strap ends securely in place. Repeat for the other strap on the other side of the bag.
- Now, with the outer bag right side out and the lining bag inside out, place the outer bag INSIDE the lining bag.
- Carefully align the top raw edges. The right side of the outer bag should be facing the right side of the lining. Match up the side seams of both bags and pin them together first, then pin the rest of the top edge all the way around. The straps will be sandwiched between the two layers.
- Sew all the way around the top opening of the bag with a 1.5 cm seam allowance.
Step 7: The Final Turn and Finishing Touches
- You’re almost there! Reach through the turning gap you left in the lining’s bottom seam.
- Gently pull the entire outer bag through the hole. It will feel like a mess at first, but keep pulling until the whole bag is turned right side out.
- Use a blunt object like a chopstick or a point turner to gently poke out the corners of the outer bag and the lining for a crisp shape.
- Now, find the opening in the lining. Fold the raw edges of the gap inwards by 1.5 cm (they should naturally fold this way) and press.
- Sew this opening closed by stitching very close to the edge (this is called an edge stitch).
- Push the lining down into the outer bag. Use your hands to smooth it out so it sits nicely inside.
- Press the top edge of the bag very well to create a crisp, professional seam.
- Finally, topstitch around the entire top opening of the bag, about 0.5 cm from the edge. This is a crucial step that secures the lining, reinforces the straps, and gives your tote a beautiful, high-quality finish.
Congratulations!
You have successfully created your very own floral-print tote bag! You now have a durable, stylish, and unique accessory that you made with your own two hands. Feel free to customize this pattern in the future by adding more pockets, a magnetic snap closure, or by using different fabric combinations.
Happy sewing!


