
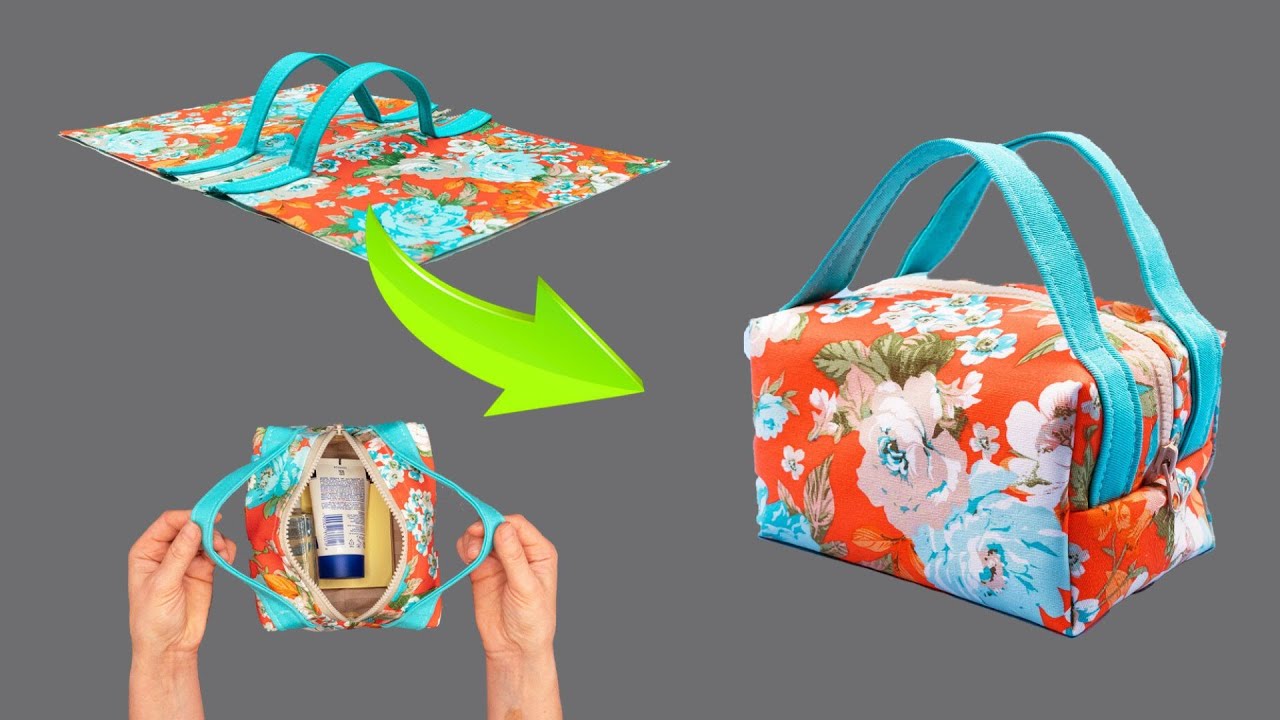
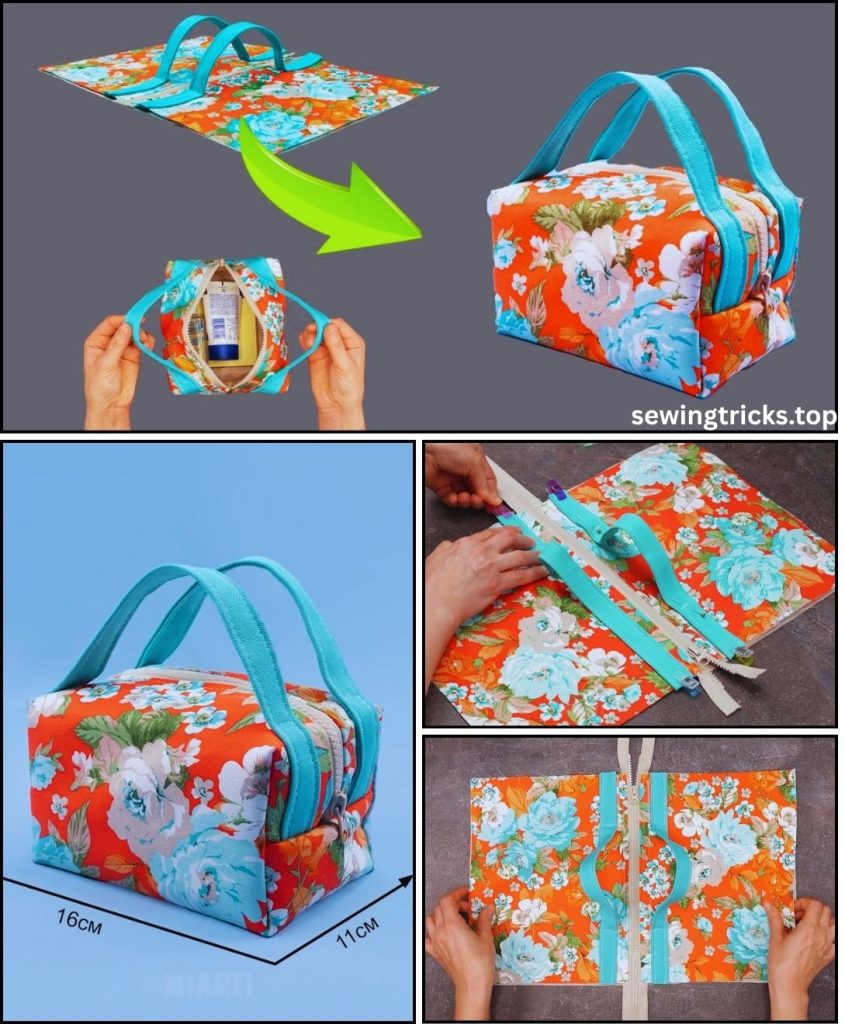
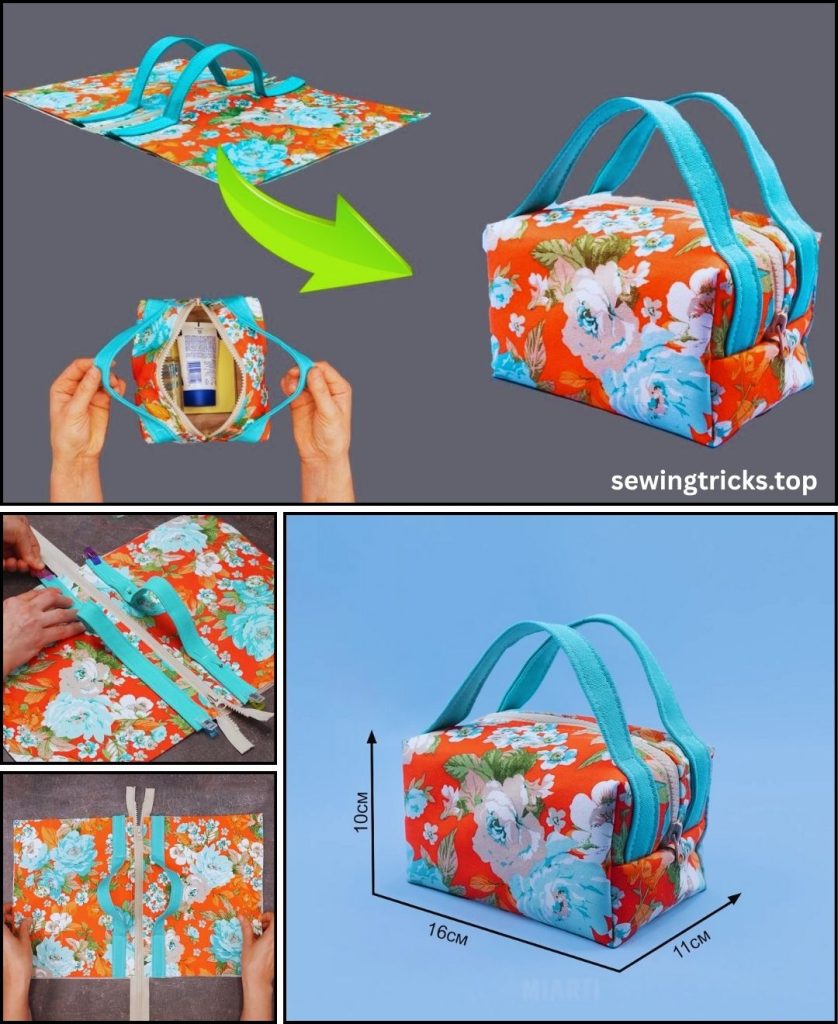
This is a fantastic project! A makeup bag, or zippered pouch, is one of the most practical and satisfying items you can sew. It’s the perfect project for learning several essential skills, including installing a zipper, lining a bag, and creating a 3D “boxy” shape.
This detailed, long-article tutorial will guide you through sewing a classic, structured boxy makeup bag. This design is durable, roomy, and looks incredibly professional. Once you master this, you can make them in any size.
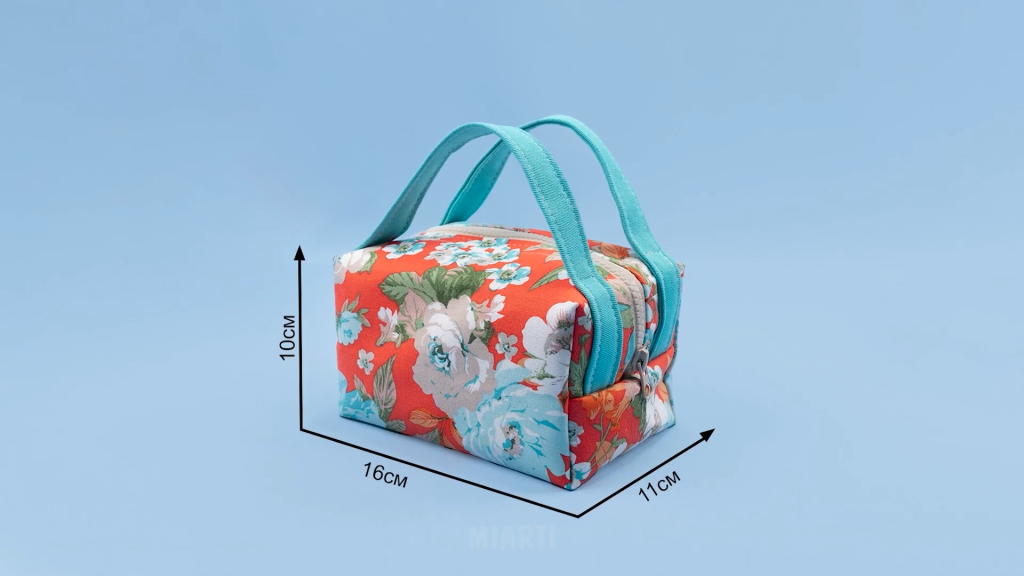
We will aim for a finished bag size of approximately:
- 8 inches (20 cm) long
- 4 inches (10 cm) tall
- 4 inches (10 cm) deep
I. Planning & Gathering Your Materials
A great bag starts with the right materials. For a structured makeup bag, interfacing is just as important as the fabric.
- Exterior Fabric:
- Quantity: 1/4 yard (or a “fat quarter” scrap)
- Type: Sturdy fabrics are best. Think canvas, duck cloth, denim, corduroy, upholstery fabric, or home decor fabric. A high-quality quilting cotton will also work if properly interfaced.
- Lining Fabric:
- Quantity: 1/4 yard (or a fat quarter)
- Type: Laminated cotton or ripstop nylon are excellent choices as they are water-resistant and easy to wipe clean. Standard quilting cotton is also perfectly fine and easier for a first-timer.
- Interfacing (The Key to Structure!):
- Quantity: 1/2 yard
- Type: You need a good medium-to-heavy-weight fusible interfacing.
- For a crisp, structured bag (like canvas): Use a non-woven fusible like Pellon 809 Decor-Bond.
- For a softer, padded bag (like quilting cotton): Use fusible fleece or Pellon SF101 Shape-Flex. For this tutorial, we’ll assume a standard medium-weight fusible interfacing.
- Zipper:
- Quantity: 1
- Type: A nylon coil zipper (all-purpose) is easiest to sew.
- Length: At least 10 inches (25 cm). It is much easier to use a zipper that is longer than your bag. We will trim the excess.
- Optional – Pull Tabs:
- A small scrap of denim, leather, ribbon, or your exterior fabric (approx. 2″ x 3″) to make tabs for the ends of the zipper. This gives a highly professional finish.
- Matching Thread:
- Type: All-purpose polyester thread. If using very heavy canvas or denim, a “heavy-duty” thread is a good idea.
- Basic Sewing Tools:
- Sewing machine
- Zipper Foot: This is essential. You cannot sew a neat zipper without it.
- Fabric Needle: A universal size 80/12 is fine for cotton. Use a 90/14 or 100/16 “Denim” needle for heavy canvas or denim.
- Sharp Fabric Scissors or a Rotary Cutter & Mat
- Long Ruler
- Fabric Chalk, Frixion Pen, or Mark-B-Gone Pen
- Plenty of Pins or Fabric Clips (clips are wonderful for thick layers)
- Iron and Ironing Board
- Seam Ripper (just in case!)
II. The “Pattern” – Cutting Your Fabric
This bag is made entirely of rectangles. Precision is key, so measure twice and cut once!
We will use a 1/2-inch (1.27 cm) seam allowance for all steps unless noted.
From your EXTERIOR Fabric, cut:
- (2) Main Body Panels: 9 inches wide x 6 inches tall
From your LINING Fabric, cut:
- (2) Main Body Panels: 9 inches wide x 6 inches tall
From your FUSIBLE INTERFACING, cut:
- (2) Exterior Interfacing Panels: 9 inches wide x 6 inches tall
- (2) Lining Interfacing Panels: 9 inches wide x 6 inches tall (This is optional but adds extra body)
From your optional PULL TAB Fabric, cut:
- (1) Tab Piece: 2 inches wide x 3 inches tall
III. Step-by-Step Sewing Instructions
Let’s break this down into clear, manageable phases.
Phase 1: Preparation (Fusing & Tabs)
- Fuse Your Interfacing:
- Lay your Exterior Fabric Panels wrong side up on your ironing board.
- Place the corresponding interfacing pieces on top, fusible (bumpy) side down.
- Following the manufacturer’s instructions, press and hold the iron to fuse the interfacing. Do not “scrub” with the iron; lift, press, and hold.
- Repeat this process for your Lining Panels (optional, but recommended).
- Prepare the Zipper Pull Tabs (Optional, but recommended):
- Take your 2″ x 3″ tab piece.
- Fold it in half lengthwise (“hot dog” style) and press.
- Open it up. Fold the two long raw edges in to meet at the center crease you just made. Press.
- Fold the whole thing in half along the original center crease. You now have a 1/2″ x 3″ strip with no raw edges on the long sides.
- Topstitch along both long edges, about 1/8 inch from the edge.
- Cut this strip in half, creating two 1.5-inch long tabs. Set them aside.
Phase 2: Install the Zipper (The “Sandwich” Method)
This is the most important part, but it’s easy if you take it one step at a time.
- Create the First Zipper Sandwich:
- Lay one Exterior Panel on your table, right side up.
- Place your zipper on top, right side down (the zipper pull should be facing the fabric). Align the top edge of the zipper tape with the top 9-inch edge of the fabric.
- Lay one Lining Panel on top of the zipper, right side down.
- You now have a sandwich: Exterior (up), Zipper (down), Lining (down). All top 9-inch edges should be aligned.
- Clip or pin these three layers together.
- Sew the First Side:
- Attach the zipper foot to your sewing machine.
- Stitch along this top edge with a 1/4-inch to 3/8-inch seam allowance (just wide enough to catch the fabric and zipper tape securely, without hitting the teeth).
- Tip: When you get close to the bulky zipper pull, stop with your needle down in the fabric, lift the presser foot, and gently slide the zipper pull past the foot. Lower the foot and continue sewing.
- Press and Topstitch:
- Open the unit you just sewed. Fold the exterior and lining fabrics away from the zipper, so their wrong sides are together.
- Press the fabric away from the zipper teeth.
- Topstitch on the exterior side, about 1/8 inch from the seam. This is a key step that keeps the fabric from ever getting caught in the zipper.
- Create the Second Zipper Sandwich:
- Now, lay your second Exterior Panel on the table, right side up.
- Take the unit you just topstitched. Lay it on top, with the zipper’s free edge aligned with the top 9-inch edge of the new exterior panel. The zipper should be right side down.
- Lay your second Lining Panel on top, right side down.
- Clip or pin these three new layers together.
- Sew, Press, and Topstitch:
- Sew this seam just like the first one.
- Open, press, and topstitch on the exterior side, just as you did before.
- You should now have a single, large, flat panel: Lining | Exterior | Zipper | Exterior | Lining.
Phase 3: Sew the Bag Body
- CRITICAL STEP: Open your zipper to the halfway point! If you forget this, you will not be able to turn your bag right side out.
- Arrange the Bag: Lay your flat panel on the table. Fold it so that the two Exterior Panels are right sides together.
- Arrange the Lining: Now, fold the lining panels so the two Lining Panels are right sides together. The zipper will be in the middle of this large “tube.”
- Pin/Clip: Pin or clip all the way around the perimeter.
- Make sure the two Exterior side seams align.
- Make sure the two Lining side seams align.
- At the zipper, make sure the zipper teeth are folded and pressed towards the lining side. This ensures a clean finish.
- Attach Zipper Tabs (Optional):
- At the end of the zipper (where the metal stop is), tuck one of your 1.5″ folded tabs inside the sandwich, between the two exterior panels. The raw edge of the tab should align with the raw edge of the bag. The tab loop should point inward.
- At the other end (the top of the zipper), do the same with the other tab.
- Clip in place.
- Sew the Perimeter:
- Starting on the bottom of the lining, sew all the way around the bag with a 1/2-inch seam allowance.
- Sew up the lining side, across the zipper (go very slowly and carefully over the zipper ends), down the exterior side, across the exterior bottom, up the other exterior side, across the zipper again, and down the other lining side.
- STOP! LEAVE A 4-INCH GAP at the bottom of the lining. Backstitch at the start and end of this gap. This is your turning hole.
Phase 4: Box the Corners (The 3D Magic)
This is what turns your flat pouch into a boxy bag. We will do this for all four corners.
- Cut the Corners:
- Go to one of the four corners (e.g., an exterior corner). It’s currently sewn at a 90-degree angle.
- Flatten the corner. Use your ruler to draw a 2-inch x 2-inch square from the stitching lines, not the raw edge.
- Carefully cut this square out through both layers of fabric.
- Repeat for all four corners (the other exterior corner and the two lining corners).
- Sew the Boxed Corners:
- Take one of the corners you just cut.
- Pull the two sides apart (the side seam and bottom seam).
- Pinch them together in the opposite direction, matching the side seam to the bottom seam. The new raw edge will be a straight line.
- Clip or pin this new seam.
- Sew across this edge with a 1/2-inch seam allowance. Backstitch at the start and end to secure it.
- Repeat this for all four corners.
Phase 5: The Final Turn (The Reveal)
- Turn the Bag: This is the magic moment. Reach through the 4-inch gap you left in the lining.
- Grab the exterior fabric (find a pull tab or the zipper) and gently start pulling the entire bag right-side out through the hole. Be patient and don’t force it.
- Poke Out Corners: Once it’s all through, use your fingers or a blunt tool (like a chopstick or a point turner) to push out all four exterior corners and the two top zipper corners. The boxy shape will appear.
- Close the Lining Gap: Find the 4-inch hole in the lining. Tuck the raw edges inside by 1/2 inch and press them flat. Sew this opening closed using either:
- Machine: A quick topstitch 1/8-inch from the folded edge (fastest).
- Hand: An invisible ladder stitch (cleanest).
- Finish: Push the lining down into the bag. Use your fingers to set the corners of the lining into the corners of the exterior bag.
- Give the entire bag a final good press with your iron (if your lining isn’t laminated). Zip it up and admire your work!
Congratulations! You have successfully sewn a beautiful, professional, and incredibly useful boxy makeup bag. You can now use this same pattern and technique to make bags of any size by simply changing the dimensions of your starting rectangles and the size of your boxed corner cutouts.


