
This is a trendy, eco-friendly, and rewarding project. The “Half-Moon” bag (also known as a Crescent bag or Hobo bag) is incredibly popular right now. Its curved shape hugs the body comfortably, making it the perfect shoulder bag.
Using old jeans for this project is ideal because denim is durable, holds the curved shape well, and looks even better as it ages.
Here is a comprehensive, detailed guide on How to Sew a Half-Moon Bag from Old Jeans.
The Ultimate Guide: Sewing a Half-Moon Bag from Old Jeans
I. Project Overview
- Skill Level: High Beginner / Intermediate (due to the zipper and curves).
- Time: 2–3 hours.
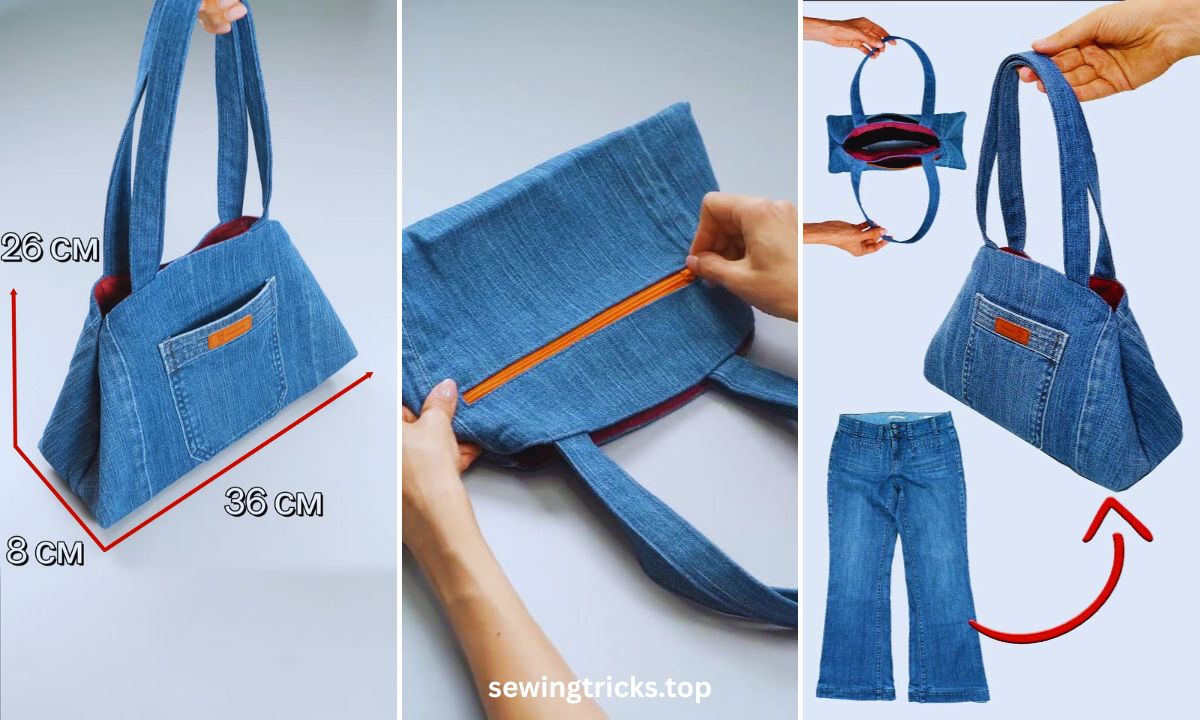
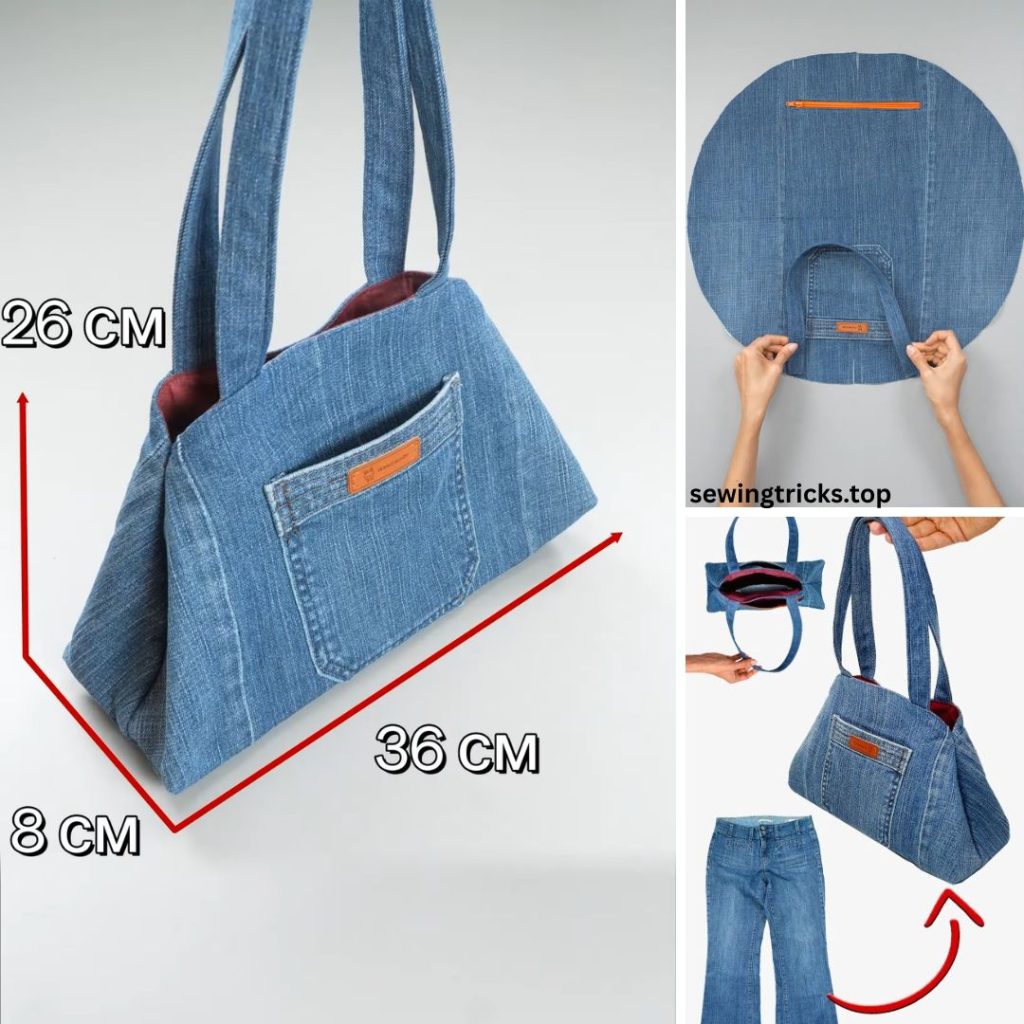
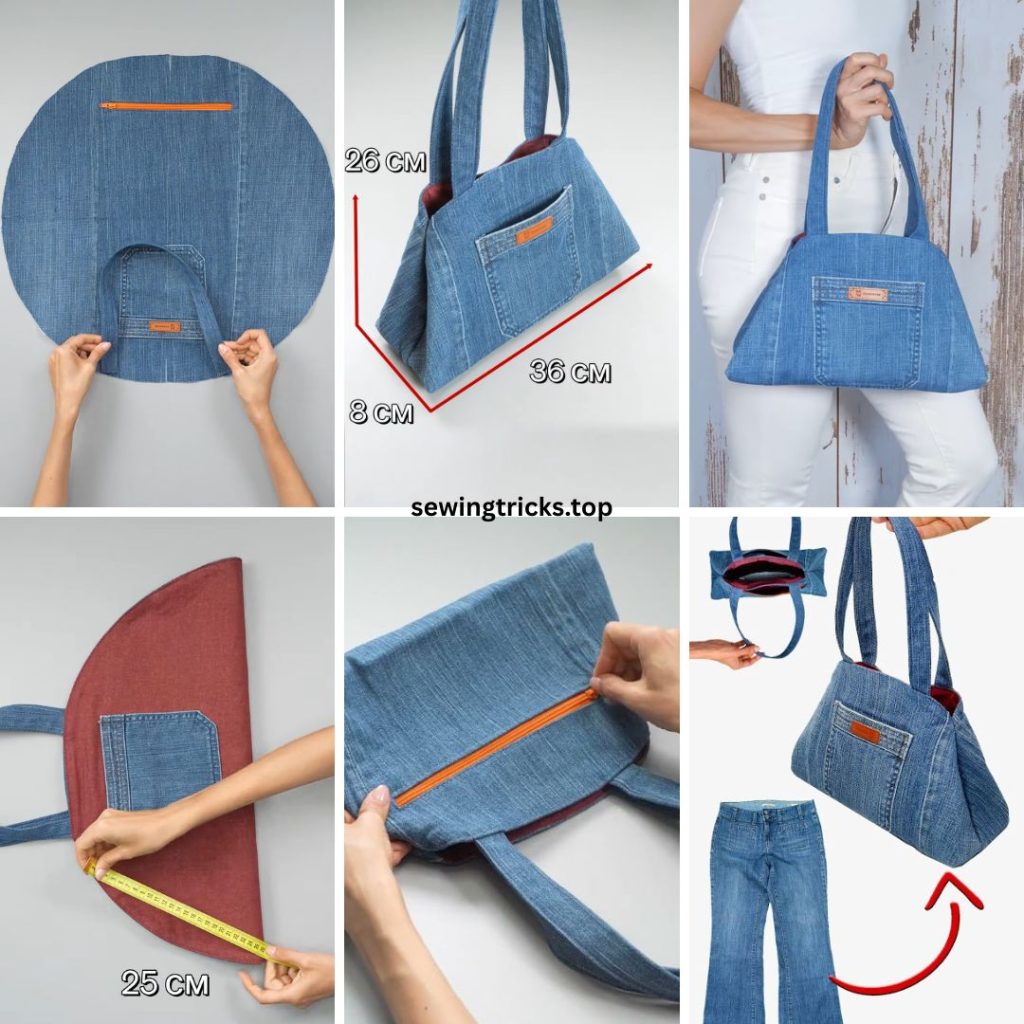
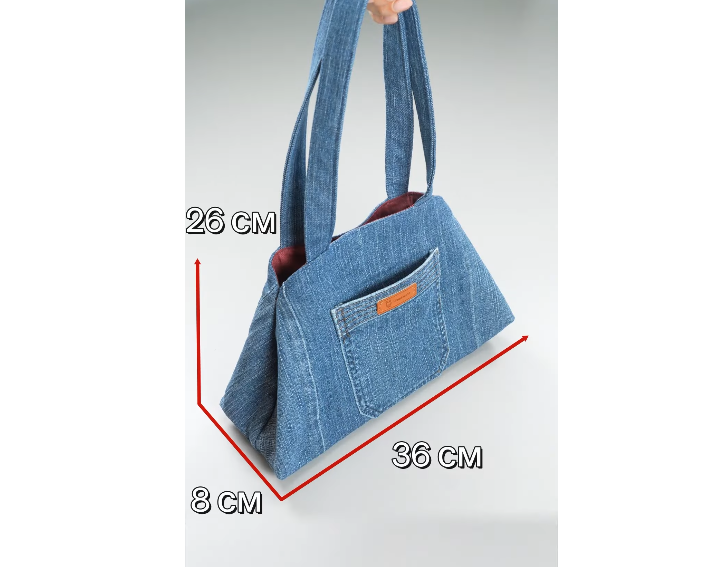
- Finished Dimensions: Approximately 12” wide x 7” tall (at the center) x 3” deep.
- Style: Minimalist, structured crescent shape with a zipper closure and an adjustable strap.
II. Gathering Your Materials
1. The Fabric
- Old Jeans: You will need 1 pair of adult jeans. Wide-leg or boot-cut jeans work best as they offer more fabric. 100% cotton denim (rigid denim) is easier to sew than super-stretchy jeggings, as it holds the moon shape better.
- Lining Fabric: 1/2 yard of cotton fabric. A fun floral print or a bright color makes the inside pop.
2. Structure & Hardware
- Fusible Interfacing: 1/2 yard of medium-weight fusible fleece or heavy-weight interfacing (like Pellon 987F or 809). This is the secret ingredient. Without it, your bag will look like a floppy pouch. The fleece gives it that puffy, structured luxury feel.
- Zipper: A nylon coil zipper, at least 14 inches long. (Longer is better; we can cut it down).
- Strap Hardware:
- (2) D-Rings (1 inch wide)
- (2) Swivel Hooks (1 inch wide)
- (1) Slide Adjuster (1 inch wide)
- Note: If you want to keep it simple, you can skip the hardware and just sew the strap directly into the seams.
3. Tools
- Sewing Machine (with a Zipper Foot)
- Denim Needle: Size 90/14 or 100/16.
- Heavy Duty Thread: Or regular polyester thread (use a longer stitch length).
- Rotary Cutter & Mat (ideal for curves) or sharp scissors.
- Clips (Wonder Clips work better than pins on thick denim).
- Iron & Ironing Board.
- Paper/Cardboard (for making the pattern).
III. Drafting the “Half-Moon” Pattern
You don’t need to print a pattern; you can draw one easily.
- Get a large piece of paper: (A grocery bag or packing paper works great).
- Draw the Top Line: Draw a horizontal line 14 inches long.
- Draw the Dip: Mark the center of that line. Measure down 1.5 inches from the center and make a mark. Draw a gentle curve connecting the two ends of the line to this center mark. This slight “dip” makes the bag sit comfortably under your arm.
- Draw the Bottom Curve: From the center mark, measure down 8 inches. Draw a deep “U” shape or semi-circle connecting the ends of the top line to this bottom point.
- Round the Corners: Smooth out the sharp corners where the top and bottom lines meet.
- Add Darts (Optional but recommended): At the very bottom center of the curve, cut out a small “V” shape (about 1 inch wide and 1.5 inches tall). Closing these darts later will give the bag a 3D rounded bottom rather than a flat pancake look.
IV. Cutting and Preparation
1. Harvest the Denim
Cut the legs off your jeans. Slit them open along the inner leg seam. Iron them flat. Try to utilize the side seams of the jeans as a decorative element down the center of your bag!
2. Cut the Fabric
Using your paper pattern, cut:
- Exterior: 2 pieces from Denim.
- Lining: 2 pieces from Lining fabric.
- Interfacing: 2 pieces from Fusible Fleece (cut these about 1/4″ smaller than the pattern to reduce bulk in the seams).
- Strap: Create a strip from the remaining denim leg. Cut it 4 inches wide by the length of the leg (approx. 30-40 inches).
- Tabs: Cut two small denim squares (4″ x 4″) to hold the D-rings.
3. Fuse
Iron the fusible fleece to the wrong side of your Denim Exterior pieces.
4. Sew the Darts
If you cut “V” darts at the bottom of your pattern: Fold the fabric so the “V” edges match (right sides together). Sew along the edge. Do this for all 4 main panels (2 denim, 2 lining). This creates the bowl shape.
V. Step-by-Step Sewing Instructions
Seam Allowance: Use 1/2 inch unless otherwise noted.
Phase 1: The Strap and Tabs
- Make the Strap: Take your long 4″ wide denim strip. Fold it in half lengthwise (wrong sides together) and press. Open it up, fold the long raw edges to the center crease, and press. Fold in half again. You now have a 1-inch wide, 4-layer strap. Topstitch down both sides.
- Make the Tabs: Repeat the process with the 4″ x 4″ squares to make two short 1-inch wide strips.
- Attach Hardware: Slide a D-ring onto each short tab. Fold the tab in half. Baste (sew) the raw edges of the tab together to secure the ring.
Phase 2: Installing the Zipper (The Sandwich Method)
- Layer 1: Lay one Denim Exterior piece right side up.
- Layer 2: Place the Zipper face down along the top curved edge. (The zipper pull should be facing the denim).
- Layer 3: Place one Lining piece face down on top.
- Sew: Align the top edges. Using your zipper foot, sew through all three layers along the top curve.
- Tip: Because it is curved, you may need to make tiny snips in the zipper tape (not the teeth!) to help it lay flat as you sew.
- Press and Topstitch: Flip the lining and denim away from the zipper so they are wrong sides together. Press well. Topstitch along the denim edge, 1/8″ from the zipper. This prevents the fabric from getting caught in the zipper.
- Repeat: Repeat the sandwich process for the other side of the zipper with the remaining Denim and Lining pieces.
Phase 3: Attaching the D-Ring Tabs
- Lay your bag flat, opened up. You should see the denim side.
- Locate the ends of the zipper tape. Position your D-Ring Tabs on the denim, right over the ends of the zipper tape, pointing inward toward the center of the bag.
- Baste (sew) them in place within the seam allowance. This ensures the strap connects right at the corners of the bag.
Phase 4: Assembly
- Open the Zipper: CRITICAL STEP! Unzip the zipper halfway. If you forget this, you cannot turn the bag right side out.
- Match Sides: Open the bag up like a book.
- Match the two Denim pieces Right Sides Together.
- Match the two Lining pieces Right Sides Together.
- Pin/Clip: Pin all the way around the perimeter. Ensure the zipper teeth are folded toward the lining side.
- Sew:
- Start at the bottom of the lining.
- Sew up the side, over the zipper hump (go slowly!), all the way around the denim, over the other zipper hump, and down the other side of the lining.
- Leave a 5-inch gap at the bottom of the lining for turning.
- Trim: Trim the seam allowance down to 1/4 inch, except at the gap area.
- Notch the Curves: Use your scissors to cut little triangles out of the seam allowance along the curved bottom. This allows the seam to sit flat when turned.
Phase 5: Turning and Finishing
- Turn: Reach through the gap in the lining and pull the denim bag through. It will be bulky, so be patient.
- Poke: Use a chopstick or point turner to push out the corners where the zipper meets the tabs.
- Close Lining: Fold the raw edges of the lining gap inward. Sew the gap closed (machine stitch or hand stitch).
- Press: Push the lining into the denim bag. Roll the seams between your fingers and give the bag a very heavy steam press to shape that “half-moon.”
Phase 6: The Adjustable Strap
- Take your long denim strap. Slide one end through the Slide Adjuster loop. Fold back 1 inch and sew it to itself.
- Feed the other end of the strap through one of the Swivel Hooks.
- Feed that same end back up and through the Slide Adjuster again.
- Finally, feed the end through the second Swivel Hook, fold back 1 inch, and sew it to itself.
- Clip the hooks onto the D-rings on your bag.
VI. Pro Tips for Sewing Denim
- The Hump Jumper: When sewing over the thick seams (where the side seam meets the zipper), your presser foot might tilt up and get stuck. Fold a piece of cardboard and place it under the back of the foot to level it out.
- Thread Color: Use a gold or “topaz” colored thread to mimic the original jeans stitching for an authentic look.
- Decorate: Before assembling the bag, consider sewing a patch, a label, or even some embroidery onto the main denim panel.
Congratulations! You have just created a trendy, durable, and sustainable half-moon bag. This shape is incredibly versatile and looks great worn as a short shoulder bag or a crossbody.


