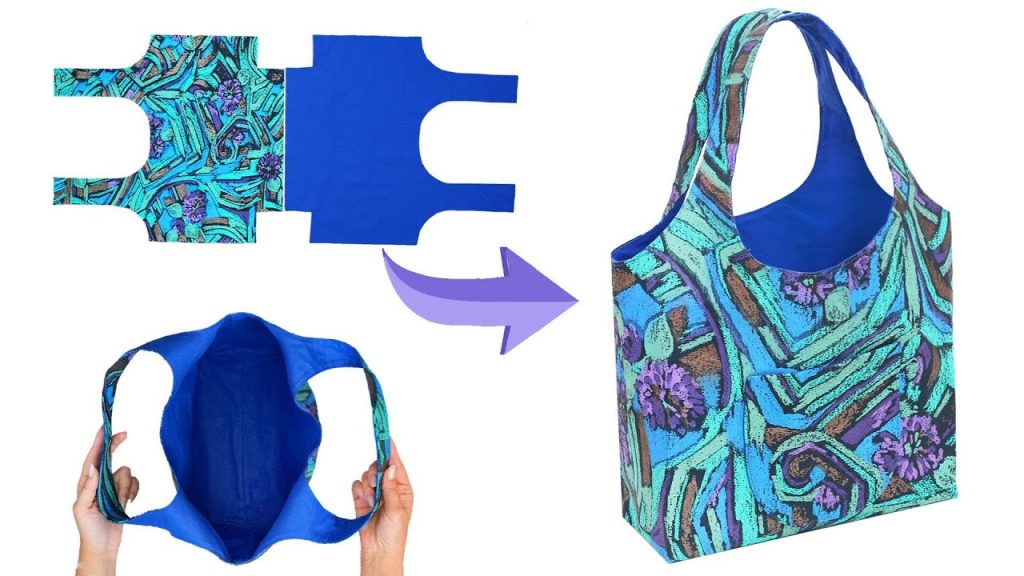
Sewing a tote bag is a fantastic project for beginners. It’s a quick and easy way to learn fundamental sewing skills, and you’ll end up with a practical, reusable bag that you can use every day. The key to making this project easy and quick is to use simple rectangular shapes and a straightforward construction method.
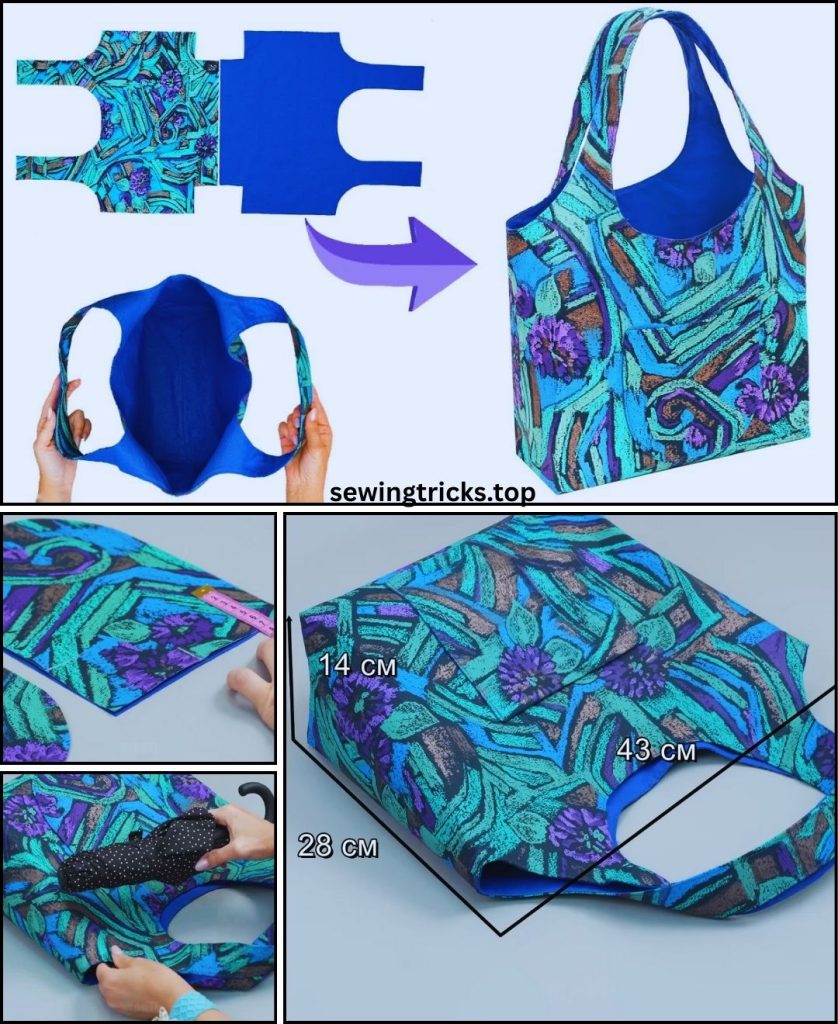
This detailed tutorial will guide you through creating a classic, lined tote bag with a flat, structured bottom. We’ll aim for a finished size of approximately 14 inches wide, 12 inches tall, and 4 inches deep, a perfect size for groceries, books, or daily essentials.
I. Planning & Gathering Your Materials
Careful preparation will make the sewing process fast and smooth.
- Main Fabric:
- Quantity: 1 yard of sturdy, woven fabric like canvas, duck cloth, or a heavy cotton twill. A solid color is an excellent choice for a first project.
- Preparation: Wash and iron the fabric before you begin. This is a crucial step that prevents your finished bag from shrinking later.
- Lining Fabric:
- Quantity: 1 yard of lighter-weight cotton fabric, like quilting cotton or broadcloth. This will make the inside of your bag look clean and finished. A fun, contrasting print is a great way to add personality.
- Preparation: Wash and iron.
- Interfacing (Optional but Recommended):
- Quantity: 1 yard of medium-weight fusible interfacing. This will give your bag more body and a professional, crisp feel.
- Webbing for Handles:
- Type: Cotton or polypropylene webbing, 1 inch wide.
- Quantity: Two pieces, each 26 inches long.
- Matching Thread: All-purpose polyester thread that matches your fabric.
- Basic Sewing Tools:
- Sewing machine.
- Sharp fabric scissors or a rotary cutter and cutting mat.
- Measuring tape or long ruler.
- Fabric marker or chalk.
- Plenty of pins or fabric clips.
- Iron and ironing board.
II. Step-by-Step Sewing Instructions
We will use a consistent 1/2-inch (1.27 cm) seam allowance throughout this tutorial.
1. Cut the Fabric Panels
- From your Main Fabric:
- Cut two rectangles, each 15 inches wide by 13 inches tall.
- From your Lining Fabric:
- Cut two rectangles, each 15 inches wide by 13 inches tall.
- From your Interfacing (if using):
- Cut two pieces, each 15 inches wide by 13 inches tall. Fuse these to the wrong side of your main fabric panels according to the manufacturer’s instructions.
2. Prepare and Attach the Handles
- Take one of your main fabric panels and lay it right side up.
- Measure 4 inches in from each side edge along the top raw edge. Mark these points with your fabric marker.
- Place the raw ends of one webbing handle onto these marks, aligning the raw edge of the webbing with the raw top edge of the fabric panel. The handle loop should face downwards onto the bag body.
- Stitch the handle in place with a strong reinforcing stitch (a box with an “X” inside is a great choice) within the 1/2-inch seam allowance.
- Repeat this process for the second handle on the second main fabric panel.
3. Assemble the Exterior Bag
- Place the two main fabric panels right sides together.
- Pin along the two side seams and the bottom seam.
- Sew the side seams and the bottom seam with a 1/2-inch seam allowance.
- Create boxed corners: This step gives your bag a flat, structured bottom. With the bag still inside out, pinch one of the bottom corners so the side seam aligns with the bottom seam. Flatten the corner into a point. Measure a 2-inch square from the tip of the corner. Mark a straight line across this point. Sew along this line.
- Trim the excess fabric from the corner. Repeat this process for the other bottom corner.

4. Assemble the Lining Bag
- Follow the exact same steps as you did for the exterior bag (Step 3) to assemble your two lining panels.
- Crucially, leave a 5-6 inch opening in the middle of the bottom seam. This is the hole you will use to turn the bag right side out later.
5. Combine and Finish the Tote Bag
- Turn the exterior bag right side out.
- Keep the lining bag inside out.
- Carefully insert the exterior bag into the lining bag so that their right sides are facing each other. The handles should be tucked down between the layers. Align the side seams and the top raw edges. Pin or clip all the way around the top opening.
- Stitch all the way around the top with a 1/2-inch seam allowance.
- Turn and close: Pull the entire bag right-side out through the opening you left in the lining’s bottom seam.
- Push out the corners and all the seams. Press the seam allowances of the opening in the lining under and stitch it closed by hand or with your machine.
- Push the lining into the bag and give the entire bag a final press, paying special attention to the top edge to make it lie flat.
Congratulations! You’ve successfully sewn a classic tote bag that’s both durable and stylish. It’s the perfect starter project for any beginner sewer.