Diving into upcycling is one of the most creative and sustainable ways to enjoy sewing. Transforming a pair of old, forgotten jeans into a stylish and functional handbag is an incredibly satisfying project. This detailed guide will provide you with a gallery of ideas and a complete, step-by-step tutorial for creating a unique bag that showcases the best features of your old denim.
From Worn to Wonderful: How to Transform Old Jeans into a Beautiful Handbag
That pair of jeans in the back of your closet—the one with the perfect fade but a worn-out knee—doesn’t have to be the end of its story. Denim is one of the most durable, versatile, and character-rich fabrics you can work with. Upcycling it into a handbag is not only eco-friendly but also gives you a one-of-a-kind accessory that no one else will have.
This guide is designed to be a deep dive into the art of jean transformation. We’ll explore several beautiful design ideas and then walk through a detailed tutorial for creating a chic and practical “Top-Yoke Shoulder Bag,” a design that cleverly uses the most iconic parts of the jeans.
Part 1: Prepping Your Jeans for a New Life
Before you can turn your jeans into a bag, you need to prepare your raw materials. This deconstruction phase is key to getting the most usable fabric.
- Wash and Dry: Start by giving your jeans a thorough wash and dry. This preshrinks the fabric and ensures you’re working with clean material.
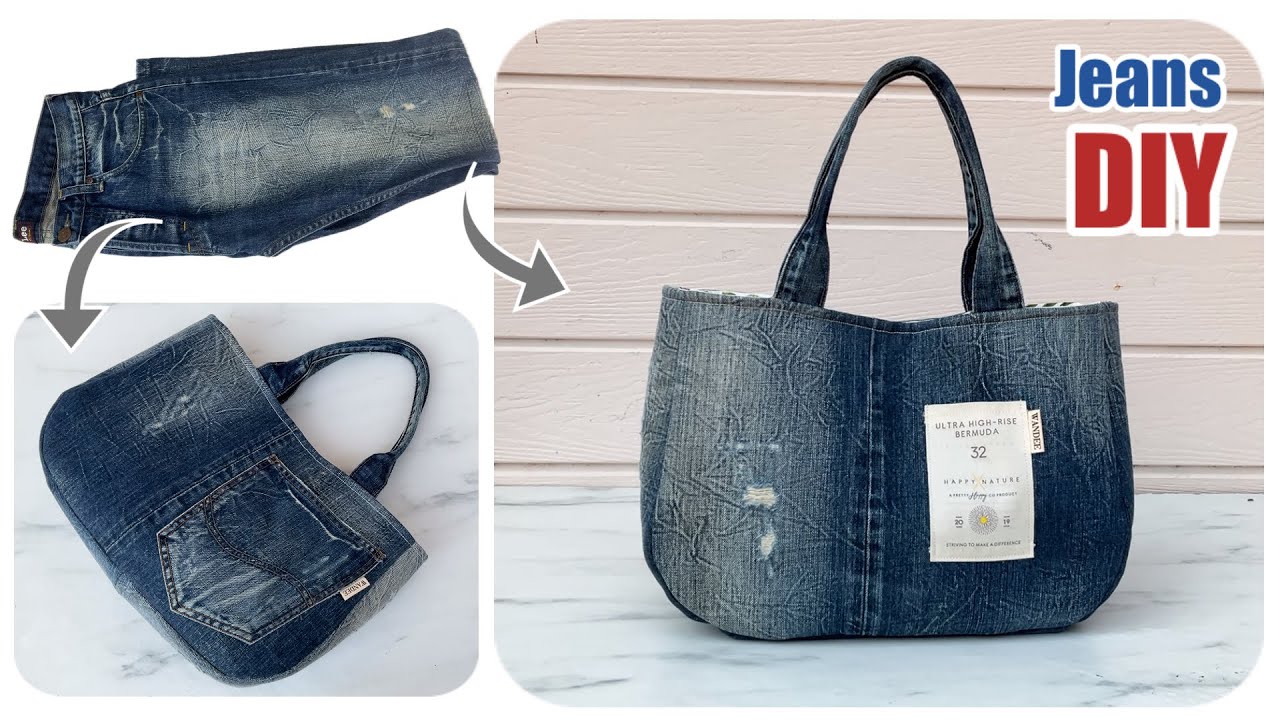
- Deconstruct for Maximum Fabric: Lay the jeans flat on your work surface. The goal is to salvage the largest possible rectangular pieces from the legs and the unique features from the top.
- Cut off the Legs: Cut straight across the jeans just below the back pockets.
- Open the Leg Seams: Using sharp fabric scissors, cut right alongside the thick, felled inseam (the double-stitched seam running up the inside of the legs). This will open up the leg into a large, flat piece of fabric. You can also cut off the outer seam if you prefer, but the inseam is usually easier to cut beside.
- Harvest the Treasures: Carefully set aside the top portion of the jeans. Do not throw this away! The waistband, belt loops, pockets, zipper, and yoke (the V-shaped seam below the waistband on the back) are the design elements that will make your bag unique. You can use a seam ripper to carefully remove back pockets if you want to reposition them later.
You should now have two large, flat panels of denim from the legs, and the entire top section of the jeans ready for creative use.
Part 2: A Gallery of Beautiful Handbag Ideas
Here are a few ideas to get your creative wheels turning. Each one uses different parts of the jeans to achieve a different style.
- The Classic Denim Tote: This is the most straightforward design. Use the large fabric panels from the jean legs to create the front and back of a simple tote bag. You can use the thick felled seams from the legs to create sturdy, pre-made straps.
- The Back Pocket Crossbody Pouch: The simplest and quickest project! Carefully cut out a back pocket, keeping about an inch of fabric around it. Sew another piece of denim or a lining fabric to it (right sides together, leaving a gap for turning) to create a small pouch. Add a long strap made from a side seam or a piece of leather cord, and you have a perfect little bag for your phone and keys.
- The Patchwork Masterpiece: Collect denim from several pairs of old jeans in different washes (light, dark, black, gray). Cut the denim into squares or strips and sew them together to create a large, unique piece of “patchwork fabric.” You can then use this fabric to create any style of bag, resulting in a beautiful, textured, and artistic accessory.
- The Slouchy Hobo Bag: For this style, you’ll cut larger, slightly curved patterns from the jean legs. By gathering the top edge and adding a single, wide strap, you can create a relaxed, bohemian-style hobo bag. The soft, worn-in denim is perfect for this slouchy silhouette.
- The Top-Yoke Shoulder Bag: This is our star tutorial! This clever design uses the entire top portion of the jeans—waistband, fly, and pockets included—as the top opening of the bag. It’s an immediate conversation starter and makes brilliant use of the jean’s original construction.
Part 3: Full Tutorial – The “Top-Yoke” Jean Shoulder Bag
This tutorial will guide you through creating a durable, functional, and incredibly stylish shoulder bag by repurposing the top of your jeans.
A. What You’ll Need
- Materials:
- One pair of old adult-sized jeans.
- Lining Fabric: About 1/2 yard (0.5 meter) of quilting cotton or another sturdy fabric.
- Medium to Heavy-Weight Fusible Interfacing: This will give the bottom of the bag structure.
- Closure: One magnetic snap set or a zipper (a snap is easier for this design).
- All-Purpose Thread: A contrasting color like gold or copper often looks great with denim.
- Crucial Tool: A heavy-duty or denim sewing machine needle (size 90/14 or 100/16). Standard needles will likely break when sewing through thick denim layers.
- Tools:
- Sewing Machine
- Sharp Fabric Scissors
- Iron & Ironing Board
- Ruler & Fabric Marker
- Pins or Sewing Clips
- Seam Ripper

B. The “Pattern” – Deconstruction & Cutting
- Cut the Top Yoke:
- Lay your jeans flat. Using your ruler, measure about 1″ below the bottom of the back pockets and draw a straight line across the entire width of the jeans.
- Carefully cut along this line. This top section, including the waistband, fly, and front/back pockets, is now your “Top Yoke.” It will form the top opening of your bag.
- Cut the Main Body Panel:
- Take the leg pieces you deconstructed earlier. From them, cut ONE (1) large rectangle that is 16″ wide×22″ tall.
- This single piece will be folded in half to become the front and back bottom panels of your bag.
- Cut the Straps:
- From the remaining leg fabric, cut TWO (2) strips, each measuring 4″ wide×24″ long. You can make these longer or shorter depending on your preference for a shoulder bag vs. a crossbody bag.
- Cut the Lining:
- First, measure the width of your Top Yoke piece along the bottom cut edge. Let’s say it’s 16″. The height of your finished bag will be the height of your Top Yoke plus half the height of the main body panel (11″). Add a seam allowance.
- Cut TWO (2) pieces from your lining fabric. They should be the same width as your Top Yoke (e.g., 16″) and approximately 15″ tall. This gives enough height to accommodate the yoke and body panels.
- Cut the Interfacing:
- From the interfacing, cut ONE (1) rectangle that is 15.5″ wide×21.5″ tall. (Slightly smaller than your main denim panel).
- Cut TWO (2) strips, each measuring 1.75″ wide×23.5″ long. (Slightly smaller than your strap pieces).
C. Step-by-Step Assembly
1. Prepare the Pieces:
- Interfacing the Body: Iron the large interfacing panel onto the wrong side of your 16″×22″ main denim panel, following the manufacturer’s instructions.
- Making the Straps: Take one strap piece. Fold it in half lengthwise (“hot dog style”) and press. Open it up. Now fold the two long raw edges in to meet at the center crease you just made. Press again. Finally, fold the whole thing in half along the original center crease. You’ll have a sturdy 1″ wide strap. Topstitch down both long edges to secure it. Repeat for the second strap.
2. Create the Outer Bag Body:
- Take your main denim panel (now interfaced) and lay it right side up.
- Place your Top Yoke piece on top, right side down, aligning its bottom raw edge with one of the short edges of the main panel. Pin securely.
- Sew this seam with a 1/2″ seam allowance.
- Press the seam allowance down towards the main panel. Topstitch on the main panel close to the seam for a professional finish.
- Now, fold the entire piece in half, bringing the other short edge of the main panel up to meet the other side of the Top Yoke. Pin and sew that side together.
- You should now have a tube of fabric. Rearrange it and sew the two open side seams of the bag.
3. Box the Corners (Optional but Recommended):
- This step gives your bag a flat bottom so it can stand up.
- At one of the bottom corners of the bag, pinch the fabric so the side seam and bottom fold meet, forming a triangle.
- Measure 2″ in from the tip of the triangle and draw a line straight across. Sew along this line.
- Trim the excess corner fabric. Repeat for the other bottom corner. Your bag now has depth!
4. Assemble the Lining:
- Place your two lining pieces right sides together.
- Sew down both sides and across the bottom, but leave a 5-inch gap in the middle of the bottom seam. This is your turning hole.
- Box the corners of the lining exactly as you did for the outer bag.
5. Install the Magnetic Snap:
- Find the center of your bag’s Top Yoke along the waistband. Install one half of your magnetic snap on the inside of the Top Yoke.
- Find the corresponding center of your lining and install the other half of the snap on the right side of the lining fabric.
6. Put It All Together:
- Turn the outer denim bag right-side out.
- Leave the lining bag wrong-side out.
- Attach the Straps: Pin the raw ends of your prepared straps to the top edge of the outer bag, placing them where you’d like them to sit (e.g., aligned with the front pockets). Make sure they aren’t twisted! You can sew a small box stitch to baste them securely in place.
- Final Assembly: Place the outer denim bag (with straps attached) inside the lining bag. The right sides of both bags should now be facing each other.
- Line up the top edges and the side seams. Pin all the way around the top opening.
- Sew around the entire top edge of the bag, securing the lining to the outer bag.
7. The Grand Finale:
- Reach into the turning gap you left in the lining. Gently pull the denim bag through the hole.
- Once it’s all pulled through, close the gap in the lining by tucking in the raw edges and sewing a straight line very close to the edge.
- Push the lining down inside the outer bag.
- Give the entire bag, especially the top edge, a final, thorough press with your iron.
You have now transformed a pair of old jeans into a sturdy, stylish, and incredibly unique shoulder bag, complete with functional pockets on the outside!