Creating a denim patchwork zipper tote bag from old jeans is one of the most rewarding sewing projects you can do. It’s a fantastic way to recycle, turning worn-out, unwearable denim into a durable, stylish, and completely unique bag. The zipper top adds a layer of security, making it perfect for daily use, while the patchwork allows for endless creativity.
This is an intermediate-level sewing project because it combines three key skills: precision patchwork, working with bulky denim, and installing a zipper. This detailed, step-by-step tutorial will guide you through the entire process, from designing your patchwork to the final topstitch.
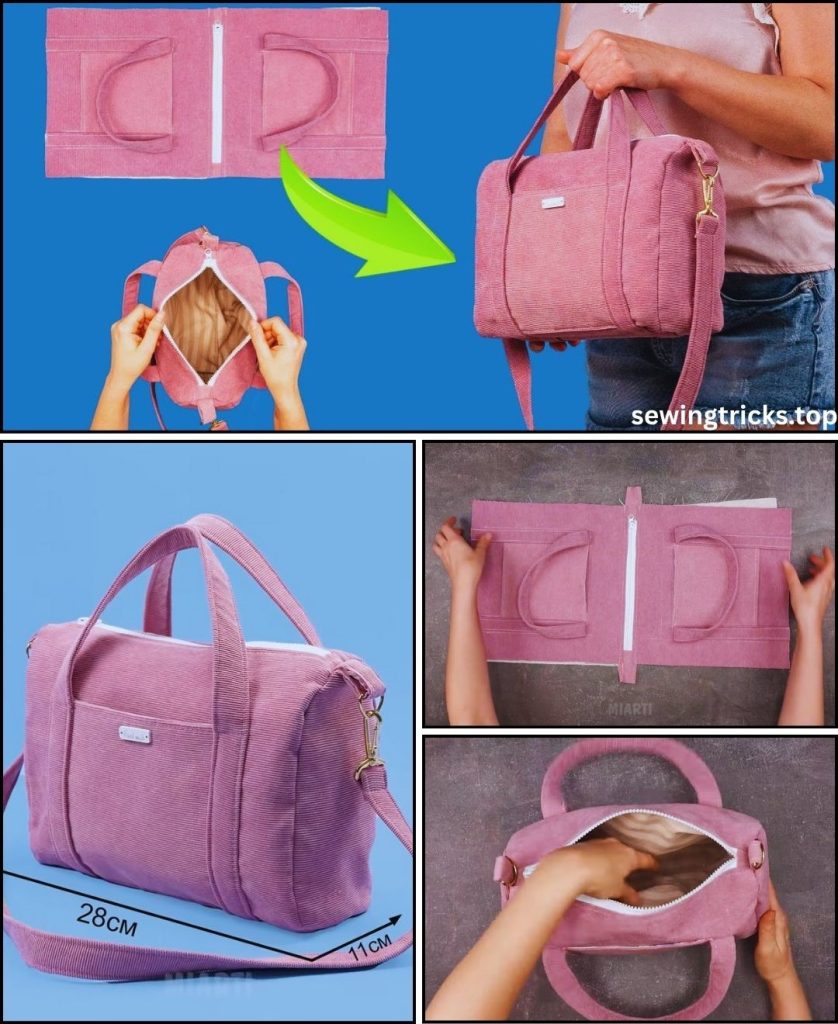
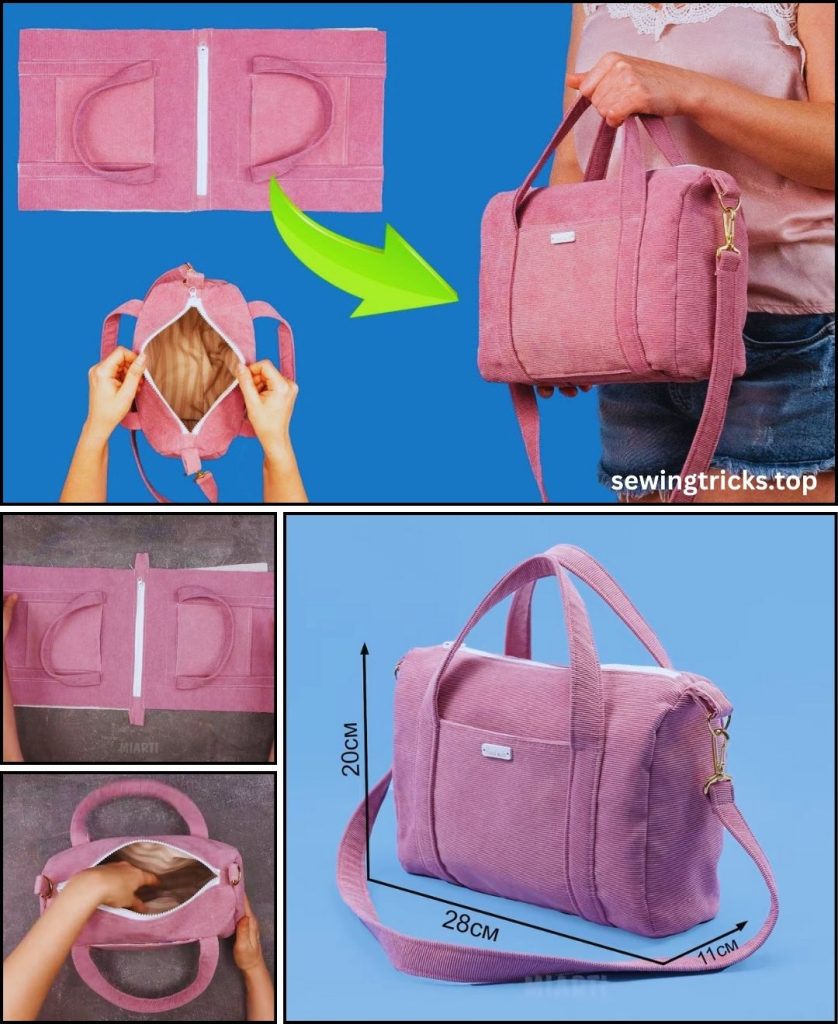
We will be making a classic, structured tote with a flat (boxed) bottom, a full zipper closure, and an interior pocket.
Finished Bag Size (Approximate):
- Width: 15 inches (38 cm)
- Height: 13 inches (33 cm)
- Depth: 4 inches (10 cm)
I. Planning & Gathering Your Materials
Before you cut a single thread, proper preparation is essential.
- Old Jeans/Denim Scraps:
- Quantity: 2-3 pairs of adult-sized jeans. The more variety in washes (light, medium, dark, faded, even black or colored denim), the more interesting your patchwork will be.
- Type: Non-stretch denim (100% cotton) is highly recommended. It’s sturdier, easier to sew, and holds its shape much better than denim with Lycra or spandex.
- Preparation: Wash, dry, and iron all your jeans. Deconstruct them by cutting off the legs and then using a seam ripper to open the inner and outer leg seams. This gives you large, flat pieces of “denim fabric” to work with.
- Lining Fabric:
- Quantity: Approximately 1 yard (0.9 meters).
- Type: A sturdy woven cotton like quilting cotton, broadcloth, or canvas. A bright color or fun pattern makes the inside of your bag a nice surprise.
- Interfacing (Crucial for Structure):
- Type: Medium to heavy-weight fusible interfacing (e.g., Pellon 809 Decor-Bond or a similar non-woven stabilizer). This is what prevents your bag from being floppy and gives it a professional, structured shape.
- Quantity: Approximately 1 yard (0.9 meters).
- Zipper:
- Type: A nylon coil zipper is easiest to sew.
- Length: At least 18 inches (45 cm). It’s always better to use a zipper that is longer than your bag’s width; you will trim the excess.
- Webbing for Handles:
- Type: 1-inch (2.5 cm) wide cotton or polypropylene webbing.
- Quantity: 2 pieces, each 26 inches (66 cm) long. (You can also make your own denim handles, but webbing is faster and very strong).
- Matching Thread:
- All-Purpose Polyester Thread: For piecing the patchwork and sewing the lining.
- Heavy-Duty or Topstitching Thread: In a classic “jean gold” or a color that matches your denim. This is for topstitching and will give your bag a professional finish.
- Essential Sewing Tools:
- Sewing Machine
- Denim Needle: Size 16/100 or 18/110. This is not optional. A regular needle will break.
- Zipper Foot: Essential for installing the zipper.
- Walking Foot (Highly Recommended): This tool helps feed multiple thick layers (denim, interfacing, lining) through your machine evenly and prevents shifting.
- Fabric Clips (Highly Recommended): Thick denim layers are often too bulky for pins. Clips are much easier and safer to use.
- Rotary Cutter, Mat, and Quilting Ruler: The most accurate way to cut your patchwork squares.
- Sharp Fabric Scissors
- Iron and Ironing Board
- Seam Ripper
- Fabric Chalk or Mark-B-Gone Pen
II. Designing & Creating Your Patchwork “Fabric”
This is the creative heart of the project. Before we can cut our bag panels, we must first create the fabric for them.
- Design Your Patchwork:
- Lay out your deconstructed denim pieces.
- Decide on a pattern. The simplest and most effective is a grid of squares or rectangles. For this tutorial, we’ll use 5-inch squares.
- Arrange your cut squares on a large table to get a preview of your bag. Mix the light, medium, and dark washes to create a balanced and interesting pattern. For a 15″x13″ panel, you’ll need a grid that is 3 squares wide and 3 squares tall (since 5″ squares will become 4.5″ once sewn).
- Cut Your Patchwork Pieces:
- Using your rotary cutter and ruler, cut your denim scraps into 5-inch x 5-inch squares.
- For the two main exterior panels of the bag, you will need a total of 18 squares (9 squares per panel).
- Sew Your Patchwork Panels (Panel 1):
- Take 3 squares for your first row. Place the first two squares right sides together (RST).
- Sew along one edge using a 1/4-inch (0.6 cm) seam allowance.
- Take the third square and add it to the second, RST, sewing with a 1/4″ seam allowance.
- CRITICAL STEP: Take this row to your iron and press the seam allowances OPEN. This is the most important trick for managing denim bulk.
- Repeat this process to create two more rows of 3 squares each.
- Now, sew your three rows together. Place Row 1 and Row 2 RST, carefully nesting the seams (where the vertical seams meet). Pin or clip at these intersections.
- Sew along the long edge with a 1/4″ seam allowance. Press the seam open.
- Add Row 3 in the same way. Press the final seam open.
- You now have one large patchwork panel. Repeat this entire step to create your second panel.
III. Cutting Your Final Panels (The Pattern)
Now that you have your “fabric,” we can cut our main pattern pieces.
- Exterior Panels (Patchwork):
- Take your two large patchwork panels. Trim them down so they are both exactly 15 inches wide x 13 inches tall.
- Lining Panels:
- From your lining fabric, cut:
- 2 Main Lining Panels: 15 inches wide x 13 inches tall.
- 1 Interior Pocket Panel: 10 inches wide x 8 inches tall.
- From your lining fabric, cut:
- Interfacing:
- From your heavy-weight stabilizer, cut:
- 2 Exterior Panels: 14 inches wide x 12 inches tall (1 inch smaller than the fabric to keep bulk out of the seams).
- From your medium-weight interfacing, cut:
- 2 Lining Panels: 14 inches wide x 12 inches tall.
- From your heavy-weight stabilizer, cut:
- Fusing:
- Center the heavy-weight stabilizer on the wrong side of each patchwork panel and fuse it according to the manufacturer’s instructions.
- Center the medium-weight interfacing on the wrong side of each lining panel and fuse.

IV. Step-by-Step Sewing Instructions
We will now use a 1/2-inch (1.27 cm) seam allowance for all construction, unless otherwise stated.
Phase 1: Prepare Components
- Prepare the Interior Pocket:
- Take your 10″x8″ pocket piece. Fold it in half (RST) to create a 10″x4″ rectangle.
- Sew along the two short sides and the long raw edge, leaving a 3-inch gap for turning.
- Clip the corners, turn the pocket right-side out, and push out the corners. Press flat. The 3-inch gap will be sewn closed when you attach it to the lining.
- Take one of your fused lining panels. Center the pocket on it, placing it about 3 inches down from the top edge.
- Topstitch the pocket onto the lining panel along the two sides and the bottom, backstitching at the start and end. This also closes the turning gap.
- Attach the Handles:
- Take one of your exterior patchwork panels. Lay it right side up.
- Measure 4 inches in from each side edge along the top (15-inch) edge. Mark these spots.
- Place one 26-inch webbing handle onto the panel. The outside edge of the webbing should align with your 4-inch mark.
- The raw ends of the webbing should align with the top raw edge of the bag. The handle loop should be pointing down towards the bottom of the bag.
- Pin or clip the handle ends in place.
- Stitch the handle ends to the bag within the 1/2-inch seam allowance (i.e., stitch 1/4″ from the top edge). This is just to baste them in place.
- Repeat this entire process for the second handle on the second patchwork panel.
Phase 2: Install the Zipper
This is the “sandwich” method and is the cleanest way to install a zipper on a tote.
- Prepare the First Zipper Sandwich:
- Lay your front patchwork panel (with handle) right side up.
- Place your zipper on top, right side down (zipper pull facing the denim). Align the top edge of the zipper tape with the top edge of the bag.
- Lay your lining panel (the one with the pocket) on top of the zipper, right side down.
- You now have a sandwich: Exterior (up), Zipper (down), Lining (down).
- Clip all three layers together along the top edge.
- Sew the First Side:
- Attach your zipper foot.
- Sew along this top edge with a 1/2-inch seam allowance. Go slowly. You may need to stop (with the needle down), lift the presser foot, and slide the zipper pull out of the way as you approach it.
- Prepare the Second Zipper Sandwich:
- Lay your back patchwork panel (with handle) right side up.
- Take the piece you just sewed. Lay it on top, zipper side down. Align the free edge of the zipper tape with the top edge of the back patchwork panel.
- Lay your second lining panel (no pocket) on top of that, right side down.
- You have another sandwich: Back Exterior (up), Zipper (down), Lining (down).
- Clip all three layers and sew this seam just as you did the first.
- Press and Topstitch:
- Open your bag unit so the exterior panels are on one side and the lining panels are on the other, with the zipper in the middle.
- Press the fabric away from the zipper on both sides.
- Change to your topstitching thread and a longer stitch length (3.0-3.5mm).
- Topstitch on the denim side, about 1/8-inch away from the seam, on both sides of the zipper. This is a key step for a professional look and keeps the fabric from catching in the zipper.
Phase 3: Sew the Bag Body
- CRITICAL STEP: Open your zipper at least halfway! If you forget this, you will not be able to turn your bag right-side out.
- Arrange the Bag: Lay your entire project out flat. Fold it so the two exterior patchwork panels are right sides together and the two lining panels are right sides together. The zipper should be at the top, with the teeth folding towards the lining side.
- Pin/Clip: Clip all the way around the perimeter. Match the side seams perfectly.
- Sew the Exterior: Starting at the bottom of the lining, sew up the side of the lining, across the zipper (backstitch over it), and down the side of the exterior. Use a 1/2″ seam allowance. Stop, then sew the entire bottom of the exterior panel closed.
- Sew the Lining: Sew up the other side of the lining, across the zipper, and down the side of the exterior. Sew the bottom of the lining panel, but LEAVE a 6-inch (15 cm) gap in the middle of the lining bottom. This is your turning hole.
Phase 4: Box All Corners
This step creates the 3D shape and flat bottom of your tote.
- Exterior Corners:
- Start with an exterior corner. Pinch the bottom seam and side seam together to flatten the corner into a triangle. The seams should be aligned.
- Your 4-inch depth requires a 2-inch cut from the tip. Measure 2 inches from the corner point and draw a line straight across.
- Stitch directly on this line. Backstitch at the start and end.
- Trim the excess triangle, leaving a 1/2-inch seam allowance.
- Repeat for the second exterior corner.
- Lining Corners:
- Repeat the exact same process for the two lining corners. (Pinch, measure 2″ from the tip, draw, stitch, trim).
Phase 5: Turn and Finish
You’re almost there! This is the magical part.
- Turn the Bag: Reach into the 6-inch gap you left in the lining bottom. Grab the denim exterior and slowly, patiently pull the entire bag right-side out through the hole.
- Poke Out Corners: Use your fingers or a blunt tool (like a chopstick) to poke out all four boxed corners (two on the exterior, two on the lining) so they are crisp and square.
- Close the Lining Gap: Find the 6-inch hole in the lining. Tuck the raw edges inside by 1/2 inch and press them flat. Sew this opening closed using either:
- Machine: A quick topstitch 1/8-inch from the folded edge.
- Hand: An invisible ladder stitch for the cleanest finish.
- Final Step: Push the lining down into the exterior bag. Use your iron to give the top zipper edge one final, crisp press.
V. Tips for a Professional Finish
- Press, Press, Press: The difference between a homemade bag and a “handcrafted” bag is pressing. Press every single seam, especially the patchwork seams (pressed open) and the final top edge.
- Thread Choice: Using heavy-duty topstitching thread in a contrasting color (like jean gold) for all visible stitching (topstitching near the zipper, attaching handles if you do it differently) instantly elevates the look.
- Thrift Flip Idea: Before you start, carefully remove a back pocket from your jeans. Sew this pocket onto one of your exterior patchwork panels before you attach the handles (Phase 1, Step 2). This gives you an easy, built-in outer pocket!
- Zipper Pull: Cut a 2-inch piece from a denim belt loop. Fold it through the hole in your zipper pull and stitch the ends together to create a matching denim zipper pull.
Congratulations! You have successfully transformed a pile of old jeans into a sturdy, stylish, and secure patchwork zipper tote bag.