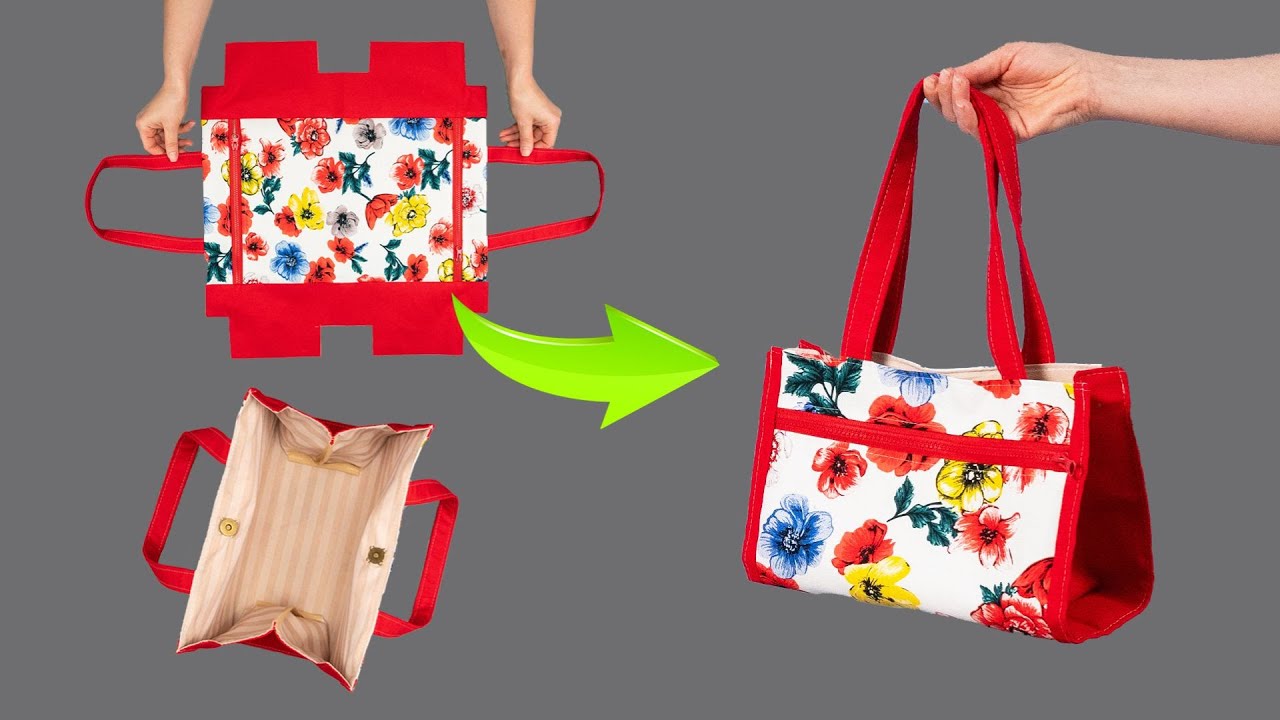
This is a wonderful project! Sewing a “cute handbag” is often the first project that gets people truly excited about sewing. The “simplest way” to get a professional-looking, durable, and “cute” bag is to make a fully lined tote with boxed corners.
Why is a lined bag simpler for a beginner? It might sound like more work, but it means you don’t have to finish any raw seams inside the bag. All the messy parts are hidden, and the bag looks clean and professional, inside and out. The “cute” factor will come from your fabric choices and the neat, structured shape.
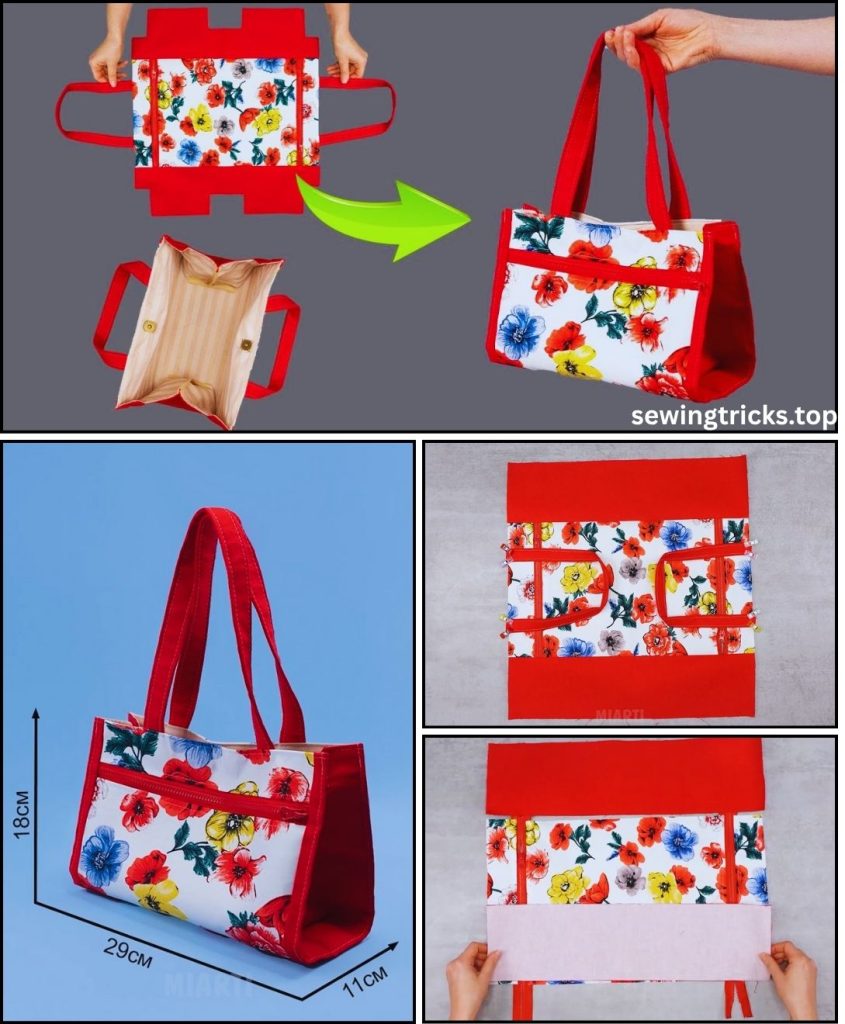
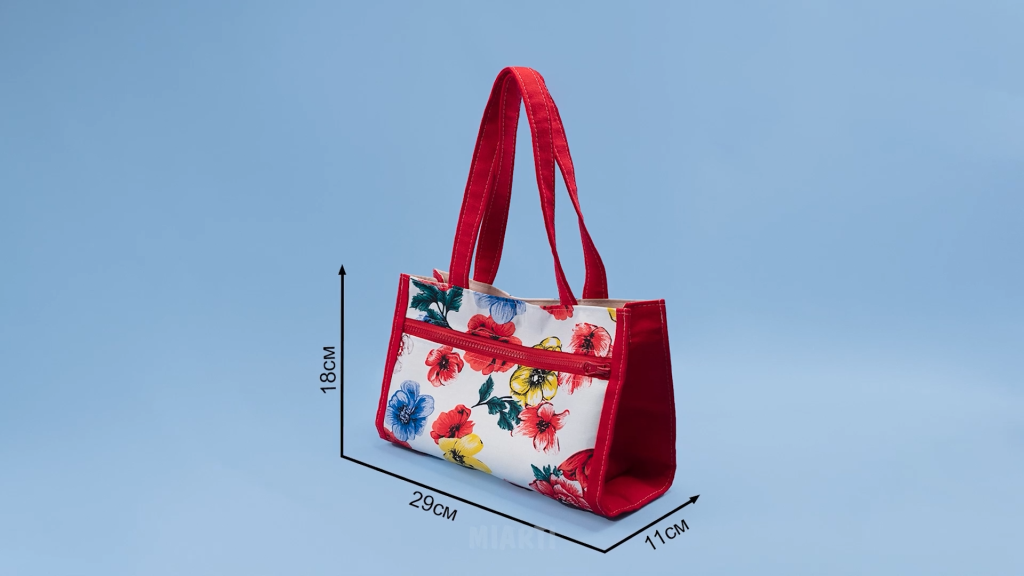
This detailed, long-form tutorial will guide you through every single step, assuming you are a complete beginner. We will create a bag that is approximately 13 inches wide, 11 inches tall, and 4 inches deep—a perfect size for a daily handbag.
I. Planning & Gathering Your “Cute” Materials
The “pattern” for this bag is just a set of simple rectangles, but your choice of fabric is what will make it “cute.”
- 1. Exterior Fabric (The “Cute” Part):
- Quantity: You need 1/2 yard (or 0.5 meters).
- Type: Choose a sturdy, medium-to-heavyweight woven fabric. This is key to a bag that holds its shape.
- Great Choices: Canvas, duck cloth, denim (from old jeans!), corduroy, or home decor fabric. A high-quality quilting cotton will also work if you use good interfacing. For a “cute” look, pick a bold floral, a geometric print, or a fun novelty pattern.
- 2. Lining Fabric (The “Surprise” Part):
- Quantity: You need 1/2 yard (or 0.5 meters).
- Type: A standard quilting cotton is perfect.
- Great Choices: Pick a fun, contrasting color or a small print that coordinates with your exterior fabric. This is the fun “pop” of color you’ll see every time you open your bag.
- 3. Interfacing (The “Structure” Part – Highly Recommended):
- Quantity: You need 1 yard (or 1 meter).
- Type: Medium-weight fusible (iron-on) interfacing. A great, widely available option is Pellon SF101 Shape-Flex. This woven interfacing is easy to use and gives your bag a soft but stable “handbag” feel, rather than a floppy grocery sack feel.
- 4. Handles (The “Handbag” Part):
- Option 1 (Easiest): Cotton or Polypropylene Webbing. You’ll need about 1.5 yards (1.4 meters). Cut this into two 24-inch (61 cm) pieces. This is strong, easy, and looks very professional.
- Option 2 (More “Cute”): Self-Fabric Handles. You’ll make these from your exterior fabric. This tutorial will include steps for this.
- 5. Essential Sewing Tools:
- Sewing Machine: (With a standard universal needle, size 80/12 or 90/14).
- All-Purpose Polyester Thread: Choose a color that matches your exterior fabric.
- Iron and Ironing Board: This is not optional! Pressing your seams is the #1 secret to a professional-looking bag.
- Cutting Tools: Sharp fabric scissors or a rotary cutter, mat, and long quilting ruler.
- Measuring Tools: Tape measure or ruler.
- Marking Tool: Fabric chalk or a disappearing ink pen.
- Pins or Sewing Clips: Clips are often easier to use and don’t distort the fabric.
II. The “Pattern” – Cutting Your Fabric
Our pattern is just a set of rectangles. Precision is key! Measure twice, cut once.
From your EXTERIOR Fabric, cut:
- (2) Main Body Panels: 15 inches wide x 13 inches tall.
- (If making self-fabric handles): (2) Handle Strips: 4 inches wide x 24 inches long.
From your LINING Fabric, cut:
- (2) Main Body Panels: 15 inches wide x 13 inches tall.
- (Optional Interior Pocket): (1) Pocket Panel: 7 inches wide x 9 inches tall.
From your FUSIBLE INTERFACING, cut:
- (2) Main Body Panels: 15 inches wide x 13 inches tall.
- (If making self-fabric handles): (2) Handle Strips: 2 inches wide x 24 inches long.
III. Step-by-Step Sewing Instructions
Let’s break this down into clear, manageable phases. Remember to backstitch at the beginning and end of every seam! We will use a consistent 1/2-inch (1.27 cm) seam allowance unless stated otherwise.
Phase 1: Preparation (The “Prep Work”)
This is the most important step for a high-quality finish.
- Fuse Your Interfacing:
- Lay one Exterior Panel wrong side up on your ironing board.
- Place one 15″ x 13″ interfacing panel on top, with the bumpy (glue) side facing the fabric.
- Following the interfacing’s instructions, press and hold the iron (don’t “scrub” back and forth) to fuse the two layers. Work your way across the entire panel.
- Repeat this for the second Exterior Panel.
- Make the Optional Interior Pocket:
- Take your 7″ x 9″ pocket piece. On one of the 7-inch (wide) edges, fold the fabric down 1/2 inch toward the wrong side and press.
- Fold it down another 1/2 inch, press again to create a clean double-hem, and sew along this fold to finish the top edge of your pocket.
- On the other three sides, simply fold 1/2 inch toward the wrong side and press.
- Take one of your Lining Panels. Place it right side up.
- Position your pocket on the lining panel, centered horizontally and about 3 inches down from the top edge. Pin it in place.
- Topstitch the pocket onto the lining by sewing along the two sides and the bottom, 1/8 inch from the edge. Backstitch at the top corners to secure it.
- Make the Handles (Skip if using pre-made webbing):
- Take one 4″ x 24″ fabric handle strip. Fuse the 2″ x 24″ interfacing strip to the center of the wrong side.
- Fold the strip in half lengthwise (“hotdog style”) and press to create a center crease.
- Open it up. Fold the two long raw edges in to meet at the center crease. Press.
- Fold the entire strip in half along the original center crease. All raw edges are now enclosed. You have a 1″ x 24″ handle.
- Topstitch along both long edges, about 1/8 inch from the edge, for a strong, professional finish.
- Repeat for the second handle.
Phase 2: Assemble the Exterior Bag Shell
- Attach the Handles:
- Take one Exterior Panel and lay it right side up.
- Take one handle. Measure 4 inches in from each side edge along the top (15-inch) edge.
- Place the raw ends of the handle at these 4-inch marks, aligning the raw ends of the handle with the top raw edge of the bag.
- The handle loop should be pointing down towards the bottom of the bag.
- Pin or clip the handle ends in place.
- Baste the handles: Sew the handle ends in place within the seam allowance (e.g., 1/4 inch from the top edge). This just holds them securely for the next steps.
- Repeat for the second handle on the second Exterior Panel.
- Sew the Exterior Shell:
- Place your two Exterior Panels Right Sides Together (RST). Your handles will be sandwiched in the middle.
- Clip or pin along the two sides and the bottom.
- Sew the two side seams and the bottom seam with a 1/2-inch seam allowance. Leave the top (handle edge) open.
- Press the side and bottom seams open. This will help you in the next step.
- Box the Corners (This creates the 3D shape!):
- Keep the bag shell inside out.
- At one of the bottom corners, pinch the bag so the side seam lines up perfectly with the bottom seam.
- Flatten this into a triangle. The seams should be running right down the middle.
- Use your ruler to measure 2 inches down from the very tip of the triangle.
- Draw a straight line across the triangle at this 2-inch mark. (This line will be 4 inches long).
- Sew directly on this line. Backstitch at the start and end.
- You can trim the excess triangle, leaving a 1/2-inch seam allowance.
- Repeat this exact process for the other bottom corner.
- Turn your exterior shell right-side out. You have a beautiful, structured bag! Set it aside.
Phase 3: Assemble the Lining Bag Shell
- Sew the Lining Shell:
- Take your two Lining Panels (one with the pocket) and place them RST.
- Clip or pin along the two sides and the bottom.
- Sew the two side seams with a 1/2-inch seam allowance.
- Sew the bottom seam, but LEAVE A 5-6 INCH GAP in the middle. Backstitch at the start and stop of this gap. This is your turning hole. Do not forget this step!
- Box the Corners:
- Repeat the exact same process from Phase 2, Step 3 to box the corners of the lining. (Pinch, align seams, measure 2″ from the tip, draw, sew, trim).
- Do NOT turn the lining. Leave it inside out.
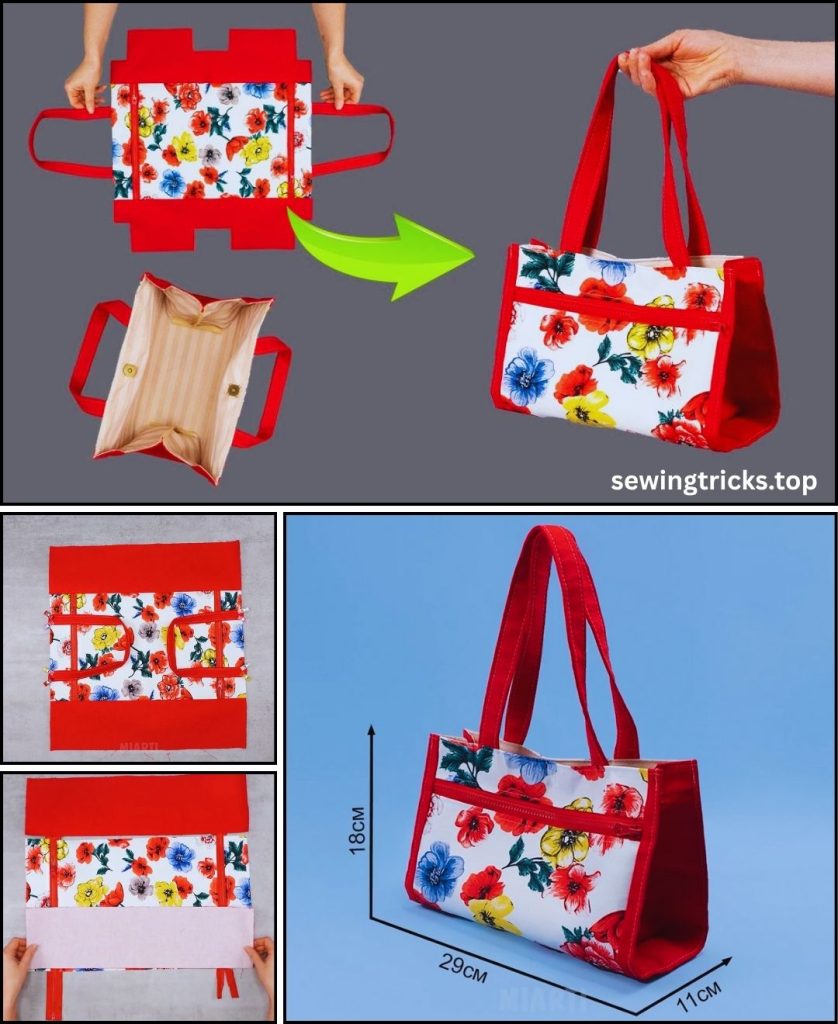
Phase 4: Combine the Bag (The “Magic” Part)
- You should have two “buckets”:
- The Exterior Bag (right-side out)
- The Lining Bag (inside-out)
- Put the Bags Together:
- Take your Exterior Bag and place it INSIDE the Lining Bag.
- This means the Right Sides of the fabric are Together.
- Your handles are now sandwiched between the two layers.
- Align and Pin:
- Carefully align the top raw edges of the exterior and lining.
- Match the side seams of the exterior bag to the side seams of the lining bag. This is key to a non-twisted bag. Pin/clip the side seams together first.
- Continue pinning/clipping all the way around the top opening.
- Sew the Top Seam:
- Sew all the way around this top circular opening with a 1/2-inch seam allowance. Backstitch over the side seams for extra strength.
Phase 5: Turn and Finish
- Turn the Bag:
- This is the exciting part! Reach into the gap you left in the lining bottom.
- Grab the exterior bag and gently pull the entire bag through this hole.
- It will look like a wrinkly mess. This is normal.
- Close the Lining Gap:
- Find the gap in the lining. The raw edges will naturally want to fold inward.
- Tuck the raw edges in, press them flat, and pin or clip the hole closed.
- Sew this hole closed by topstitching 1/8 inch from the folded edge. (This is inside your bag, so it doesn’t have to be invisible).
- Finish the Bag:
- Push the lining down into the exterior bag.
- Go to your iron. Press the top edge of the bag flat and crisp. This is the most important press of the whole project.
- Topstitch: To give your bag a final professional look and to keep the lining from peeking out, sew all the way around the top opening, about 1/4 inch from the edge. Use a slightly longer stitch length (3.0-3.5mm) for a beautiful, straight stitch.
IV. How to Make it “Cute” – Tips & Variations
- Fabric is Everything: The “cute” factor truly comes from your fabric. A novelty print, a bright floral, or a classic polka dot on the outside with a bright, solid-color lining is a timeless, cute combination.
- Add a Pocket: We added an interior pocket, but you can also add a simple patch pocket to the outside before you sew the exterior panels together (just like you did for the lining).
- Simple Closure: If you want a closure, the simplest way is to add a button and loop.
- Before sewing the top seam (Phase 4, Step 4), create a small loop of elastic or a thin strip of folded fabric.
- Baste it to the center of the top edge of the exterior back panel, with the loop pointing down (sandwiched between the layers).
- After you turn the bag, hand-sew a large, cute button to the front panel to catch the loop.
Congratulations! You have just sewn a beautiful, simple, and incredibly “cute” handbag. You’ve learned how to work with interfacing, create handles, sew a lining, and box corners—all the fundamental skills you need for bag making!