Upcycling old jeans into a shoulder bag is one of the most rewarding sewing projects you can undertake. Denim is an incredibly forgiving material: it is durable, holds its shape well, and actually looks better with a bit of wear and tear. Plus, by reusing materials you already have, you are creating a sustainable, eco-friendly accessory that is entirely unique to you.
This comprehensive tutorial will guide you through creating a classic, lined shoulder bag with comfortable straps, interior pockets, and a magnetic closure. We will use a “tote style” construction with a boxed bottom for a roomy interior.
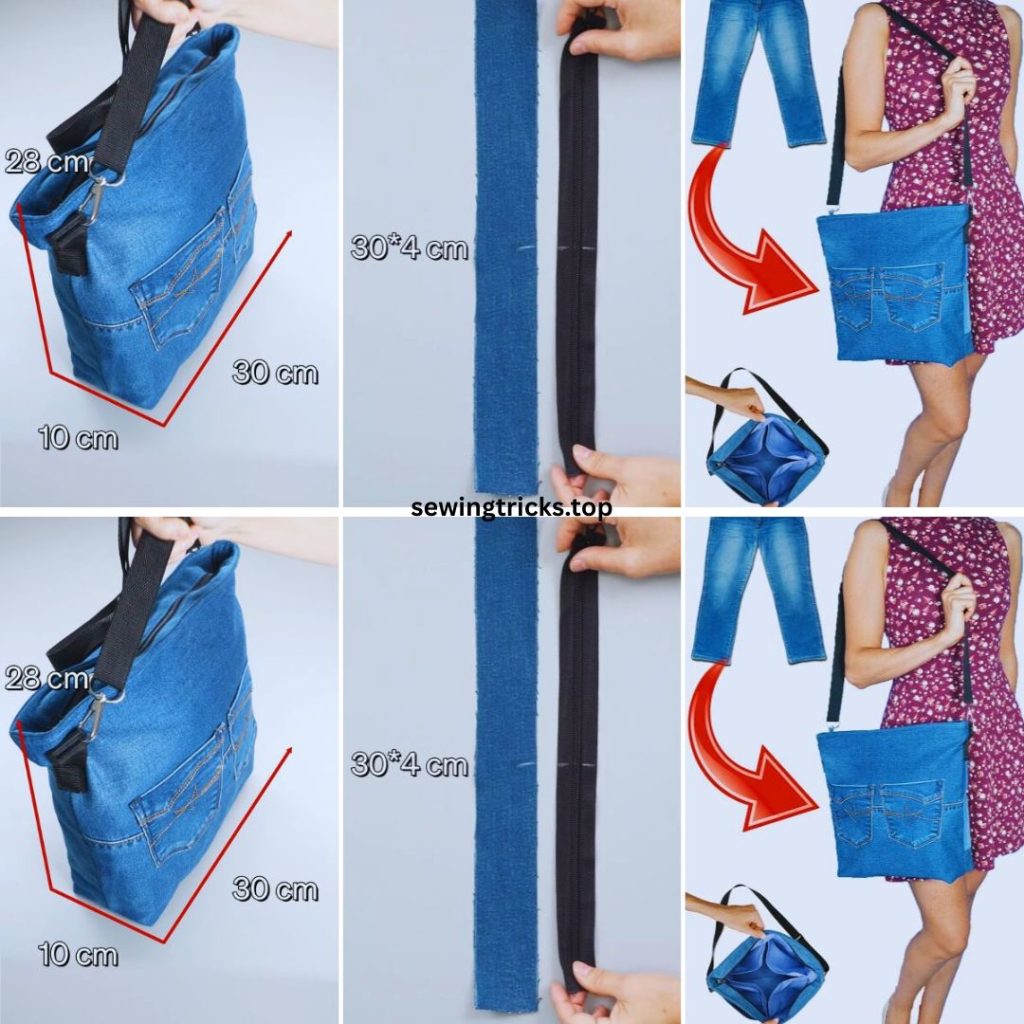
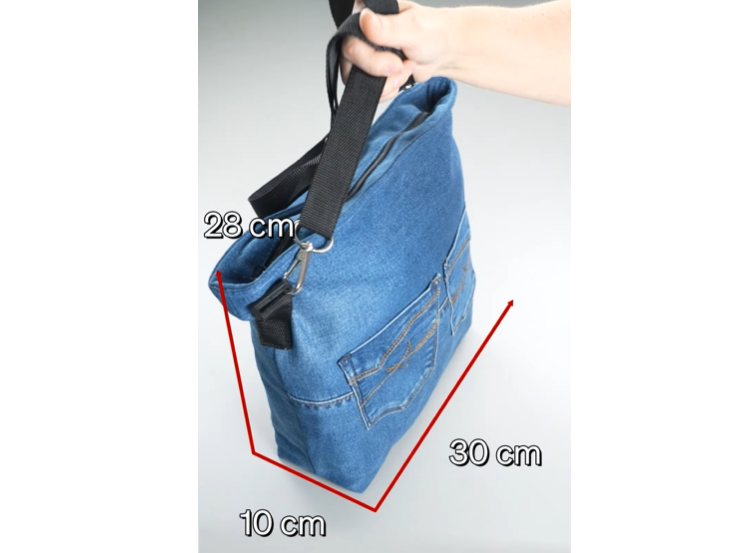
Finished Bag Size (Approximate):
- Width: 14 inches (35 cm)
- Height: 12 inches (30 cm)
- Depth: 4 inches (10 cm)
- Strap Drop: 11-12 inches (perfect for over the shoulder)
Part I: The “Ingredients” – Materials & Tools
Before cutting, gather everything you need. Working with denim requires specific tools to prevent broken needles and frustration.
1. Fabric
- Old Jeans: 1 pair of adult-sized jeans. Large sizes (men’s wide leg or boot cut) provide the most fabric. Tip: 100% cotton denim is easier to sew for bags than “super stretch” jegging material, as it holds its shape better.
- Lining Fabric: 1/2 yard (0.5 meters) of cotton fabric. A fun floral, geometric print, or a bright solid color works best to make it easy to find items inside your bag.
2. Structure & Hardware
- Fusible Interfacing: 1 yard of medium-to-heavy weight fusible interfacing (like Pellon 809 Decor-Bond). This prevents the bag from looking slouchy.
- Magnetic Snap: 1 set (optional, but gives a professional finish).
- Thread:
- All-Purpose Polyester: For construction seams.
- Topstitching Thread (Optional): In “Jean Gold” or heavy-duty thread for visible outside stitches.
3. Tools
- Sewing Machine: A standard domestic machine is fine, provided you go slowly over thick spots.
- Denim Needle: Size 100/16 or 90/14. Do not skip this. Universal needles will break.
- Scissors / Rotary Cutter & Mat
- Clips: “Wonder Clips” or binder clips are better than pins for thick denim layers.
- Iron & Ironing Board: Crucial for crisp seams.
- Seam Ripper: To harvest pockets from the jeans.
Part II: Preparation & The Pattern (Cutting Guide)
We don’t need paper patterns; we will cut simple rectangles.
1. Prep the Jeans
Wash and dry the jeans. Cut off the legs just below the crotch. Cut up the inner leg seam to open the fabric flat. Iron deeply to remove creases.
- Pro Tip: Carefully use a seam ripper to remove the back pockets from the jeans. Keep the stitching intact if possible. We will re-attach these to the bag for exterior storage!
2. Cut the Exterior (Denim)
From the leg panels, cut:
- Main Body: (2) Rectangles – 16 inches wide x 14 inches tall.
- Straps: (2) Strips – 4 inches wide x 28 inches long. (If your jeans aren’t long enough, you can piece scraps together to get this length, or use cotton webbing).
3. Cut the Lining (Cotton)
- Main Lining: (2) Rectangles – 16 inches wide x 14 inches tall.
- Interior Pocket: (1) Rectangle – 9 inches wide x 6 inches tall.
4. Cut the Interfacing
- Main Body Interfacing: (2) Rectangles – 16 inches wide x 14 inches tall.
- Strap Interfacing: (2) Strips – 2 inches wide x 27 inches long.

Part III: Step-by-Step Construction
Seam Allowance: Use 1/2 inch (1.27 cm) unless otherwise noted.
Phase 1: Prepare the Components
1. Fuse Interfacing: Follow the manufacturer’s instructions to fuse the interfacing to the wrong side of your two Main Denim Body pieces. This turns floppy denim into sturdy bag material.
2. Attach Exterior Pockets: Take the back pockets you harvested earlier. Position one on the center of each Main Denim Body piece. Pin securely. Topstitch them down, tracing the original stitch lines of the pocket.
- Tip: If the denim is very thick at the corners of the pocket, hand-crank the sewing machine wheel to avoid breaking a needle.
3. Make the Shoulder Straps:
- Take one 4″ x 28″ denim strip.
- Fuse the 2″ strip of interfacing down the center of the wrong side.
- Fold the strip in half lengthwise (hot-dog style), wrong sides together, and press to create a center crease. Open it back up.
- Fold both long raw edges inward to meet that center crease. Press.
- Fold the entire strip in half again along the original center crease. The raw edges are now hidden inside.
- Topstitch down both long sides, about 1/8″ from the edge.
- Repeat for the second strap.
4. Prepare the Interior Pocket:
- Take the 9″ x 6″ lining pocket piece. Fold the top edge down 1/4″, press, fold again 1/4″, press. Sew this hem.
- Fold the other three sides in 1/2″ and press.
- Center this pocket on the right side of one Main Lining panel. Topstitch the sides and bottom to attach it.
Phase 2: Assemble the Exterior Bag
1. Attach Straps: Lay one Main Denim Body piece right side up. Measure 4 inches in from the left side and 4 inches in from the right side along the top edge. Place the raw ends of one strap at these marks, forming a “U” shape. The strap loop should be hanging down over the pockets. Baste (sew) them in place 1/4″ from the edge. Repeat for the other panel.
2. Sew the Body: Place the two Main Denim Body pieces Right Sides Together. Clip the sides and bottom.
- Sew down the left side, across the bottom, and up the right side. Leave the top open.
- Press the seams open (this reduces bulk).
3. Box the Corners (The “Flat Bottom” Trick):
- With the bag inside out, reach into one bottom corner.
- Pull the front and back apart and flatten the corner so the side seam lies directly on top of the bottom seam, creating a triangle point.
- Measure 2 inches down from the tip of the triangle. Draw a line across (this line should be 4 inches wide).
- Sew directly on this line. Backstitch well.
- Trim the excess fabric triangle off, leaving a 1/2″ seam allowance.
- Repeat for the other bottom corner. Turn the bag right side out to check your work—you should have a nice boxy bottom! Turn it back inside out for now.
Phase 3: Assemble the Lining
1. Sew the Lining Body: Place the two Main Lining pieces Right Sides Together.
- Sew the sides and bottom, BUT leave a 5-inch gap in the center of the bottom seam. You need this hole to turn the bag later!
2. Box Lining Corners: Repeat the “Box the Corners” step from Phase 2 on the lining corners so they match the exterior.
3. Install Magnetic Snap (Optional): Before putting the bag together, install your magnetic snap. Find the center of the lining panels, measure down 1.5 inches from the top edge, and follow the package instructions to insert the prongs through the fabric (reinforce with a scrap of interfacing on the back!).
Phase 4: Assembly (The Bag-in-Bag Method)
- Combine:
- Turn the Denim Exterior bag RIGHT SIDE OUT.
- Leave the Lining bag INSIDE OUT.
- Place the Denim bag inside the Lining bag. The Right Sides should be touching each other.
- Tuck the straps down between the layers so they don’t get caught in the seam.
- Pin and Sew:
- Match the side seams of the denim and the lining. Clip all the way around the top circle opening.
- Sew all the way around the top rim with a 1/2″ seam allowance. Go slowly over the thick areas where the side seams meet.
- Turn:
- Pull the Denim bag out through the 5-inch gap you left in the bottom of the lining.
- Keep pulling until the whole bag is right side out. It will look wrinkly!
- Finish:
- Stitch the gap in the lining closed (either by machine or by hand).
- Push the lining down inside the denim bag.
- The Final Press: Roll the top edge between your fingers so the lining isn’t peeking out, and press firmly with your iron.
- Topstitch: Sew a final line of stitching around the entire top perimeter of the bag, about 1/4″ from the edge. This secures the lining and strengthens the handles.
Part IV: Tips for Sewing Thick Denim
If your machine struggles or makes a grinding noise, try these tricks:
- The “Hump Jumper” Trick: When sewing over a thick seam (like where the side seams meet), the presser foot can get stuck angling upward. Fold a piece of scrap cardboard or fabric until it is the same height as the seam. Place this “hump jumper” under the back of the presser foot to level it out. The machine will glide right over.
- Hand Wheel: When approaching very thick layers, stop using the foot pedal. Use the hand wheel on the side of your machine to manually crank the needle through the fabric slowly.
- Hammer It: It sounds aggressive, but if a seam is too thick, place a cloth over it and hit it gently with a hammer or mallet. This breaks the denim fibers and flattens the seam, making it easier to sew.
Congratulations! You have just turned a pair of unwearable jeans into a stylish, custom shoulder bag that is built to last. Enjoy your new sustainable accessory!