This is the ultimate instant-gratification sewing project. If you have 45 minutes and a sewing machine, you can make this bag.
Many bag tutorials are complicated with zippers, fusible interfacing, and complex hardware. To make this “Quick & Easy Beginner Tote,” we are going to use a specific construction method called the “Bag-in-Bag” technique. This method hides all the raw fabric edges inside the bag, meaning you don’t need a serger or any fancy finishing stitches.
Here is a comprehensive, long-form tutorial on how to sew a professional-looking tote bag in the absolute simplest way possible.
The 45-Minute Tote: A Comprehensive Guide for Absolute Beginners
I. Project Overview
- Skill Level: Absolute Beginner (you just need to know how to thread your machine and sew a straight line).
- Time: 30–60 minutes.
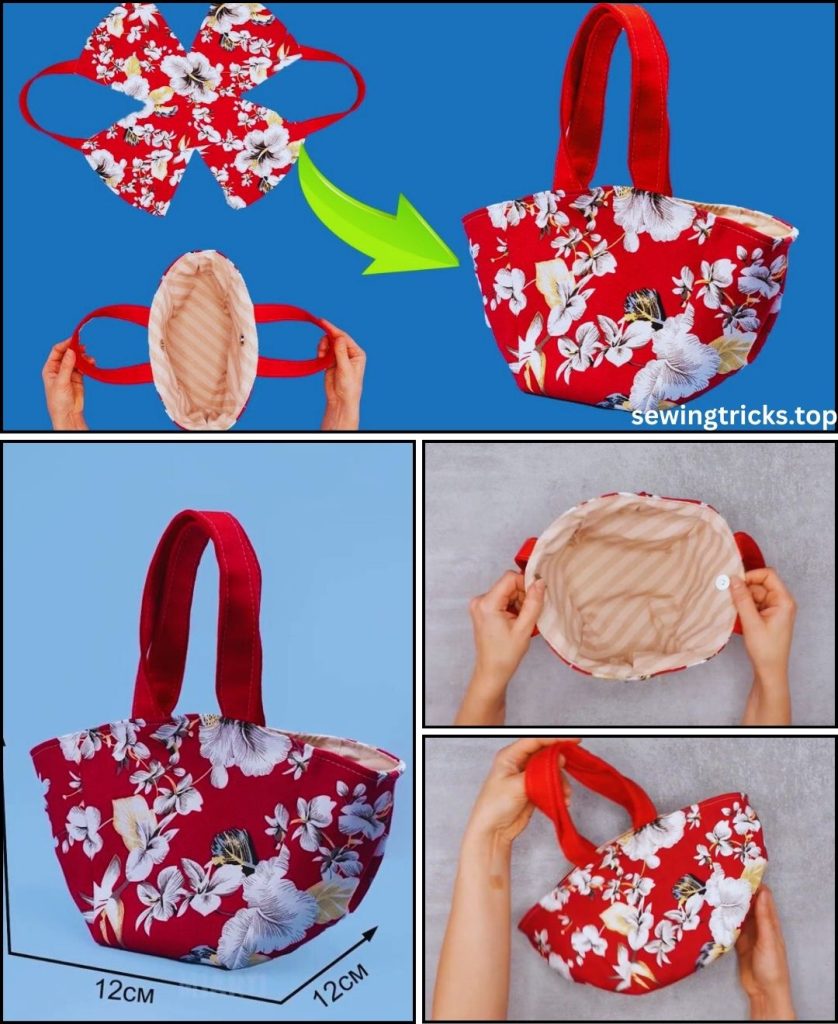
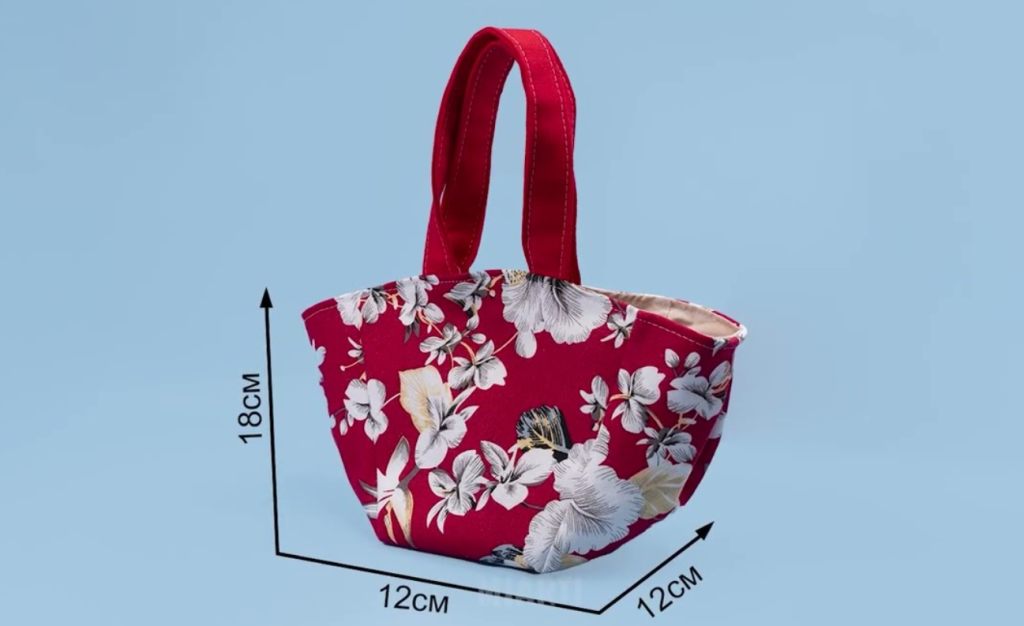
- Finished Dimensions: Approx. 13” wide x 14” tall x 3” deep.
- Style: An open-top tote with a contrasting lining and sturdy webbing straps.
II. The Secret to Speed: Materials
The secret to sewing a bag quickly is choosing the right materials so you can skip steps like ironing on stiffeners (interfacing) or making your own straps.
1. The Fabric (Structure is Key)
Because we want to skip using “interfacing” (the stiffener usually ironed onto fabric), we need the outer fabric to be sturdy on its own.
- Exterior Fabric: 1/2 yard. Choose Canvas, Duck Cloth, Denim, or Decor-Weight Cotton. These fabrics are thick and will make the bag stand up on its own.
- Lining Fabric: 1/2 yard. Standard Cotton or Quilting Cotton. This keeps the inside soft and neat.
2. The Handles (The Time Saver)
- Cotton or Polypropylene Webbing: 1.5 yards (approx. 1.3 meters).
- Why? Making fabric handles involves cutting, folding, ironing, and topstitching. Using pre-made webbing straps cuts 15 minutes off your sewing time!
3. Essential Tools
- Sewing Machine (Universal Needle size 90/14 or Denim Needle).
- Thread (All-purpose polyester).
- Scissors.
- Pins or Sewing Clips (Clips are faster!).
- Iron & Ironing Board (Don’t skip the pressing; it’s what makes it look professional).
- Ruler or Measuring Tape.
III. The Pattern (No Printer Needed)
We are using simple geometry. You can draw these measurements directly onto your fabric with a pen or chalk.
1. Cut the Exterior:
- Cut (2) Rectangles: 15 inches wide x 16 inches tall.
2. Cut the Lining:
- Cut (2) Rectangles: 15 inches wide x 16 inches tall.
3. Cut the Straps:
- Cut (2) Strips of webbing: 25 inches long (each).
IV. Step-by-Step Sewing Instructions
Seam Allowance: We will use a 1/2-inch seam allowance (this means you sew 1/2 inch away from the raw edge of the fabric).
Phase 1: Attach the Handles
- Take one Exterior Panel and lay it right-side up (the pretty side facing you).
- Measure 3 inches in from the left edge and 3 inches in from the right edge along the top (15-inch side). Mark these spots.
- Take one webbing strap. Place the raw ends of the strap at your marks, forming a “U” shape. Ensure the strap isn’t twisted. The loop of the strap should be hanging down over the fabric.
- Baste: Sew the strap ends in place using a scant 1/4-inch seam allowance. This is just a temporary stitch to hold them in place so they don’t wiggle later.
- Repeat for the second Exterior Panel.
Phase 2: Sew the “Outer Bag”
- Place your two Exterior Panels (with handles attached) Right Sides Together.
- Clip or pin the sides and the bottom. Leave the top open.
- Sew down the left side, across the bottom, and up the right side using a 1/2-inch seam allowance.
- Don’t forget to backstitch (sew forward and backward) at the start and end of your sewing to lock the threads.
Phase 3: Sew the “Inner Bag” (Lining)
- Place your two Lining Panels Right Sides Together.
- Clip or pin the sides and bottom.
- IMPORTANT: You are going to sew the sides and bottom, but you must leave a gap.
- Sew down the left side.
- Sew the right side.
- Sew the bottom, but stop in the middle and leave a 5-inch hole.
- Why? This hole is essential. It is how we will turn the bag right-side out later.
Phase 4: Box the Corners (The “3D” Step)
If you leave the bag as is, it will be flat like a pillowcase. To give it a flat bottom so it can hold groceries, we “box” the corners.
- Keep the Exterior Bag inside out.
- Look at one of the bottom corners. Grab the side seam and the bottom seam and pull them apart.
- Squash the corner flat so the Side Seam lies directly on top of the Bottom Seam, creating a triangle point.
- Measure 1.5 inches down from the very tip of the triangle point. Draw a straight line across.
- Sew directly on that line. Go back and forth a couple of times to make it strong.
- Trim off the excess triangle fabric with your scissors.
- Repeat this for the other corner of the Exterior Bag, and both corners of the Lining Bag.
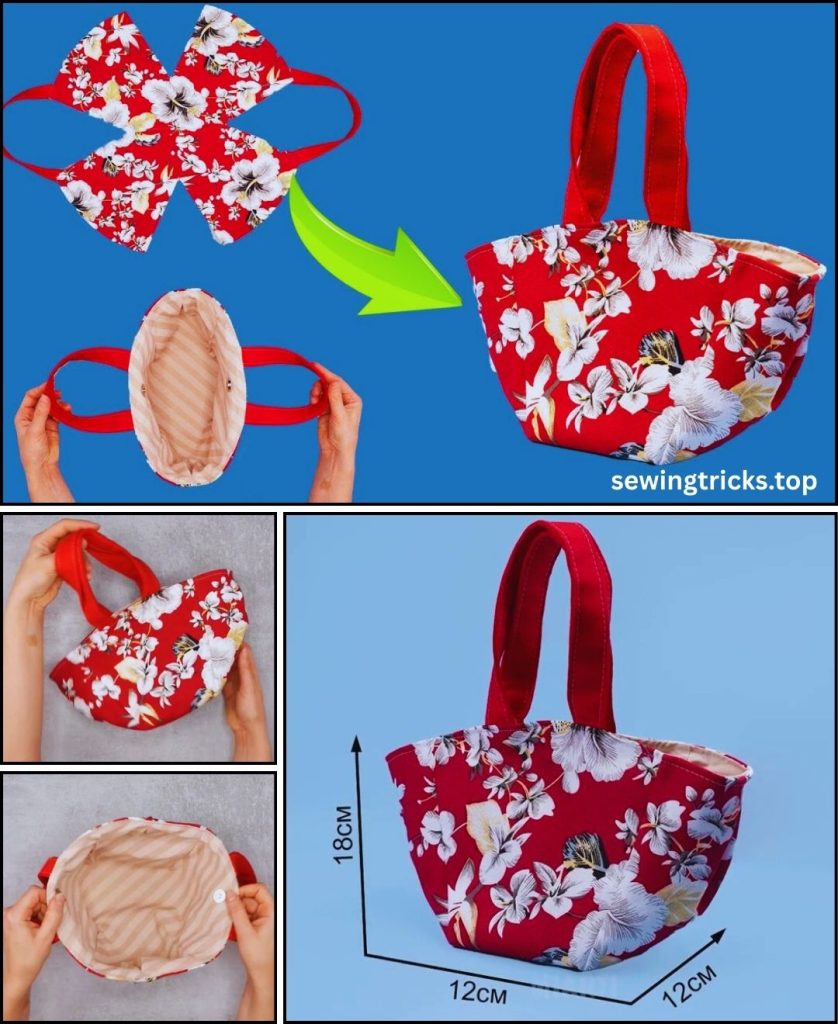
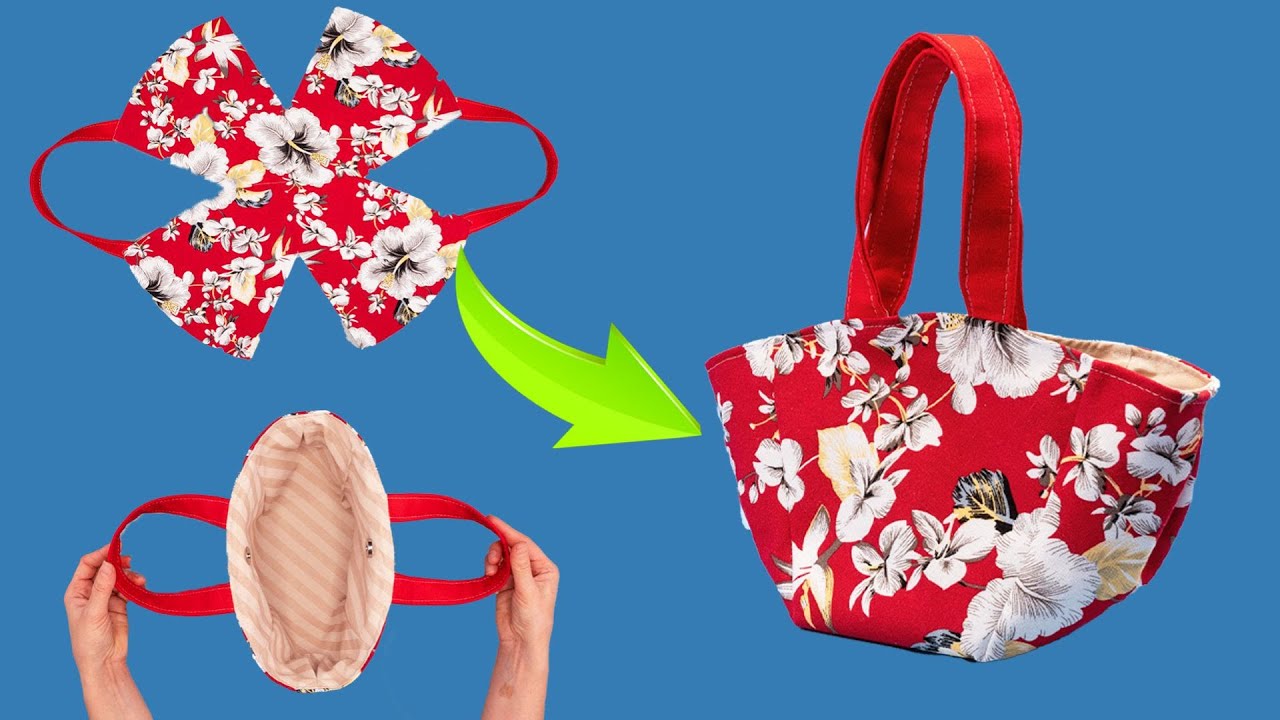
Phase 5: Assembly (The Bag-in-Bag Method)
This is the magic trick where everything comes together.
- Turn the Exterior Bag RIGHT SIDE OUT.
- Leave the Lining Bag INSIDE OUT.
- Put the Exterior Bag inside the Lining Bag.
- The Right Sides (pretty sides) should be touching each other.
- The handles should be sandwiched between the two layers, hidden from sight.
- Match the Seams: Make sure the side seams of the exterior match the side seams of the lining perfectly. Clip or pin them together.
- Continue clipping all the way around the top circle opening.
- Sew the Top: Remove the free arm from your sewing machine (if possible) to slide the bag cuff onto the machine. Sew all the way around the top circle edge with a 1/2-inch seam allowance.
Phase 6: The Great Turn & Finish
- Turn it out: Reach your hand through that 5-inch hole you left in the bottom of the lining. Grab the exterior bag fabric and pull the whole thing through the hole. It will look like a wrinkled mess—don’t panic!
- Close the hole: Once the bag is turned out, find that hole in the lining. Fold the raw edges inward, pin it shut, and sew a quick straight stitch right near the edge to close it.
- Final Press: Push the lining down inside the exterior bag.
- Pro Tip: Roll the top edge between your fingers until the exterior fabric and lining fabric meet perfectly at the top, then hit it with a hot steam iron. This makes the bag look store-bought.
- Topstitch: To keep the lining from rolling up and to strengthen the handles, sew one final straight stitch all the way around the top of the bag, about 1/4 inch from the edge.
V. Quick Tips for Speed
- Batch Sew: If you are making two bags, do step 1 for both, then step 2 for both. It saves time switching tasks.
- Don’t pin everything: On sturdy canvas, you can often just hold the fabric together with your hands. Only use clips on the corners or handles.
- Use a Magnetic Seam Guide: If you struggle to sew in a straight line, place a piece of masking tape on your machine 1/2 inch away from the needle to guide your eye.
Congratulations! You have just sewn a fully lined, durable tote bag in under an hour. Once you master this basic shape, you can easily change the dimensions to make coin purses, laundry bags, or beach totes!