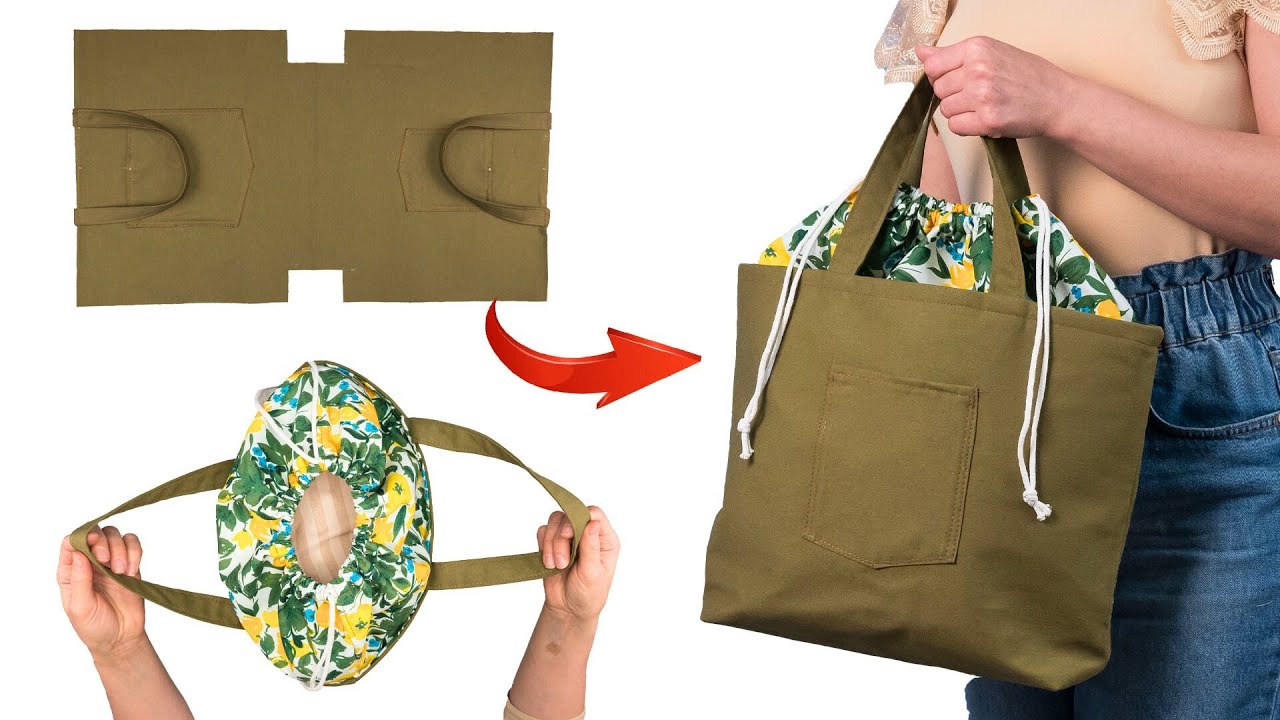
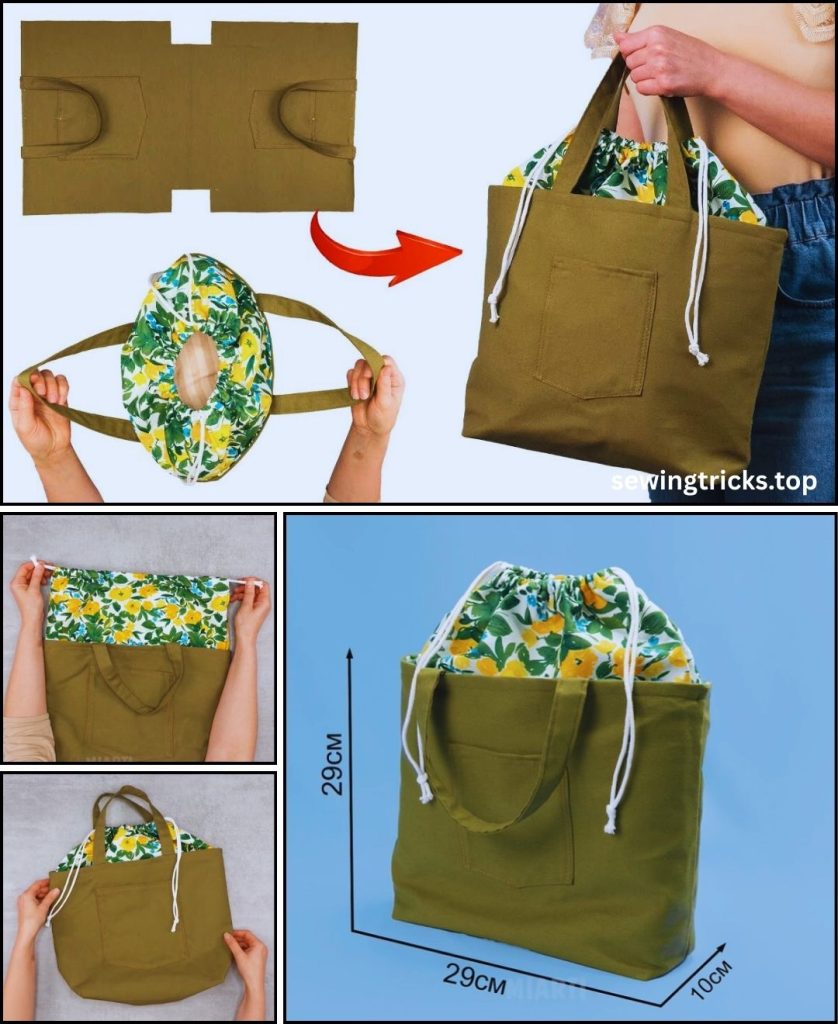
This tutorial is designed for maximum efficiency. While many patterns require fiddly steps like installing zippers, preparing custom interfacing, or hand-stitching closures, we are going to use the easiest and fastest construction method available to achieve a sturdy, fully lined, and professional-looking tote bag.
The secret lies in using pre-made webbing handles and the Bag-in-Bag assembly technique. You can easily complete this project in under an hour if you have your materials pre-cut.
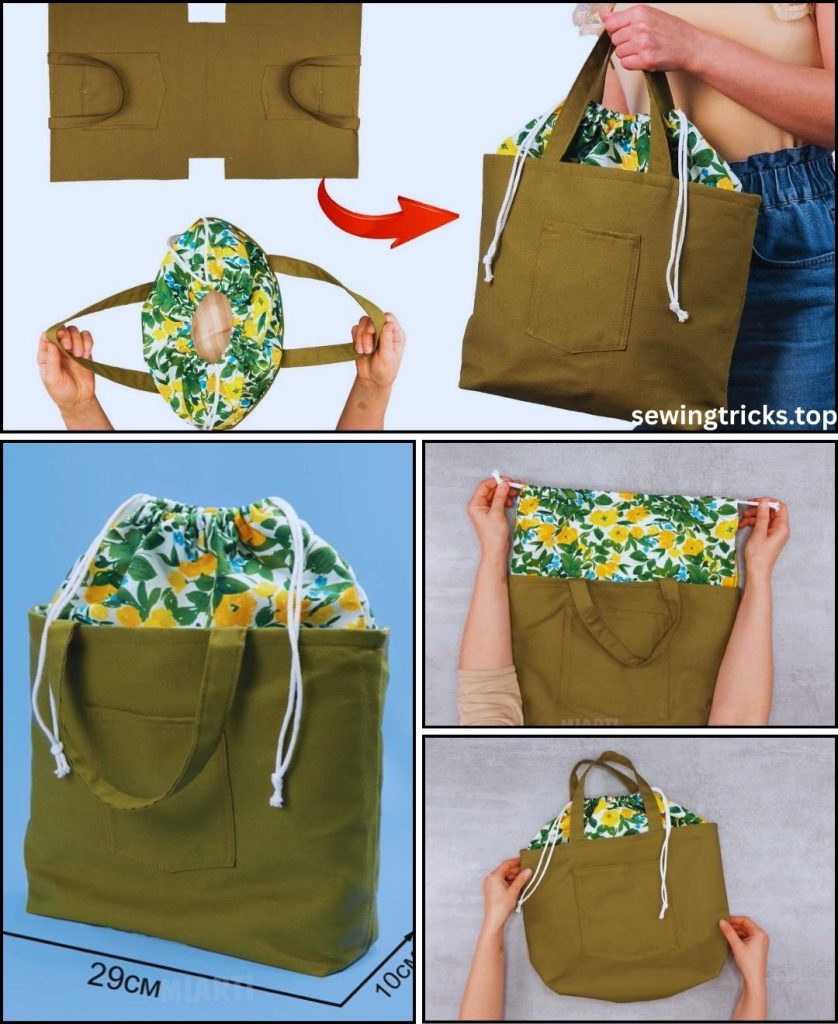
The Speed Stitch Tote: Easiest & Fastest Technique
Project Overview
- Goal: To sew a fully lined tote bag in the fastest time possible.
- Technique: Lined, straight-seam construction with boxed corners (for a flat bottom).
- Skill Level: Absolute Beginner (requires only basic machine operation).
- Estimated Time: 45 – 60 minutes.
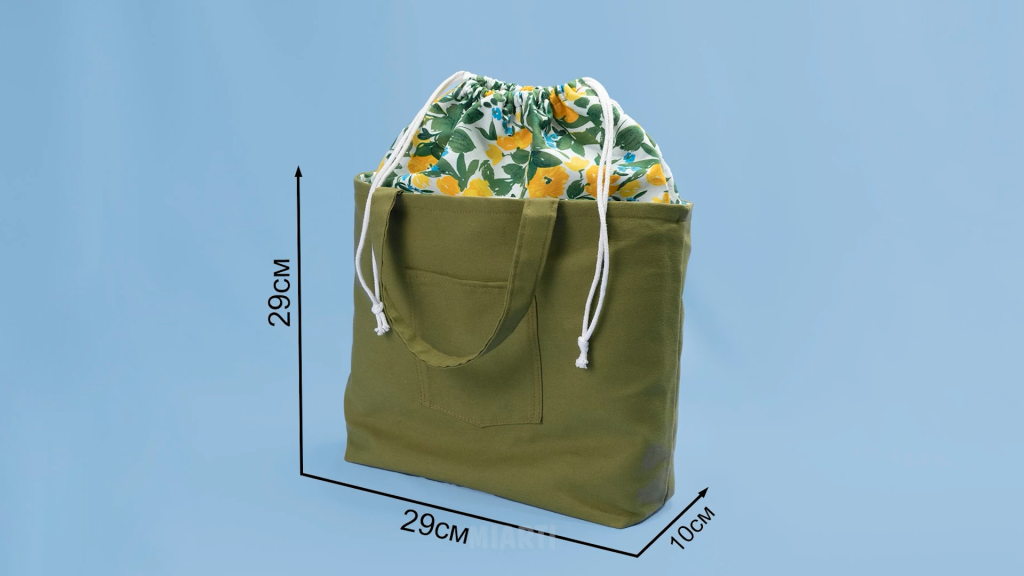
- Finished Size: Approximately 13” wide x 14” tall x 4” deep.
I. The Secret to Speed: Materials & Tools
The key to efficiency is choosing materials that let you skip time-consuming steps.
1. Materials (The Time Savers)
| Component | Material Choice | Time-Saving Reason |
| Exterior Fabric | Canvas, Duck Cloth, or Denim (Heavyweight Woven) | Saves 15 mins: Sturdy fabrics hold their shape, eliminating the need to cut and iron-on stiff interfacing! |
| Lining Fabric | Quilting Cotton (Contrasting Color) | Standard, easy to work with. |
| Handles | Cotton or Polypropylene Webbing (1” wide) | Saves 15 mins: Eliminates all time spent measuring, cutting, folding, pressing, and topstitching custom fabric straps. |
| Thread | All-Purpose Polyester | Standard. |
2. Essential Tools
- Sewing Machine (Universal or Denim Needle).
- Rotary Cutter & Mat (Faster than scissors).
- Ruler/Measuring Tape.
- Sewing Clips or Binder Clips (Faster to attach and remove than pins).
- Iron & Ironing Board (Essential for the final professional press).
II. The Pattern (No Tracing, Just Cutting)
We are simply cutting rectangles based on the final desired size, plus seam allowances.
| Piece | Quantity | Dimensions | Purpose |
| Exterior Main Panel | (2) | 15 inches wide x 16 inches tall | The outside of the bag. |
| Lining Main Panel | (2) | 15 inches wide x 16 inches tall | The inside of the bag. |
| Webbing Handles | (2) | 25 inches long | The shoulder straps. |
III. Step-by-Step Tutorial (The Fastest Technique)
We will use a consistent 1/2-inch (1.27 cm) seam allowance for all construction steps. Remember to backstitch at the beginning and end of every seam to lock the stitches.
Phase 1: Cutting & Prep (The Handle Shortcut)
- Cut Materials: Use your rotary cutter and ruler to accurately cut all four fabric rectangles and two webbing strips according to the pattern list above.
- Attach Handles (Basting):
- Take one Exterior Panel and lay it right-side up.
- Measure 3 inches in from the left raw edge and 3 inches in from the right raw edge along the top (15-inch) edge. Mark these spots.
- Place the raw ends of one 25-inch webbing strap onto these marks, aligning the strap end with the top raw fabric edge. The loop should hang down over the bag body.
- Baste (sew) the strap ends in place using a 1/4-inch seam allowance. This temporary stitch holds them securely, ready for the main assembly.
- Repeat this for the second Exterior Panel and the second strap.
Phase 2: Assemble the Exterior Shell
- Place the two Exterior Panels (with handles) Right Sides Together (RST). The handles will be sandwiched inside.
- Clip or pin the two side edges and the bottom edge.
- Chain Piece: Sew down the left side, across the bottom, and up the right side using your 1/2-inch seam allowance. Leave the top open.
- Finger-press the seams open (skipping the iron saves time!).
Phase 3: Assemble the Lining Shell (The Turning Hole)
- Place the two Lining Panels Right Sides Together (RST).
- Clip or pin the two side edges and the bottom edge.
- Leave a Gap: Sew the sides and the bottom, BUT LEAVE A 5 TO 6-INCH GAP in the center of the bottom seam. This gap is vital for turning the bag right side out.
- Finger-press the seams open.
Phase 4: Box the Corners (The Pro Trick)
This quick step takes less than 5 minutes but gives your bag a flat, functional bottom, making it look much more professional than a simple flat sack.
- Locate the Corner: Keep the Exterior Bag inside out. Reach into one bottom corner.
- Create the Triangle: Pinch the corner so the side seam lies perfectly flat on top of the bottom seam. The corner now forms a triangle.
- Measure and Mark: Measure 2 inches down from the tip of the triangle. Draw a straight line across the triangle at this 2-inch mark.
- Sew and Trim: Sew directly on the line. Backstitch well. Trim the excess fabric off, leaving a 1/2-inch seam allowance.
- Repeat this process for the other corner of the Exterior Bag and both corners of the Lining Bag.
Phase 5: The Final Assembly (The Bag-in-Bag Magic)
- Prepare the Bags: Turn the Exterior Bag RIGHT SIDE OUT. Leave the Lining Bag INSIDE OUT.
- The Drop-In: Carefully place the Exterior Bag inside the Lining Bag. The Right Sides of the fabric should be touching all the way around the top rim.
- Ensure the handles are tucked neatly down between the layers.
- Align and Sew:
- Match the side seams of the Exterior and Lining perfectly, and clip them together.
- Clip all the way around the entire top raw edge.
- Sew all the way around the top perimeter using a 1/2-inch seam allowance.
Phase 6: The Final Reveal & Finish
- The Turn: Reach your hand into the 5-inch hole you left in the bottom of the lining. Grab the exterior bag fabric and gently pull the entire bag through the hole.
- Close the Gap: Find the hole in the lining. Fold the raw edges inward, press with your fingers, and sew a straight stitch very close to the edge to close the hole.
- Set the Shape: Push the lining down inside the bag.
- The Final Press: This is the most important step for a professional look. Use a hot iron to firmly press the entire top edge of the bag flat and crisp.
- Topstitch (Optional but Recommended): To lock the lining in place and provide extra strength to the handles, sew one final straight stitch all the way around the top edge of the bag, about 1/4 inch from the fold. Use a slightly longer stitch length (3.0mm) for a better look.
IV. Pro Tips for Maximum Efficiency
- Finger Pressing: Save time by skipping the iron for every single seam. Instead, open the seam with your fingers and press it flat with your nail (called “finger pressing”). Save the iron only for the final top edge.
- Chain Piecing: When sewing the bag (e.g., sewing the left side seam, the bottom seam, and the right side seam), do not cut your thread between the different seams. Sew the left side, lift the presser foot (needle down), pivot, and continue sewing the bottom, then pivot again. This saves time starting and stopping.
- Use Clips: Sewing clips are infinitely faster than pins. For this bag, you can hold everything together quickly and securely.
- Skip Pockets: While interior pockets are useful, they add 10-15 minutes to the project. For the absolute fastest result, skip them!
Congratulations! You have just completed a professional, fully lined, and structured tote bag in record time using the easiest construction method available to beginners.