This is a fantastic project that turns unusable denim scraps into a highly functional and durable item. Denim’s ruggedness makes it perfect for a cosmetic bag, and using the textures and seams from old jeans gives the pouch character.
This long-form tutorial will guide you through sewing a small, boxy denim pouch that is ideal for cosmetics, pencils, or small electronics.

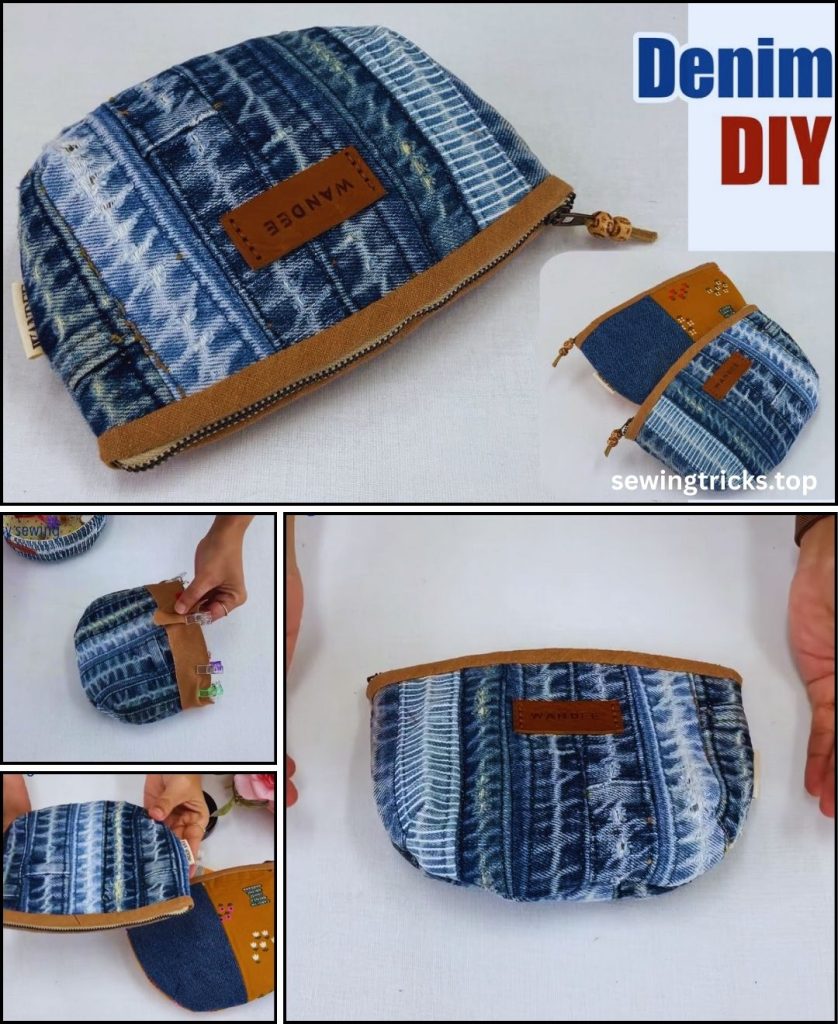
Upcycled From Old Jeans – Full Sewing Pattern & Step-by-Step Guide
Recycling old jeans is one of the most satisfying sewing projects: the denim is durable, stylish, and full of character. A mini pouch or cosmetic bag made from jeans is perfect for storing makeup, coins, earbuds, or small essentials.
This tutorial will walk you through creating a beautifully structured mini pouch using simple techniques—ideal for beginners and experienced sewists alike.
MATERIALS NEEDED
Fabric & Notions
- Scrap pieces of old denim jeans (preferably medium-weight)
- Cotton fabric for lining (fat quarter is enough)
- Zipper: 7–9 inch (18–22 cm) nylon or metal zipper
- Matching thread (polyester recommended)
- Optional: fusible interfacing or fusible fleece (for added structure)
- Fabric scissors or rotary cutter
- Pins or clips
- Sewing machine (standard straight stitch is enough)
- Iron & ironing board
- Tailor’s chalk or washable marker
- Ruler or measuring tape
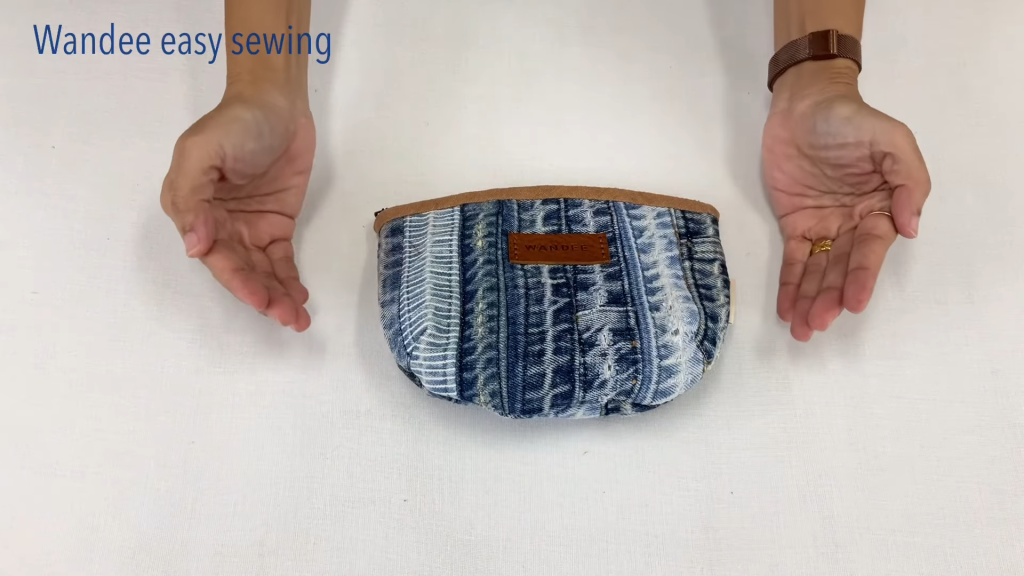
FINISHED SIZE
Approx.: 7″ wide × 4″ tall × 2″ deep
If you want a different size, simply adjust the rectangle dimensions.
CUTTING PATTERN (With Measurements)
Main Bag Panels (Denim):
Cut 2 rectangles measuring:
- 8.5” × 6.5” (22 cm × 17 cm)
Lining Fabric:
Cut 2 rectangles:
- 8.5” × 6.5”
Optional Interfacing:
Cut 2 rectangles the same size as the denim pieces.
Zipper Tabs (Optional but Recommended):
Cut 2 small rectangles:
- 1.5” × 2” (4 cm × 5 cm)
These create a clean, professional finish at the ends of your zipper.
STEP-BY-STEP SEWING INSTRUCTIONS
STEP 1 – PREPARE THE DENIM PIECES
- Lay your old jeans flat.
- Select a section free from heavy seams.
- Cut two panels slightly bigger than the final dimensions, then trim accurately.
- If your denim is thick, lightly press it with steam to flatten.
- Apply fusible interfacing to the wrong side of each denim piece if you want extra structure.
Tip: Reuse pockets, seams, or faded sections of jeans for a more stylish look!
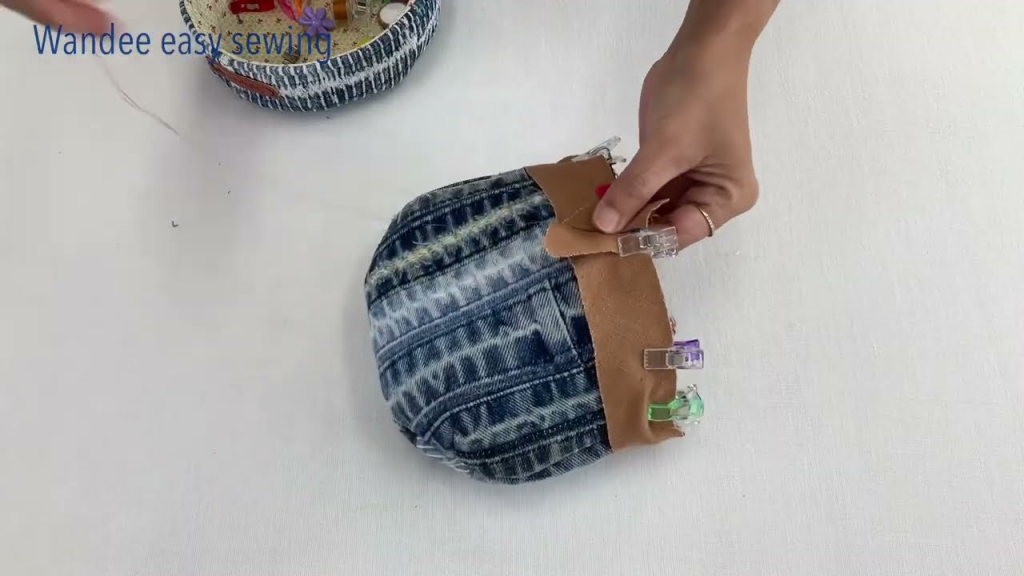
STEP 2 – PREPARE THE ZIPPER AND TABS
If using zipper tabs:
- Fold each small rectangle in half, right sides together, and press.
- Insert one zipper end into the folded tab.
- Sew across to secure.
- Trim the tab so it aligns with the width of your bag panels.
Zipper tabs create a neat, store-bought finish and prevent bulky edges.
STEP 3 – INSTALL THE ZIPPER (Sandwich Method)
This is the most important and neatest technique.
- Lay one denim panel right side up.
- Place the zipper right-side down on top of the edge.
- Place the lining fabric right-side down on top of the zipper, forming a “fabric-zipper sandwich.”
- Clip in place.
- Sew using a zipper foot, ¼” seam allowance.
- Turn both fabrics right-side out and press.
Repeat for the other side:
- Lay the second denim panel right side up.
- Place the zipper (with attached layers) right side down.
- Add the lining on top, right side down.
- Sew the second side.
- Turn and press again.
Tip: Open the zipper halfway before sewing the bag closed later.
STEP 4 – TOPSTITCH AROUND THE ZIPPER
Topstitching keeps the lining away from the zipper teeth and adds a professional look.
- Sew 1⁄8″ from the zipper edge.
- Go slowly to keep the line straight.
- Use a slightly longer stitch (3.0–3.5 mm) for a clean finish.
STEP 5 – ASSEMBLE THE BAG BODY
1. Align the Panels
- Open up the layers so the denim panels face each other (right sides together).
- Lining pieces face each other too (right sides together).
- Match edges carefully.
- Pin or clip around the entire perimeter.
2. Match the Seams by the Zipper
- Press seam allowances toward the lining.
- This reduces bulk near the zipper.
3. Leave a Gap in the Lining
- Mark a 3–4 inch opening at the bottom of the lining fabric.
This is where you’ll turn the pouch right side out.
4. Sew Around the Bag
Sew all around with a ¼” to ⅜” seam allowance, except the turning gap.
Reinforce the corners with a few backstitches.
STEP 6 – CREATE BOXED CORNERS (Optional but Recommended)
Boxed corners help your pouch stand upright.
- Pinch each corner so the side seam aligns with the bottom seam, forming a triangle.
- Measure 1 inch (2.5 cm) from the tip.
- Draw a line straight across.
- Stitch along this line.
- Trim off the triangle, leaving ¼” seam allowance.
Repeat on all four corners (2 denim, 2 lining).
STEP 7 – TURN THE BAG RIGHT SIDE OUT
- Carefully turn the pouch through the lining opening.
- Push out the corners using a blunt tool (e.g., chopstick).
- Once everything looks correct, tuck in the edges of the lining opening.
- Sew the opening closed using:
- A straight stitch by machine, or
- A ladder stitch by hand for an invisible finish.
STEP 8 – FINAL SHAPING & PRESSING
- Press the pouch gently, especially around the zipper.
- Avoid pressing denim on high heat if it contains elastic fibers.
- Reshape the corners so the bag stands correctly.
OPTIONAL EMBELLISHMENTS
Add a Denim Pocket
Use a small pocket from the jeans and stitch it onto the front panel for a rustic look.
Add Jeans Labels or Tags
Original leather or canvas jean labels make great statement pieces.
Decorative Stitching
Use heavy topstitch thread for the classic “jeans look.”
Add a Wrist Strap
Cut a denim strip 1″ × 10″, fold in thirds, topstitch, and attach with a small loop.
TROUBLESHOOTING TIPS
Problem: Denim too thick at seams
→ Use a jeans needle (size 90/14 or 100/16).
→ Sew slowly and flatten seams with a hammer.
Problem: Zipper puckering
→ Reduce presser foot pressure.
→ Press the sandwich before sewing.
Problem: Bag lining gets caught in the zipper
→ Topstitch closer to zipper teeth.
→ Ensure lining is pressed away from zipper before sewing.
PATTERN VARIATIONS
1. Flat Rectangular Pouch (No Box Corners)
Skip boxed corners for a slim pencil pouch style.
2. Triangle or Pyramid Pouch
Use shorter sides and add a loop at the top.
3. Patchwork Denim Version
Use small denim scraps to create a quilted exterior.
4. Quilted & Padded Version
Add fusible fleece for a soft, cosmetic-bag style finish.
SUMMARY
This upcycled denim mini pouch/cosmetic bag is a quick and satisfying project that uses materials you already have. With just a few basic sewing skills—installing a zipper, sewing a straight seam, and optional corner boxing—you can create a durable, stylish, practical pouch.
Perfect as:
- Makeup bags
- Travel organisers
- Coin pouches
- Gifts
- Craft storage bags
Using old jeans makes each pouch unique and environmentally friendly.